Compress binary files to zip format

This workflow allows you to compress binary files to zip format.
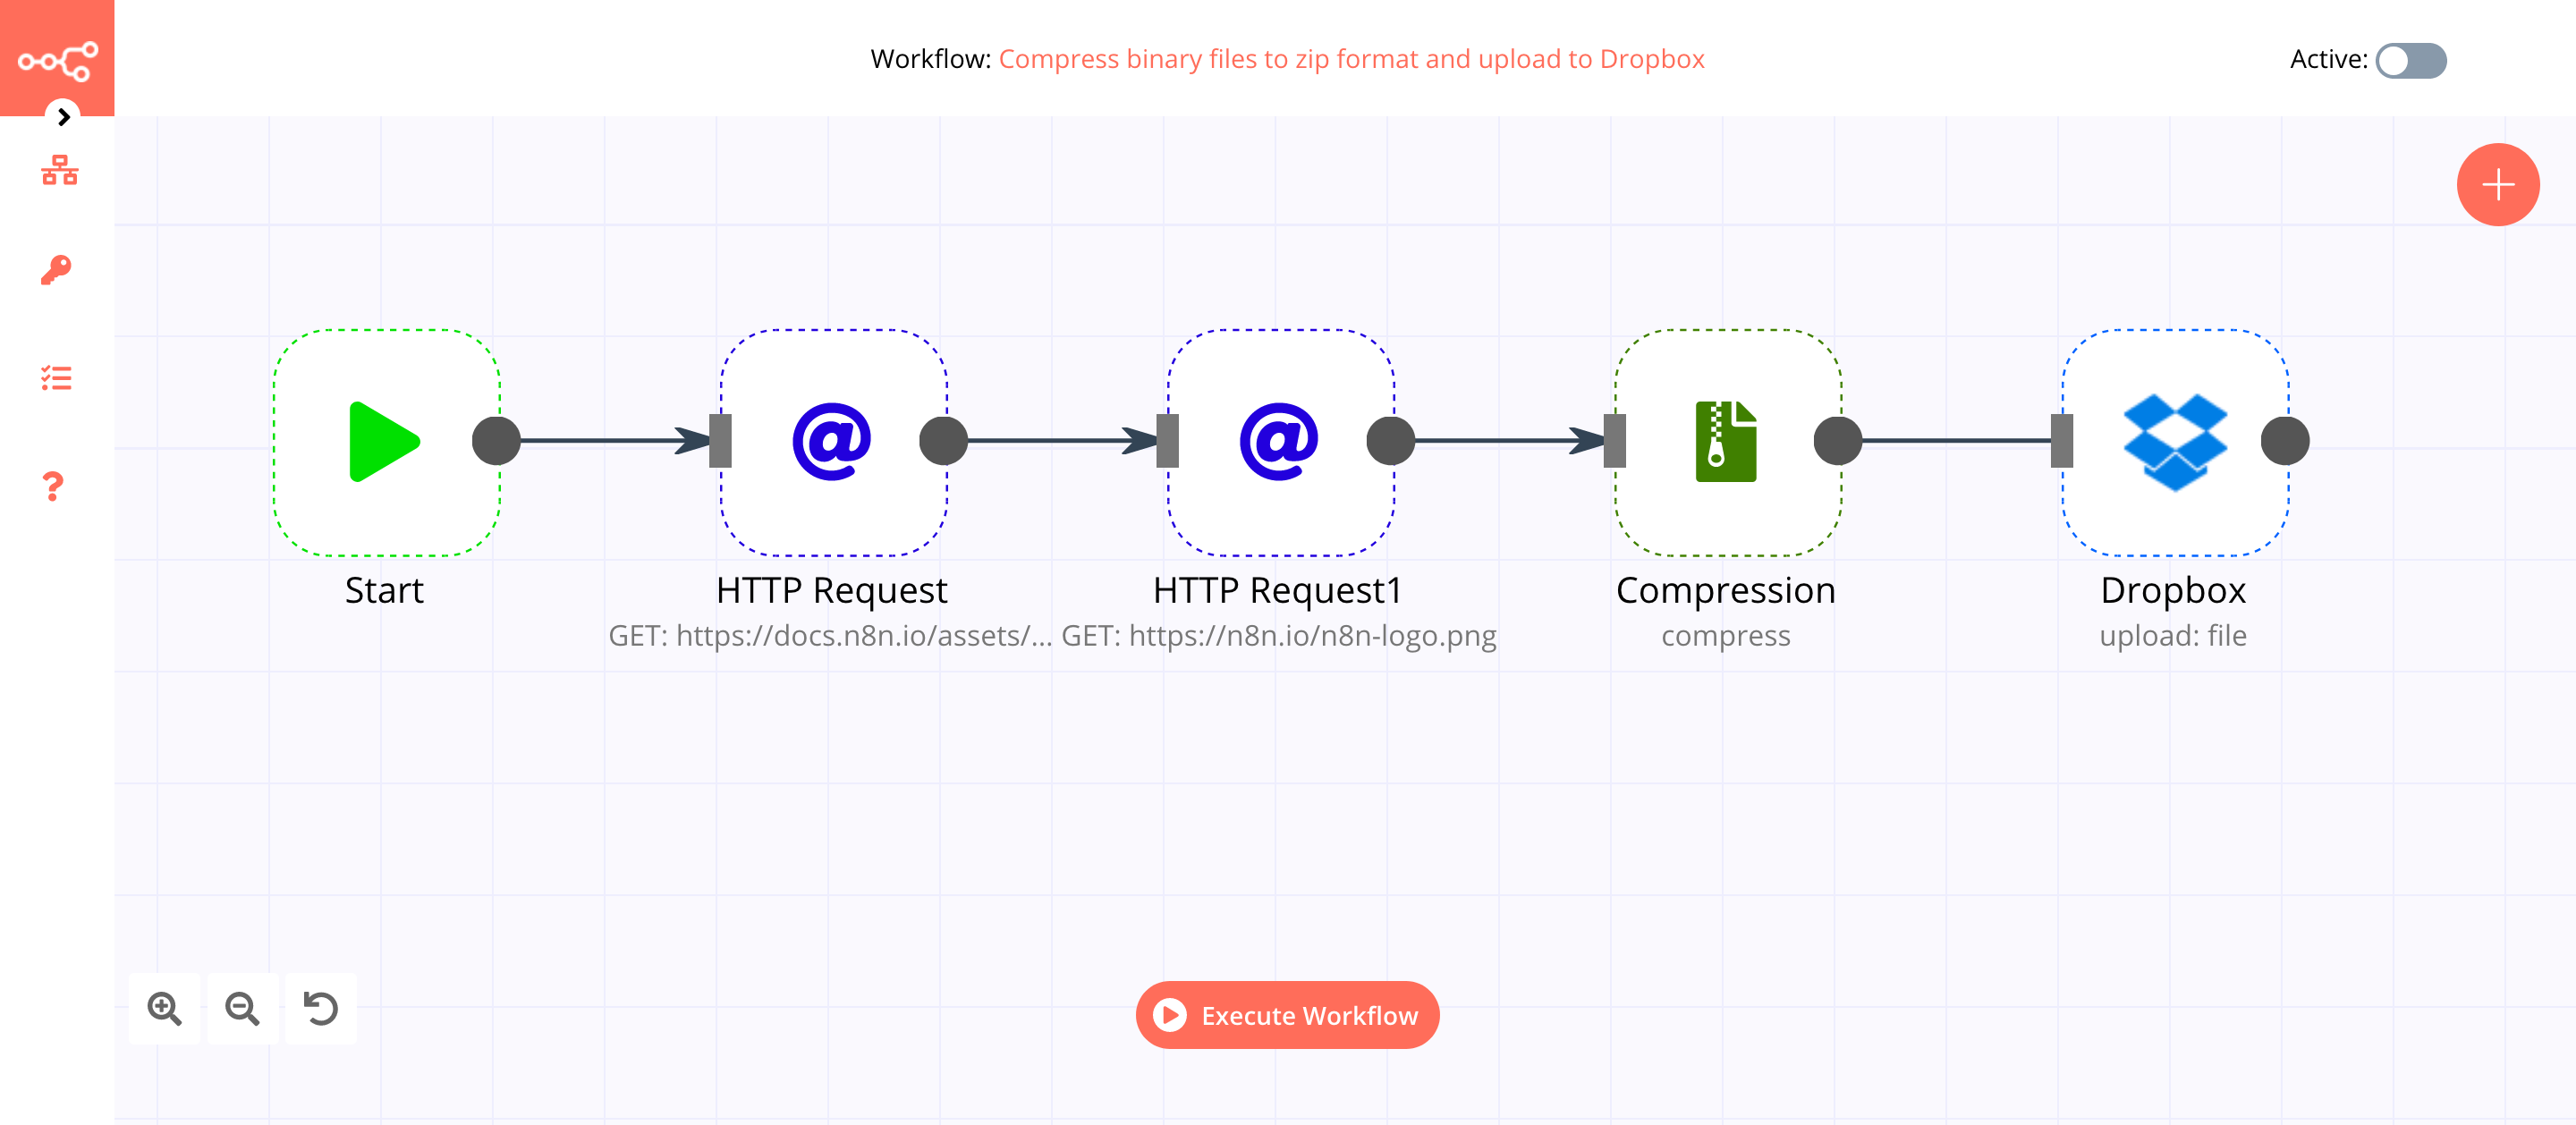
HTTP Request node: The workflow uses the HTTP Request node to fetch files from the internet. If you want to fetch files from your local machine, replace it with the Read Binary File or Read Binary Files node.
Compression node: The Compression node compresses the file into a zip. If you want to compress the files to gzip, then select the gzip format instead.
Based on your use-case, you may want to write the files to your disk or upload it to Google Drive or Box. If you want to write the compressed file to your disk, replace the Dropbox node with the Write Binary File node, or if you want to upload the file to a different service, use the respective node.
Compress Binary Files to ZIP Format
This n8n workflow demonstrates how to compress binary files into a ZIP archive using the Compression node. It's a basic example that can be extended to fetch files from various sources (like cloud storage, FTP, or webhooks) and then compress them before further processing or storage.
What it does
This workflow showcases the core functionality of the Compression node:
- Starts the workflow: Initiates the execution flow.
- Provides example binary data: Uses a Dropbox node to simulate receiving binary file data. Note: In a real-world scenario, this would be replaced by a node that actually fetches your files.
- Compresses the data: Takes the binary data and compresses it into a ZIP format.
- Sends a dummy HTTP Request: Simulates sending the compressed data to an external service or API. Note: This node is a placeholder; you would configure it to send the ZIP file to your desired destination.
Prerequisites/Requirements
- n8n Instance: You need a running n8n instance to import and execute this workflow.
- Dropbox Credentials (Optional): If you intend to use the example Dropbox node as-is, you will need to configure Dropbox credentials in n8n. However, this node primarily serves as a placeholder for binary data.
Setup/Usage
- Import the workflow:
- Copy the provided JSON content.
- In your n8n instance, go to "Workflows" and click "New".
- Click the "Import from JSON" button (usually a cloud icon with an arrow pointing down) and paste the JSON.
- Click "Import".
- Configure the Dropbox node (if using):
- Click on the "Dropbox" node.
- Select or create your Dropbox API credentials.
- Configure the operation to fetch the binary file you wish to compress.
- Configure the Compression node:
- The "Compression" node is pre-configured to compress the input data into a ZIP file. You can adjust settings like the output filename if needed.
- Configure the HTTP Request node:
- Click on the "HTTP Request" node.
- Change the "URL" and "Method" to point to your desired API endpoint or service where you want to send the compressed ZIP file.
- Configure any necessary headers or body parameters for your API call.
- Activate the workflow:
- Ensure the workflow is active by toggling the "Active" switch in the top right corner.
- Execute the workflow:
- You can manually test the workflow by clicking "Execute Workflow" in the editor.
- For production use, you would typically set up a trigger node (e.g., a Webhook, Cron, or another app's trigger) to automatically run this workflow when new files are available for compression.
Related Templates
Auto-create TikTok videos with VEED.io AI avatars, ElevenLabs & GPT-4
💥 Viral TikTok Video Machine: Auto-Create Videos with Your AI Avatar --- 🎯 Who is this for? This workflow is for content creators, marketers, and agencies who want to use Veed.io’s AI avatar technology to produce short, engaging TikTok videos automatically. It’s ideal for creators who want to appear on camera without recording themselves, and for teams managing multiple brands who need to generate videos at scale. --- ⚙️ What problem this workflow solves Manually creating videos for TikTok can take hours — finding trends, writing scripts, recording, and editing. By combining Veed.io, ElevenLabs, and GPT-4, this workflow transforms a simple Telegram input into a ready-to-post TikTok video featuring your AI avatar powered by Veed.io — speaking naturally with your cloned voice. --- 🚀 What this workflow does This automation links Veed.io’s video-generation API with multiple AI tools: Analyzes TikTok trends via Perplexity AI Writes a 10-second viral script using GPT-4 Generates your voiceover via ElevenLabs Uses Veed.io (Fabric 1.0 via FAL.ai) to animate your avatar and sync the lips to the voice Creates an engaging caption + hashtags for TikTok virality Publishes the video automatically via Blotato TikTok API Logs all results to Google Sheets for tracking --- 🧩 Setup Telegram Bot Create your bot via @BotFather Configure it as the trigger for sending your photo and theme Connect Veed.io Create an account on Veed.io Get your FAL.ai API key (Veed Fabric 1.0 model) Use HTTPS image/audio URLs compatible with Veed Fabric Other APIs Add Perplexity, ElevenLabs, and Blotato TikTok keys Connect your Google Sheet for logging results --- 🛠️ How to customize this workflow Change your Avatar: Upload a new image through Telegram, and Veed.io will generate a new talking version automatically. Modify the Script Style: Adjust the GPT prompt for tone (educational, funny, storytelling). Adjust Voice Tone: Tweak ElevenLabs stability and similarity settings. Expand Platforms: Add Instagram, YouTube Shorts, or X (Twitter) posting nodes. Track Performance: Customize your Google Sheet to measure your most successful Veed.io-based videos. --- 🧠 Expected Outcome In just a few seconds after sending your photo and theme, this workflow — powered by Veed.io — creates a fully automated TikTok video featuring your AI avatar with natural lip-sync and voice. The result is a continuous stream of viral short videos, made without cameras, editing, or effort. --- ✅ Import the JSON file in n8n, add your API keys (including Veed.io via FAL.ai), and start generating viral TikTok videos starring your AI avatar today! 🎥 Watch This Tutorial --- 📄 Documentation: Notion Guide Need help customizing? Contact me for consulting and support : Linkedin / Youtube
 By Dr. Firas
Automate invoice processing with OCR, GPT-4 & Salesforce opportunity creation
PDF Invoice Extractor (AI) End-to-end pipeline: Watch Drive ➜ Download PDF ➜ OCR text ➜ AI normalize to JSON ➜ Upsert Buyer (Account) ➜ Create Opportunity ➜ Map Products ➜ Create OLI via Composite API ➜ Archive to OneDrive. --- Node by node (what it does & key setup) 1) Google Drive Trigger Purpose: Fire when a new file appears in a specific Google Drive folder. Key settings: Event: fileCreated Folder ID: google drive folder id Polling: everyMinute Creds: googleDriveOAuth2Api Output: Metadata { id, name, ... } for the new file. --- 2) Download File From Google Purpose: Get the file binary for processing and archiving. Key settings: Operation: download File ID: ={{ $json.id }} Creds: googleDriveOAuth2Api Output: Binary (default key: data) and original metadata. --- 3) Extract from File Purpose: Extract text from PDF (OCR as needed) for AI parsing. Key settings: Operation: pdf OCR: enable for scanned PDFs (in options) Output: JSON with OCR text at {{ $json.text }}. --- 4) Message a model (AI JSON Extractor) Purpose: Convert OCR text into strict normalized JSON array (invoice schema). Key settings: Node: @n8n/n8n-nodes-langchain.openAi Model: gpt-4.1 (or gpt-4.1-mini) Message role: system (the strict prompt; references {{ $json.text }}) jsonOutput: true Creds: openAiApi Output (per item): $.message.content → the parsed JSON (ensure it’s an array). --- 5) Create or update an account (Salesforce) Purpose: Upsert Buyer as Account using an external ID. Key settings: Resource: account Operation: upsert External Id Field: taxid_c External Id Value: ={{ $json.message.content.buyer.tax_id }} Name: ={{ $json.message.content.buyer.name }} Creds: salesforceOAuth2Api Output: Account record (captures Id) for downstream Opportunity. --- 6) Create an opportunity (Salesforce) Purpose: Create Opportunity linked to the Buyer (Account). Key settings: Resource: opportunity Name: ={{ $('Message a model').item.json.message.content.invoice.code }} Close Date: ={{ $('Message a model').item.json.message.content.invoice.issue_date }} Stage: Closed Won Amount: ={{ $('Message a model').item.json.message.content.summary.grand_total }} AccountId: ={{ $json.id }} (from Upsert Account output) Creds: salesforceOAuth2Api Output: Opportunity Id for OLI creation. --- 7) Build SOQL (Code / JS) Purpose: Collect unique product codes from AI JSON and build a SOQL query for PricebookEntry by Pricebook2Id. Key settings: pricebook2Id (hardcoded in script): e.g., 01sxxxxxxxxxxxxxxx Source lines: $('Message a model').first().json.message.content.products Output: { soql, codes } --- 8) Query PricebookEntries (Salesforce) Purpose: Fetch PricebookEntry.Id for each Product2.ProductCode. Key settings: Resource: search Query: ={{ $json.soql }} Creds: salesforceOAuth2Api Output: Items with Id, Product2.ProductCode (used for mapping). --- 9) Code in JavaScript (Build OLI payloads) Purpose: Join lines with PBE results and Opportunity Id ➜ build OpportunityLineItem payloads. Inputs: OpportunityId: ={{ $('Create an opportunity').first().json.id }} Lines: ={{ $('Message a model').first().json.message.content.products }} PBE rows: from previous node items Output: { body: { allOrNone:false, records:[{ OpportunityLineItem... }] } } Notes: Converts discount_total ➜ per-unit if needed (currently commented for standard pricing). Throws on missing PBE mapping or empty lines. --- 10) Create Opportunity Line Items (HTTP Request) Purpose: Bulk create OLIs via Salesforce Composite API. Key settings: Method: POST URL: https://<your-instance>.my.salesforce.com/services/data/v65.0/composite/sobjects Auth: salesforceOAuth2Api (predefined credential) Body (JSON): ={{ $json.body }} Output: Composite API results (per-record statuses). --- 11) Update File to One Drive Purpose: Archive the original PDF in OneDrive. Key settings: Operation: upload File Name: ={{ $json.name }} Parent Folder ID: onedrive folder id Binary Data: true (from the Download node) Creds: microsoftOneDriveOAuth2Api Output: Uploaded file metadata. --- Data flow (wiring) Google Drive Trigger → Download File From Google Download File From Google → Extract from File → Update File to One Drive Extract from File → Message a model Message a model → Create or update an account Create or update an account → Create an opportunity Create an opportunity → Build SOQL Build SOQL → Query PricebookEntries Query PricebookEntries → Code in JavaScript Code in JavaScript → Create Opportunity Line Items --- Quick setup checklist 🔐 Credentials: Connect Google Drive, OneDrive, Salesforce, OpenAI. 📂 IDs: Drive Folder ID (watch) OneDrive Parent Folder ID (archive) Salesforce Pricebook2Id (in the JS SOQL builder) 🧠 AI Prompt: Use the strict system prompt; jsonOutput = true. 🧾 Field mappings: Buyer tax id/name → Account upsert fields Invoice code/date/amount → Opportunity fields Product name must equal your Product2.ProductCode in SF. ✅ Test: Drop a sample PDF → verify: AI returns array JSON only Account/Opportunity created OLI records created PDF archived to OneDrive --- Notes & best practices If PDFs are scans, enable OCR in Extract from File. If AI returns non-JSON, keep “Return only a JSON array” as the last line of the prompt and keep jsonOutput enabled. Consider adding validation on parsing.warnings to gate Salesforce writes. For discounts/taxes in OLI: Standard OLI fields don’t support per-line discount amounts directly; model them in UnitPrice or custom fields. Replace the Composite API URL with your org’s domain or use the Salesforce node’s Bulk Upsert for simplicity.
 By Le Nguyen
Automate RSS to social media pipeline with AI, Airtable & GetLate for multiple platforms
Overview Automates your complete social media content pipeline: sources articles from Wallabag RSS, generates platform-specific posts with AI, creates contextual images, and publishes via GetLate API. Built with 63 nodes across two workflows to handle LinkedIn, Instagram, and Bluesky—with easy expansion to more platforms. Ideal for: Content marketers, solo creators, agencies, and community managers maintaining a consistent multi-platform presence with minimal manual effort. How It Works Two-Workflow Architecture: Content Aggregation Workflow Monitors Wallabag RSS feeds for tagged articles (to-share-linkedin, to-share-instagram, etc.) Extracts and converts content from HTML to Markdown Stores structured data in Airtable with platform assignment AI Generation & Publishing Workflow Scheduled trigger queries Airtable for unpublished content Routes to platform-specific sub-workflows (LinkedIn, Instagram, Bluesky) LLM generates optimized post text and image prompts based on custom brand parameters Optionally generates AI images and hosts them on Imgbb CDN Publishes via GetLate API (immediate or draft mode) Updates Airtable with publication status and metadata Key Features: Tag-based content routing using Wallabag's native system Swappable AI providers (Groq, OpenAI, Anthropic) Platform-specific optimization (tone, length, hashtags, CTAs) Modular design—duplicate sub-workflows to add new platforms in \~30 minutes Centralized Airtable tracking with 17 data points per post Set Up Steps Setup time: \~45-60 minutes for initial configuration Create accounts and get API keys (\~15 min) Wallabag (with RSS feeds enabled) GetLate (social media publishing) Airtable (create base with provided schema—see sticky notes) LLM provider (Groq, OpenAI, or Anthropic) Image service (Hugging Face, Fal.ai, or Stability AI) Imgbb (image hosting) Configure n8n credentials (\~10 min) Add all API keys in n8n's credential manager Detailed credential setup instructions in workflow sticky notes Set up Airtable database (\~10 min) Create "RSS Feed - Content Store" base Add 19 required fields (schema provided in workflow sticky notes) Get Airtable base ID and API key Customize brand prompts (\~15 min) Edit "Set Custom SMCG Prompt" node for each platform Define brand voice, tone, goals, audience, and image preferences Platform-specific examples provided in sticky notes Configure platform settings (\~10 min) Set GetLate account IDs for each platform Enable/disable image generation per platform Choose immediate publish vs. draft mode Adjust schedule trigger frequency Test and deploy Tag test articles in Wallabag Monitor the first few executions in draft mode Activate workflows when satisfied with the output Important: This is a proof-of-concept template. Test thoroughly with draft mode before production use. Detailed setup instructions, troubleshooting tips, and customization guidance are in the workflow's sticky notes. Technical Details 63 nodes: 9 Airtable operations, 8 HTTP requests, 7 code nodes, 3 LangChain LLM chains, 3 RSS triggers, 3 GetLate publishers Supports: Multiple LLM providers, multiple image generation services, unlimited platforms via modular architecture Tracking: 17 metadata fields per post, including publish status, applied parameters, character counts, hashtags, image URLs Prerequisites n8n instance (self-hosted or cloud) Accounts: Wallabag, GetLate, Airtable, LLM provider, image generation service, Imgbb Basic understanding of n8n workflows and credential configuration Time to customize prompts for your brand voice Detailed documentation, Airtable schema, prompt examples, and troubleshooting guides are in the workflow's sticky notes. Category Tags social-media-automation, ai-content-generation, rss-to-social, multi-platform-posting, getlate-api, airtable-database, langchain, workflow-automation, content-marketing
 By Mikal Hayden-Gates