Auto-create and publish AI social videos with Telegram, GPT-4 and Blotato

Auto-create and publish AI social videos with Telegram, GPT-4 and Blotato
> ⚠️ Disclaimer: This workflow uses Community Nodes and must be run on a self-hosted instance of n8n.
Who is this for?
This template is perfect for social media managers, content creators, AI enthusiasts, and automation pros who want to generate short-form videos (Reels) from a simple Telegram message, then publish them across multiple platforms—all without video editing or manual uploads.
What problem is this workflow solving?
Creating content is only half the job. The real bottleneck comes in:
- Rendering the video,
- Adding voice or music,
- Writing captions and titles,
- Publishing to multiple platforms.
This workflow automates all of that using AI. It saves hours every week and guarantees consistent output.
What this workflow does
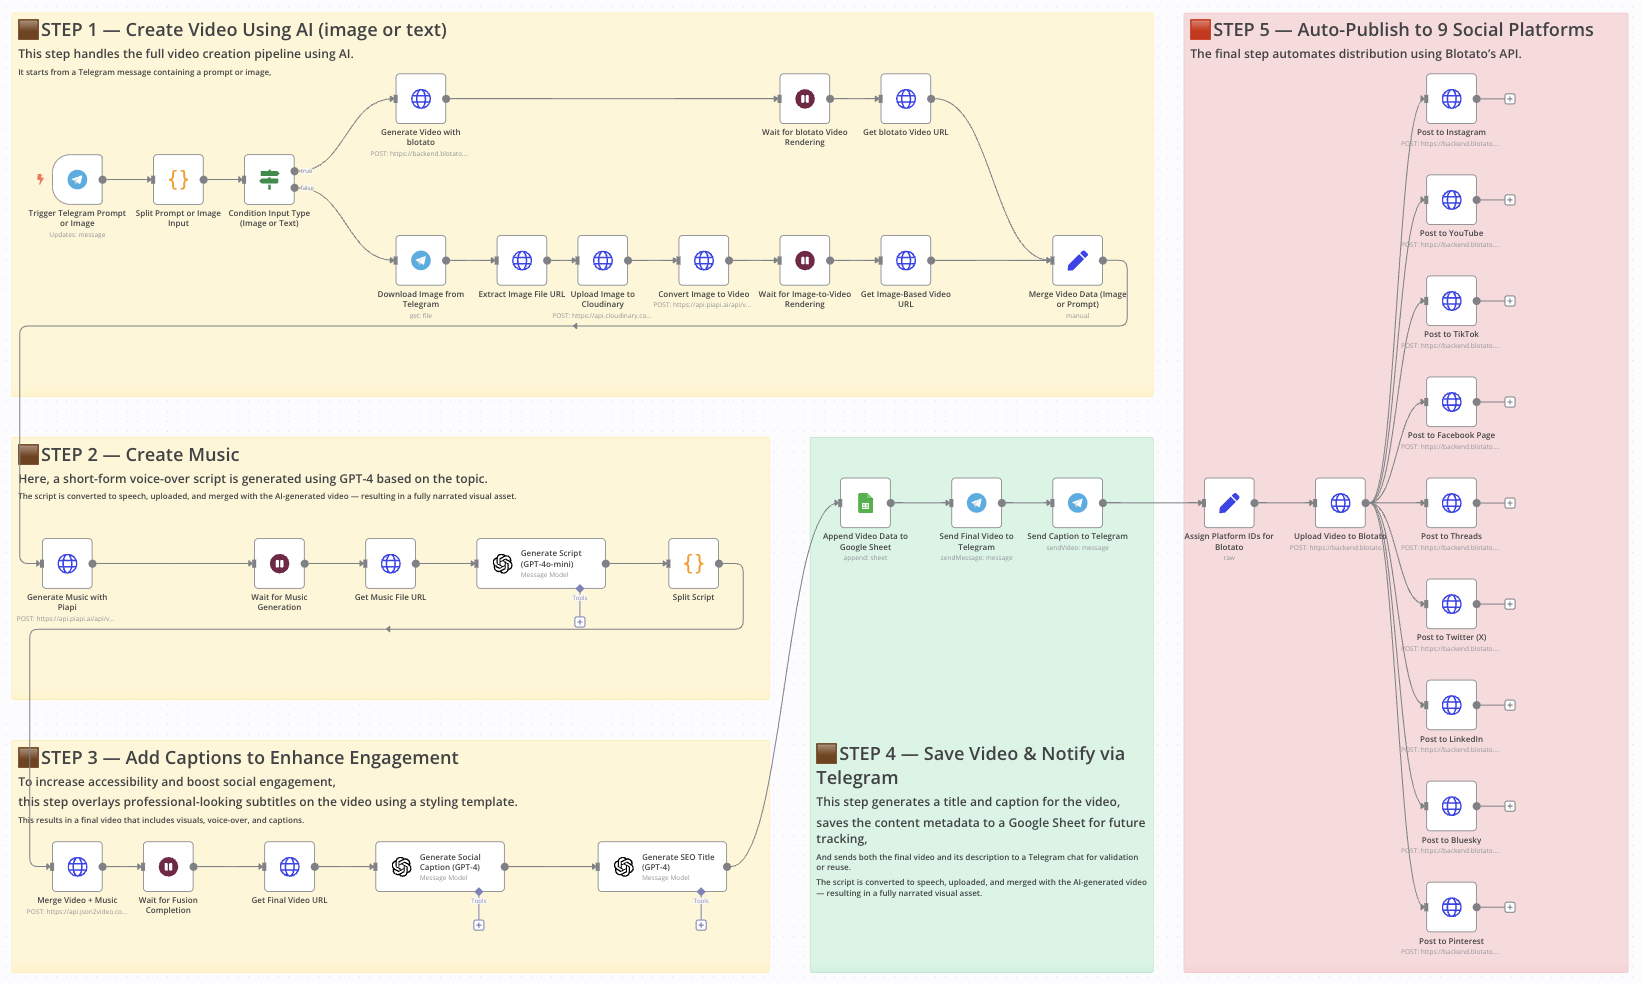
This end-to-end automation handles everything from AI video generation to social publishing:
- Starts with a Telegram message (text or image prompt)
- Generates video using Kling or Blotato, based on the input
- Creates music with Piapi and merges it with the video
- Generates text overlays and captions with GPT-4
- Builds a stylized video using JSON2Video
- Logs results to Google Sheets
- Sends final output back to Telegram
- Auto-posts the video to 9 platforms via Blotato (Instagram, TikTok, YouTube, Facebook, LinkedIn, Threads, Twitter/X, Pinterest, Bluesky)
Setup
- Connect your Telegram bot to the trigger node.
- Add your OpenAI API key for all GPT nodes.
- Set up Kling and Piapi API access (for video and music generation).
- Connect your Cloudinary account to upload images.
- Link a Google Sheet with columns: Title, Caption, URL.
- Set your Blotato API key and fill in the platform-specific account IDs.
How to customize this workflow to your needs
- Change prompt formatting to control GPT responses and video tone.
- Edit text styling in JSON2Video to match your brand.
- Add a Telegram approval step before publishing, if needed.
- Disable platforms you don’t use by deleting their HTTP Request nodes.
- Use a Google Sheet filter to only process new rows or drafts.
📄 Documentation: Notion Guide
Auto-Create and Publish AI Social Videos with Telegram, GPT-4, and Blotato
This n8n workflow automates the process of generating social media video ideas, creating the videos, and publishing them, all triggered and managed through Telegram. It leverages AI (GPT-4) for content generation and integrates with a video creation service (Blotato) and Google Sheets for tracking.
What it does
This workflow streamlines the creation and publication of social media videos through the following steps:
- Listens for Telegram Commands: The workflow is triggered by specific commands received in a Telegram chat.
- Generates Video Ideas (AI): Upon receiving a trigger, it uses OpenAI (likely GPT-4) to generate a video idea based on a prompt.
- Creates Video (Blotato): The generated idea is then sent to Blotato (via an HTTP Request) to create the actual video.
- Stores Video Data: Information about the created video (e.g., URL, status) is recorded in a Google Sheet.
- Notifies via Telegram: The workflow sends a Telegram message with the video details and a prompt for approval.
- Waits for Approval: It pauses and waits for a specific approval command from Telegram.
- Publishes Video (Conditional): If approved, it proceeds to publish the video (via another HTTP Request, likely to Blotato's publish endpoint).
- Updates Google Sheet: The Google Sheet is updated with the video's published status.
- Sends Final Telegram Notification: A final Telegram message confirms the video's publication or informs about rejection.
Prerequisites/Requirements
To use this workflow, you will need:
- n8n Instance: A running instance of n8n.
- Telegram Bot Token: A Telegram bot configured to receive messages and send replies.
- OpenAI API Key: An API key for OpenAI (specifically for GPT-4 or a similar model).
- Blotato Account & API Access: An account with Blotato and necessary API credentials to create and publish videos.
- Google Sheets Account: A Google Sheet set up to store video ideas and publication status.
- Google Sheets Credentials: OAuth 2.0 or service account credentials for n8n to access your Google Sheet.
Setup/Usage
- Import the Workflow: Import the provided JSON into your n8n instance.
- Configure Credentials:
- Set up your Telegram Bot credential.
- Set up your OpenAI API Key credential.
- Set up your Google Sheets credential.
- The Blotato integration uses HTTP Request nodes. You will need to configure the URLs, headers (for API keys/tokens), and body content for these requests according to Blotato's API documentation.
- Update Node Settings:
- Telegram Trigger: Ensure the "Allowed Updates" and "Bot Token" are correctly configured.
- OpenAI: Configure the "Model" (e.g.,
gpt-4) and the prompt for generating video ideas. - HTTP Request (Blotato Create Video): Adjust the URL, method, headers, and body to match Blotato's API for video creation. Map the AI-generated idea to the appropriate field.
- Google Sheets (Add/Update): Specify your Spreadsheet ID, Sheet Name, and map the data fields (e.g., video idea, URL, status) correctly.
- Telegram (Send Message): Configure the chat ID and message content for notifications.
- If Node: Review the conditions for approval (e.g., checking for a specific approval message in Telegram).
- HTTP Request (Blotato Publish Video): Adjust the URL, method, headers, and body to match Blotato's API for publishing videos.
- Activate the Workflow: Once all configurations are complete, activate the workflow in n8n.
Now, when you send the configured trigger command to your Telegram bot, the workflow will initiate the automated video creation and publishing process.
Related Templates
Automate Dutch Public Procurement Data Collection with TenderNed
TenderNed Public Procurement What This Workflow Does This workflow automates the collection of public procurement data from TenderNed (the official Dutch tender platform). It: Fetches the latest tender publications from the TenderNed API Retrieves detailed information in both XML and JSON formats for each tender Parses and extracts key information like organization names, titles, descriptions, and reference numbers Filters results based on your custom criteria Stores the data in a database for easy querying and analysis Setup Instructions This template comes with sticky notes providing step-by-step instructions in Dutch and various query options you can customize. Prerequisites TenderNed API Access - Register at TenderNed for API credentials Configuration Steps Set up TenderNed credentials: Add HTTP Basic Auth credentials with your TenderNed API username and password Apply these credentials to the three HTTP Request nodes: "Tenderned Publicaties" "Haal XML Details" "Haal JSON Details" Customize filters: Modify the "Filter op ..." node to match your specific requirements Examples: specific organizations, contract values, regions, etc. How It Works Step 1: Trigger The workflow can be triggered either manually for testing or automatically on a daily schedule. Step 2: Fetch Publications Makes an API call to TenderNed to retrieve a list of recent publications (up to 100 per request). Step 3: Process & Split Extracts the tender array from the response and splits it into individual items for processing. Step 4: Fetch Details For each tender, the workflow makes two parallel API calls: XML endpoint - Retrieves the complete tender documentation in XML format JSON endpoint - Fetches metadata including reference numbers and keywords Step 5: Parse & Merge Parses the XML data and merges it with the JSON metadata and batch information into a single data structure. Step 6: Extract Fields Maps the raw API data to clean, structured fields including: Publication ID and date Organization name Tender title and description Reference numbers (kenmerk, TED number) Step 7: Filter Applies your custom filter criteria to focus on relevant tenders only. Step 8: Store Inserts the processed data into your database for storage and future analysis. Customization Tips Modify API Parameters In the "Tenderned Publicaties" node, you can adjust: offset: Starting position for pagination size: Number of results per request (max 100) Add query parameters for date ranges, status filters, etc. Add More Fields Extend the "Splits Alle Velden" node to extract additional fields from the XML/JSON data, such as: Contract value estimates Deadline dates CPV codes (procurement classification) Contact information Integrate Notifications Add a Slack, Email, or Discord node after the filter to get notified about new matching tenders. Incremental Updates Modify the workflow to only fetch new tenders by: Storing the last execution timestamp Adding date filters to the API query Only processing publications newer than the last run Troubleshooting No data returned? Verify your TenderNed API credentials are correct Check that you have setup youre filter proper Need help setting this up or interested in a complete tender analysis solution? Get in touch 🔗 LinkedIn – Wessel Bulte
 By Wessel Bulte
AI multi-agent executive team for entrepreneurs with Gemini, Perplexity and WhatsApp
This workflow is an AI-powered multi-agent system built for startup founders and small business owners who want to automate decision-making, accountability, research, and communication, all through WhatsApp. The “virtual executive team,” is designed to help small teams to work smarter. This workflow sends you market analysis, market and sales tips, It can also monitor what your competitors are doing using perplexity (Research agent) and help you stay a head, or make better decisions. And when you feeling stuck with your start-up accountability director is creative enough to break the barrier 🎯 Core Features 🧑💼 1. President (Super Agent) Acts as the main controller that coordinates all sub-agents. Routes messages, assigns tasks, and ensures workflow synchronization between the AI Directors. 📊 2. Sales & Marketing Director Uses SerpAPI to search for market opportunities, leads, and trends. Suggests marketing campaigns, keywords, or outreach ideas. Can analyze current engagement metrics to adjust content strategy. 🕵️♀️ 3. Business Research Director Powered by Perplexity AI for competitive and market analysis. Monitors competitor moves, social media engagement, and product changes. Provides concise insights to help the founder adapt and stay ahead. ⏰ 4. Accountability Director Keeps the founder and executive team on track. Sends motivational nudges, task reminders, and progress reports. Promotes consistency and discipline — key traits for early-stage success. 🗓️ 5. Executive Secretary Handles scheduling, email drafting, and reminders. Connects with Google Calendar, Gmail, and Sheets through OAuth. Automates follow-ups, meeting summaries, and notifications directly via WhatsApp. 💬 WhatsApp as the Main Interface Interact naturally with your AI team through WhatsApp Business API. All responses, updates, and summaries are delivered to your chat. Ideal for founders who want to manage operations on the go. ⚙️ How It Works Trigger: The workflow starts from a WhatsApp Trigger node (via Meta Developer Account). Routing: The President agent analyzes the incoming message and determines which Director should handle it. Processing: Marketing or sales queries go to the Sales & Marketing Director. Research questions are handled by the Business Research Director. Accountability tasks are assigned to the Accountability Director. Scheduling or communication requests are managed by the Secretary. Collaboration: Each sub-agent returns results to the President, who summarizes and sends the reply back via WhatsApp. Memory: Context is maintained between sessions, ensuring personalized and coherent communication. 🧩 Integrations Required Gemini API – for general intelligence and task reasoning Supabase- for RAG and postgres persistent memory Perplexity API – for business and competitor analysis SerpAPI – for market research and opportunity scouting Google OAuth – to connect Sheets, Calendar, and Gmail WhatsApp Business API – for message triggers and responses 🚀 Benefits Acts like a team of tireless employees available 24/7. Saves time by automating research, reminders, and communication. Enhances accountability and strategy consistency for founders. Keeps operations centralized in a simple WhatsApp interface. 🧰 Setup Steps Create API credentials for: WhatsApp (via Meta Developer Account) Gemini, Perplexity, and SerpAPI Google OAuth (Sheets, Calendar, Gmail) Create a supabase account at supabase Add the credentials in the corresponding n8n nodes. Customize the system prompts for each Director based on your startup’s needs. Activate and start interacting with your virtual executive team on WhatsApp. Use Case You are a small organisation or start-up that can not afford hiring; marketing department, research department and secretar office, then this workflow is for you 💡 Need Customization? Want to tailor it for your startup or integrate with CRM tools like Notion or HubSpot? You can easily extend the workflow or contact the creator for personalized support. Consider adjusting the system prompt to suite your business
 By Shadrack
🎓 How to transform unstructured email data into structured format with AI agent
This workflow automates the process of extracting structured, usable information from unstructured email messages across multiple platforms. It connects directly to Gmail, Outlook, and IMAP accounts, retrieves incoming emails, and sends their content to an AI-powered parsing agent built on OpenAI GPT models. The AI agent analyzes each email, identifies relevant details, and returns a clean JSON structure containing key fields: From – sender’s email address To – recipient’s email address Subject – email subject line Summary – short AI-generated summary of the email body The extracted information is then automatically inserted into an n8n Data Table, creating a structured database of email metadata and summaries ready for indexing, reporting, or integration with other tools. --- Key Benefits ✅ Full Automation: Eliminates manual reading and data entry from incoming emails. ✅ Multi-Source Integration: Handles data from different email providers seamlessly. ✅ AI-Driven Accuracy: Uses advanced language models to interpret complex or unformatted content. ✅ Structured Storage: Creates a standardized, query-ready dataset from previously unstructured text. ✅ Time Efficiency: Processes emails in real time, improving productivity and response speed. *✅ Scalability: Easily extendable to handle additional sources or extract more data fields. --- How it works This workflow automates the transformation of unstructured email data into a structured, queryable format. It operates through a series of connected steps: Email Triggering: The workflow is initiated by one of three different email triggers (Gmail, Microsoft Outlook, or a generic IMAP account), which constantly monitor for new incoming emails. AI-Powered Parsing & Structuring: When a new email is detected, its raw, unstructured content is passed to a central "Parsing Agent." This agent uses a specified OpenAI language model to intelligently analyze the email text. Data Extraction & Standardization: Following a predefined system prompt, the AI agent extracts key information from the email, such as the sender, recipient, subject, and a generated summary. It then forces the output into a strict JSON structure using a "Structured Output Parser" node, ensuring data consistency. Data Storage: Finally, the clean, structured data (the from, to, subject, and summarize fields) is inserted as a new row into a specified n8n Data Table, creating a searchable and reportable database of email information. --- Set up steps To implement this workflow, follow these configuration steps: Prepare the Data Table: Create a new Data Table within n8n. Define the columns with the following names and string type: From, To, Subject, and Summary. Configure Email Credentials: Set up the credential connections for the email services you wish to use (Gmail OAuth2, Microsoft Outlook OAuth2, and/or IMAP). Ensure the accounts have the necessary permissions to read emails. Configure AI Model Credentials: Set up the OpenAI API credential with a valid API key. The workflow is configured to use the model, but this can be changed in the respective nodes if needed. Connect the Nodes: The workflow canvas is already correctly wired. Visually confirm that the email triggers are connected to the "Parsing Agent," which is connected to the "Insert row" (Data Table) node. Also, ensure the "OpenAI Chat Model" and "Structured Output Parser" are connected to the "Parsing Agent" as its AI model and output parser, respectively. Activate the Workflow: Save the workflow and toggle the "Active" switch to ON. The triggers will begin polling for new emails according to their schedule (e.g., every minute), and the automation will start processing incoming messages. --- Need help customizing? Contact me for consulting and support or add me on Linkedin.
 By Davide