Deploy Docker Immich, API backend for WHMCS/WISECP

Setting up n8n workflow
Overview
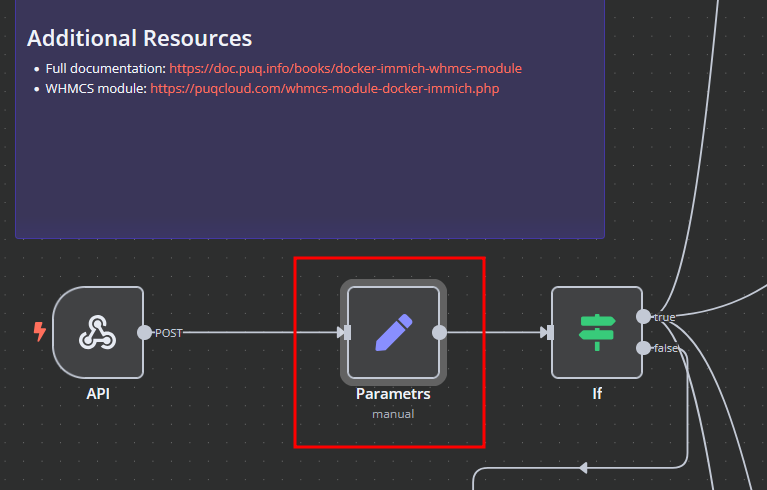
The Docker Immich WHMCS module uses a specially designed workflow for n8n to automate deployment processes. The workflow provides an API interface for the module, receives specific commands, and connects via SSH to a server with Docker installed to perform predefined actions.
Prerequisites
- You must have your own n8n server.
- Alternatively, you can use the official n8n cloud installations available at: n8n Official Site
Installation Steps
Install the Required Workflow on n8n
You have two options:
Option 1: Use the Latest Version from the n8n Marketplace
- The latest workflow templates for our modules are available on the official n8n marketplace.
- Visit our profile to access all available templates: PUQcloud on n8n
Option 2: Manual Installation
- Each module version comes with a workflow template file.
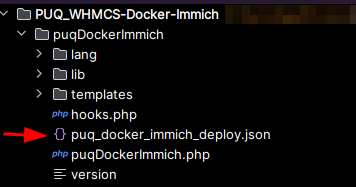
- You need to manually import this template into your n8n server.


n8n Workflow API Backend Setup for WHMCS/WISECP
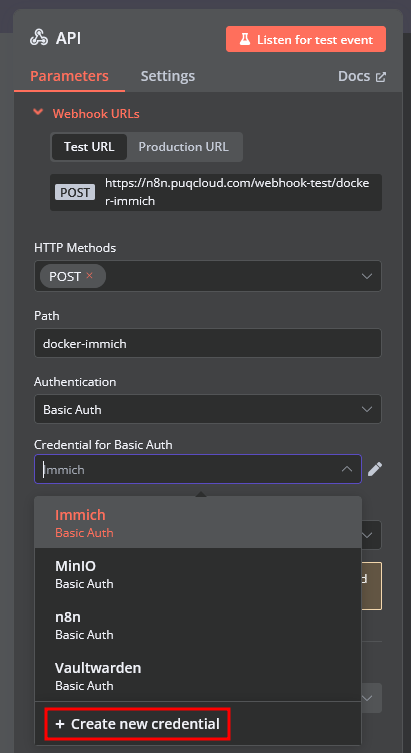
Configure API Webhook and SSH Access
-
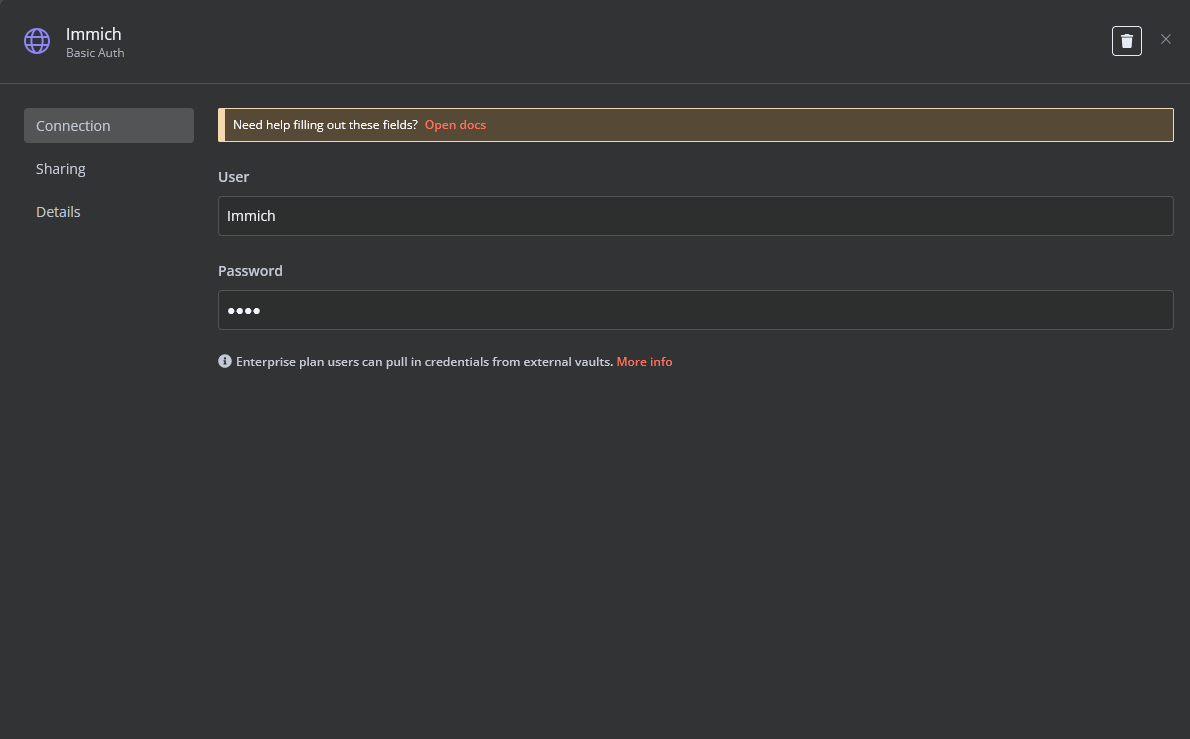
Create a Basic Auth Credential for the Webhook API Block in n8n.

-
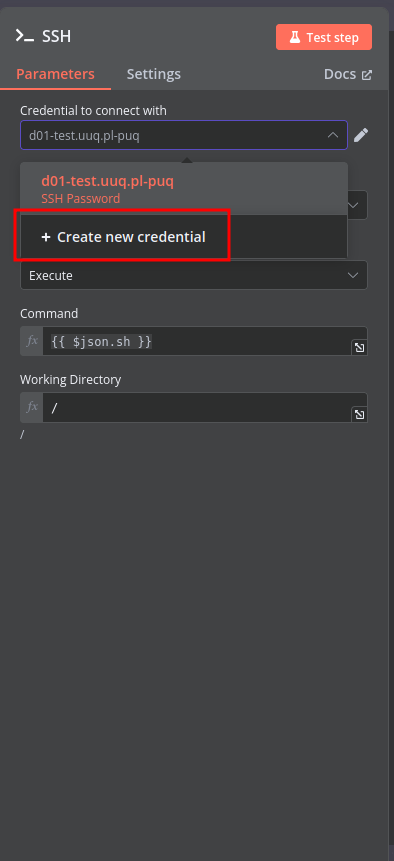
Create an SSH Credential for accessing a server with Docker installed.


Modify Template Parameters
In the Parameters block of the template, update the following settings:
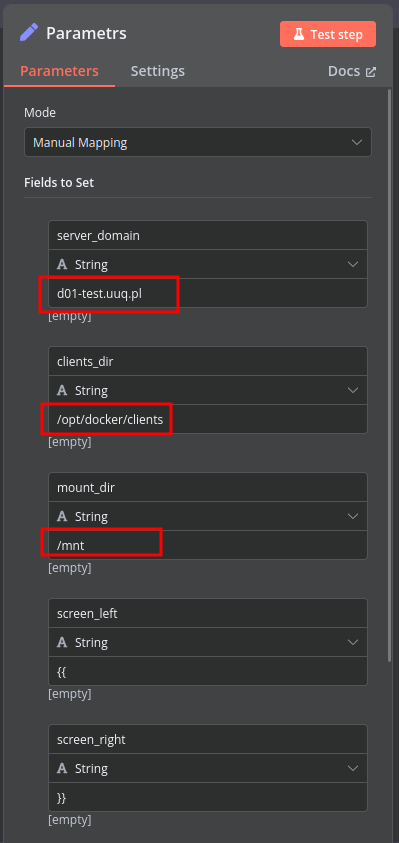
server_domain– Must match the domain of the WHMCS/WISECP Docker server.clients_dir– Directory where user data related to Docker and disks will be stored.mount_dir– Default mount point for the container disk (recommended not to change).
Do not modify the following technical parameters:
screen_leftscreen_right
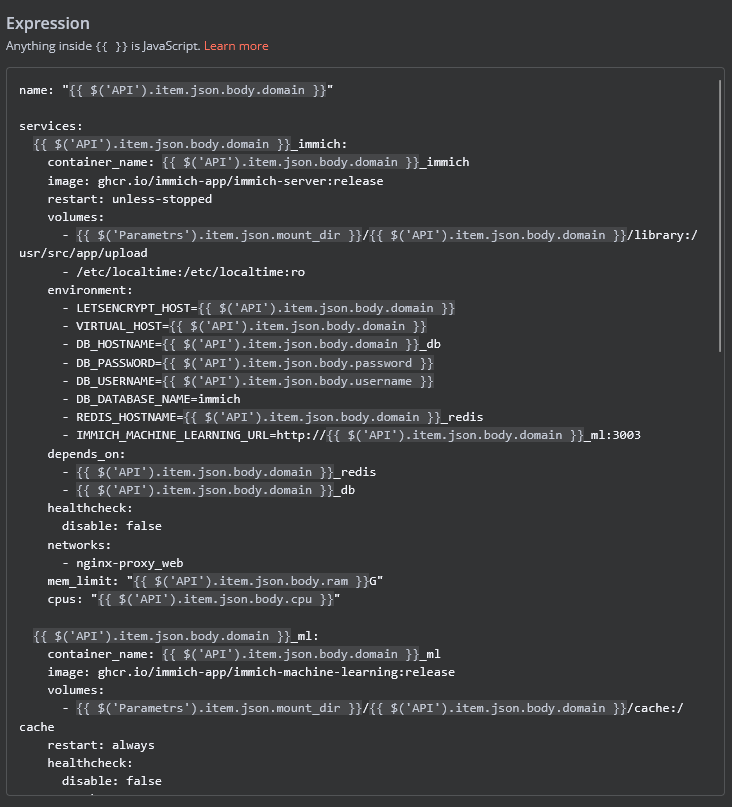
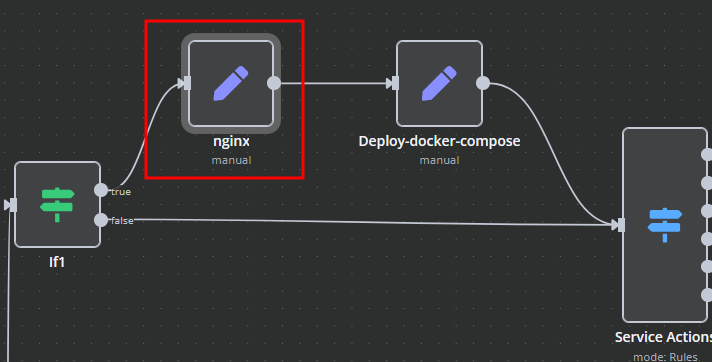
Deploy-docker-compose
In the Deploy-docker-compose element, you have the ability to modify the Docker Compose configuration, which will be generated in the following scenarios:
- When the service is created
- When the service is unlocked
- When the service is updated
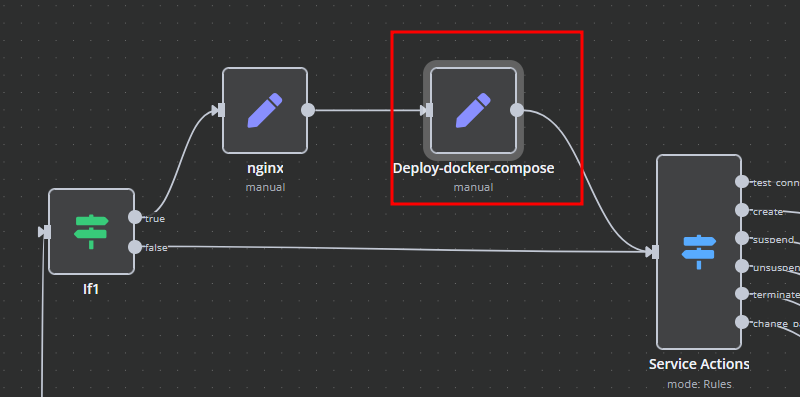
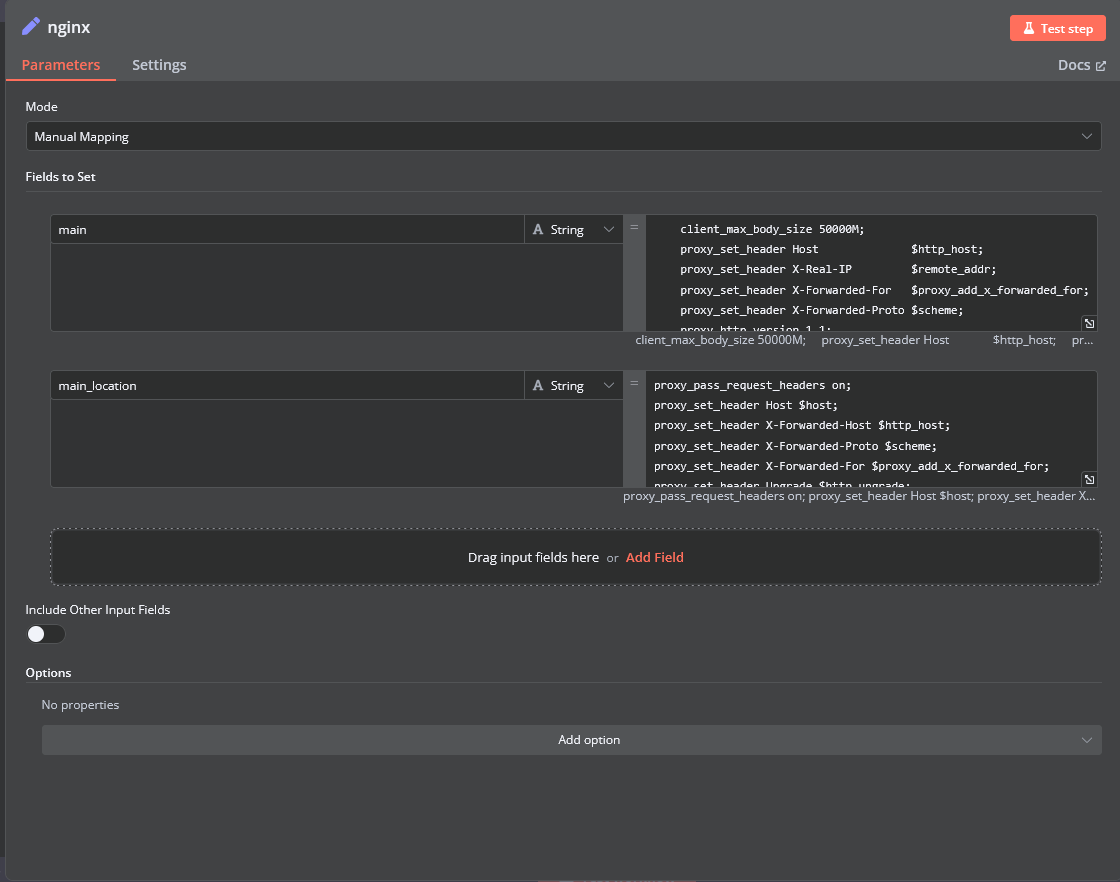
nginx
In the nginx element, you can modify the configuration parameters of the web interface proxy server.
- The main section allows you to add custom parameters to the server block in the proxy server configuration file.
- The main_location section contains settings that will be added to the location / block of the proxy server configuration. Here, you can define custom headers and other parameters specific to the root location.
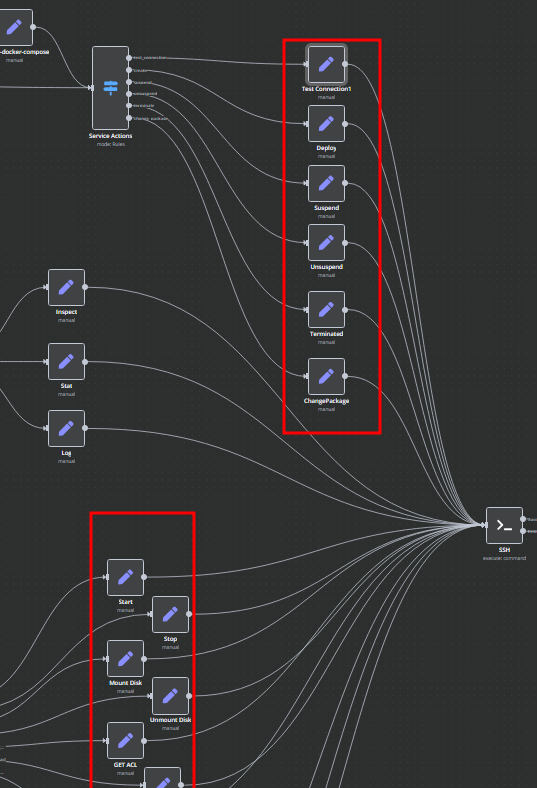
Bash Scripts
Management of Docker containers and all related procedures on the server is carried out by executing Bash scripts generated in n8n. These scripts return either a JSON response or a string.
- All scripts are located in elements directly connected to the SSH element.
- You have full control over any script and can modify or execute it as needed.
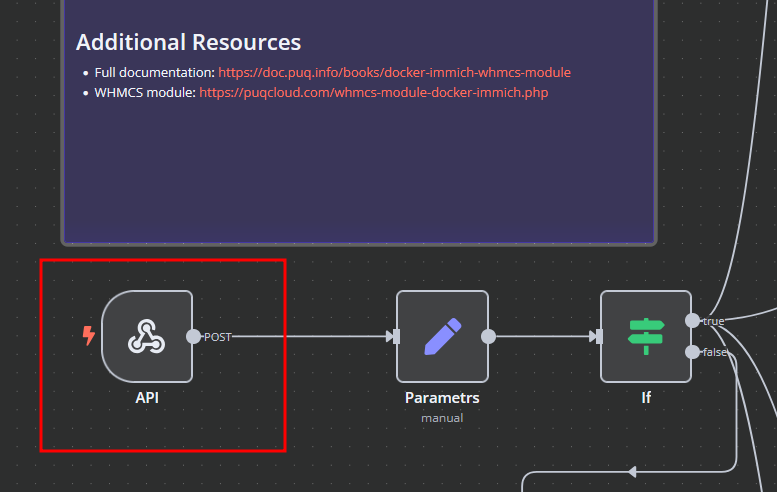
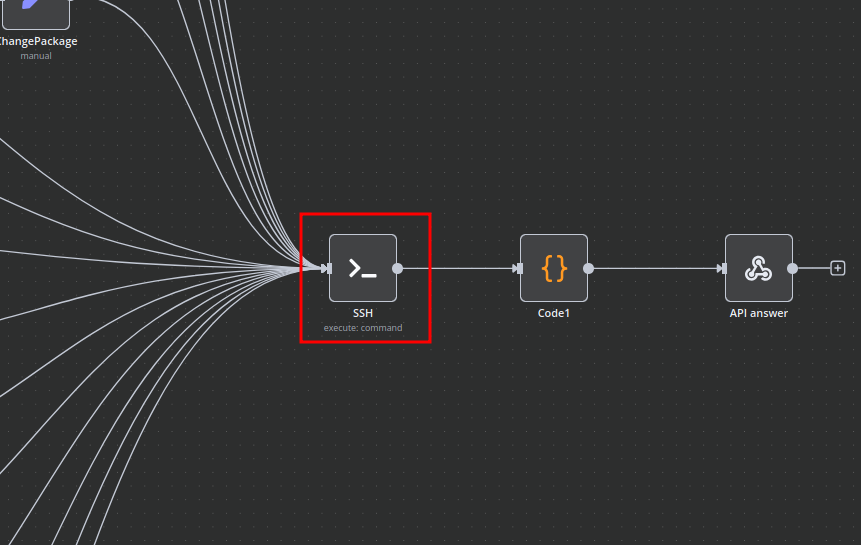
n8n Docker Immich API Backend Deployment Workflow
This n8n workflow provides a robust and flexible framework for deploying a Dockerized Immich API backend. It acts as a central control point, allowing you to trigger deployments, apply conditional logic, and execute SSH commands on a remote server, all while providing clear feedback.
What it does
This workflow is designed to streamline the deployment process for the Immich API backend. Here's a step-by-step breakdown:
- Receives Webhook Trigger: The workflow starts by listening for incoming HTTP POST requests via a Webhook. This acts as the trigger for the entire deployment process.
- Initial Field Editing: Upon receiving the webhook, the workflow uses an "Edit Fields (Set)" node. While the specific fields being edited are not defined in the provided JSON, this node typically allows for modifying, adding, or removing data from the incoming webhook payload, preparing it for subsequent steps.
- Conditional Logic (If): A crucial "If" node introduces conditional branching. This node likely evaluates a condition based on the incoming data (e.g., a specific parameter in the webhook payload) to determine the next course of action.
- True Branch: If the condition evaluates to
true, the workflow proceeds to a "Switch" node. - False Branch: If the condition evaluates to
false, the workflow responds directly to the webhook.
- True Branch: If the condition evaluates to
- Further Conditional Logic (Switch): The "Switch" node, connected to the "True" branch of the "If" node, provides more granular conditional routing. It can evaluate multiple conditions against the incoming data, directing the workflow to different paths based on the outcome.
- SSH Command Execution: One of the potential paths from the "Switch" node leads to an "SSH" node. This node is configured to connect to a remote server and execute commands. This is where the actual Docker deployment commands for the Immich API backend would be run (e.g.,
docker pull,docker run,docker-compose up). - Code Execution: Another potential path from the "Switch" node leads to a "Code" node. This node allows for custom JavaScript execution within the workflow. This could be used for advanced data manipulation, logging, or preparing data for other services.
- Respond to Webhook: Regardless of the path taken, the workflow eventually converges back to a "Respond to Webhook" node. This node sends a response back to the original caller of the webhook, indicating the status or outcome of the deployment process.
- Sticky Notes for Documentation: Throughout the workflow, "Sticky Note" nodes are used. These are purely for documentation purposes within the n8n editor, providing explanations or context for different parts of the workflow.
Prerequisites/Requirements
To use this workflow, you will need:
- n8n Instance: A running n8n instance (self-hosted or cloud).
- Webhook Trigger: An external system capable of sending HTTP POST requests to the n8n webhook URL.
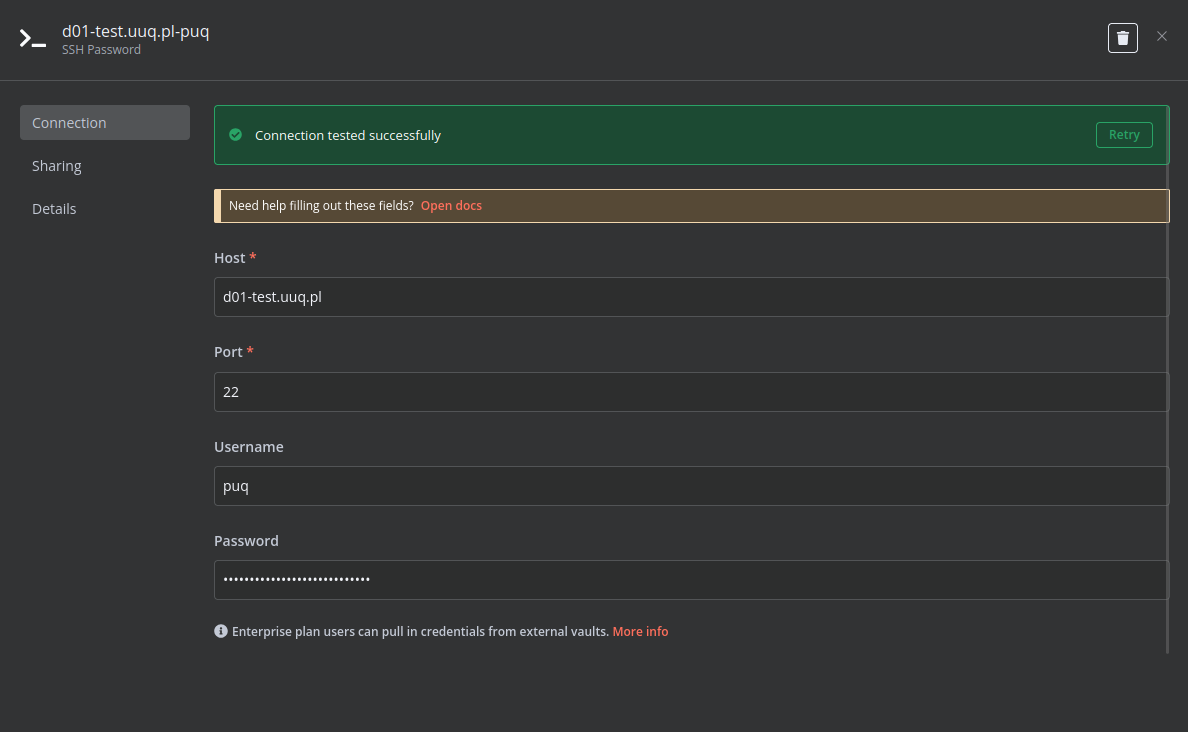
- SSH Credentials: Access to a remote server via SSH, including:
- Hostname or IP address
- Username
- Authentication method (e.g., private key or password).
- Docker/Docker Compose: The remote server must have Docker and Docker Compose installed to deploy the Immich API backend.
- Immich API Backend Configuration: Knowledge of the necessary Docker commands or Docker Compose files for the Immich API backend deployment.
Setup/Usage
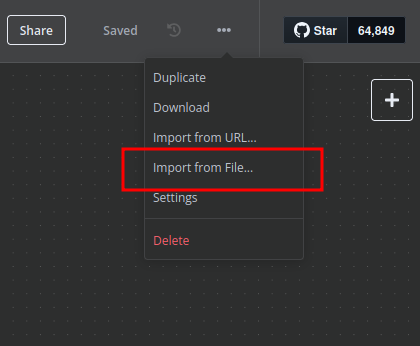
- Import the Workflow:
- Copy the provided JSON content.
- In your n8n instance, go to "Workflows" and click "New".
- Click the three dots next to "New Workflow" and select "Import from JSON".
- Paste the JSON content and click "Import".
- Configure the Webhook:
- Locate the "Webhook" trigger node.
- Note the "Webhook URL". This is the endpoint your external system will call to trigger the workflow.
- Configure SSH Credentials:
- Locate the "SSH" node.
- Click on the node and configure your SSH credentials (hostname, username, authentication method, etc.). Ensure the n8n instance has network access to the target SSH server.
- Update the "Command" field with the specific Docker commands required to deploy your Immich API backend. This could involve
docker pull,docker run, ordocker-compose upcommands, depending on your setup.
- Configure Conditional Logic (If & Switch):
- Review the "If" and "Switch" nodes.
- Define the conditions based on your specific requirements. For example, you might check for a
deploy_typeorenvironmentparameter in the incoming webhook data to decide which deployment script to run.
- Configure "Code" Node (Optional):
- If you intend to use the "Code" node, update the JavaScript code to perform any custom logic, data transformation, or logging as needed for your deployment process.
- Activate the Workflow:
- Once configured, activate the workflow by toggling the "Active" switch in the top right corner of the n8n editor.
- Trigger the Workflow:
- Send an HTTP POST request to the Webhook URL you obtained in step 2. Include any necessary data in the request body that your "If" and "Switch" nodes are configured to evaluate.
This workflow provides a flexible foundation. You can expand it further by adding notifications (e.g., Slack, email) for deployment status, error handling, or integrating with other services.
Related Templates
Auto-create TikTok videos with VEED.io AI avatars, ElevenLabs & GPT-4
💥 Viral TikTok Video Machine: Auto-Create Videos with Your AI Avatar --- 🎯 Who is this for? This workflow is for content creators, marketers, and agencies who want to use Veed.io’s AI avatar technology to produce short, engaging TikTok videos automatically. It’s ideal for creators who want to appear on camera without recording themselves, and for teams managing multiple brands who need to generate videos at scale. --- ⚙️ What problem this workflow solves Manually creating videos for TikTok can take hours — finding trends, writing scripts, recording, and editing. By combining Veed.io, ElevenLabs, and GPT-4, this workflow transforms a simple Telegram input into a ready-to-post TikTok video featuring your AI avatar powered by Veed.io — speaking naturally with your cloned voice. --- 🚀 What this workflow does This automation links Veed.io’s video-generation API with multiple AI tools: Analyzes TikTok trends via Perplexity AI Writes a 10-second viral script using GPT-4 Generates your voiceover via ElevenLabs Uses Veed.io (Fabric 1.0 via FAL.ai) to animate your avatar and sync the lips to the voice Creates an engaging caption + hashtags for TikTok virality Publishes the video automatically via Blotato TikTok API Logs all results to Google Sheets for tracking --- 🧩 Setup Telegram Bot Create your bot via @BotFather Configure it as the trigger for sending your photo and theme Connect Veed.io Create an account on Veed.io Get your FAL.ai API key (Veed Fabric 1.0 model) Use HTTPS image/audio URLs compatible with Veed Fabric Other APIs Add Perplexity, ElevenLabs, and Blotato TikTok keys Connect your Google Sheet for logging results --- 🛠️ How to customize this workflow Change your Avatar: Upload a new image through Telegram, and Veed.io will generate a new talking version automatically. Modify the Script Style: Adjust the GPT prompt for tone (educational, funny, storytelling). Adjust Voice Tone: Tweak ElevenLabs stability and similarity settings. Expand Platforms: Add Instagram, YouTube Shorts, or X (Twitter) posting nodes. Track Performance: Customize your Google Sheet to measure your most successful Veed.io-based videos. --- 🧠 Expected Outcome In just a few seconds after sending your photo and theme, this workflow — powered by Veed.io — creates a fully automated TikTok video featuring your AI avatar with natural lip-sync and voice. The result is a continuous stream of viral short videos, made without cameras, editing, or effort. --- ✅ Import the JSON file in n8n, add your API keys (including Veed.io via FAL.ai), and start generating viral TikTok videos starring your AI avatar today! 🎥 Watch This Tutorial --- 📄 Documentation: Notion Guide Need help customizing? Contact me for consulting and support : Linkedin / Youtube
 By Dr. Firas
Automate Dutch Public Procurement Data Collection with TenderNed
TenderNed Public Procurement What This Workflow Does This workflow automates the collection of public procurement data from TenderNed (the official Dutch tender platform). It: Fetches the latest tender publications from the TenderNed API Retrieves detailed information in both XML and JSON formats for each tender Parses and extracts key information like organization names, titles, descriptions, and reference numbers Filters results based on your custom criteria Stores the data in a database for easy querying and analysis Setup Instructions This template comes with sticky notes providing step-by-step instructions in Dutch and various query options you can customize. Prerequisites TenderNed API Access - Register at TenderNed for API credentials Configuration Steps Set up TenderNed credentials: Add HTTP Basic Auth credentials with your TenderNed API username and password Apply these credentials to the three HTTP Request nodes: "Tenderned Publicaties" "Haal XML Details" "Haal JSON Details" Customize filters: Modify the "Filter op ..." node to match your specific requirements Examples: specific organizations, contract values, regions, etc. How It Works Step 1: Trigger The workflow can be triggered either manually for testing or automatically on a daily schedule. Step 2: Fetch Publications Makes an API call to TenderNed to retrieve a list of recent publications (up to 100 per request). Step 3: Process & Split Extracts the tender array from the response and splits it into individual items for processing. Step 4: Fetch Details For each tender, the workflow makes two parallel API calls: XML endpoint - Retrieves the complete tender documentation in XML format JSON endpoint - Fetches metadata including reference numbers and keywords Step 5: Parse & Merge Parses the XML data and merges it with the JSON metadata and batch information into a single data structure. Step 6: Extract Fields Maps the raw API data to clean, structured fields including: Publication ID and date Organization name Tender title and description Reference numbers (kenmerk, TED number) Step 7: Filter Applies your custom filter criteria to focus on relevant tenders only. Step 8: Store Inserts the processed data into your database for storage and future analysis. Customization Tips Modify API Parameters In the "Tenderned Publicaties" node, you can adjust: offset: Starting position for pagination size: Number of results per request (max 100) Add query parameters for date ranges, status filters, etc. Add More Fields Extend the "Splits Alle Velden" node to extract additional fields from the XML/JSON data, such as: Contract value estimates Deadline dates CPV codes (procurement classification) Contact information Integrate Notifications Add a Slack, Email, or Discord node after the filter to get notified about new matching tenders. Incremental Updates Modify the workflow to only fetch new tenders by: Storing the last execution timestamp Adding date filters to the API query Only processing publications newer than the last run Troubleshooting No data returned? Verify your TenderNed API credentials are correct Check that you have setup youre filter proper Need help setting this up or interested in a complete tender analysis solution? Get in touch 🔗 LinkedIn – Wessel Bulte
 By Wessel Bulte
Automate invoice processing with OCR, GPT-4 & Salesforce opportunity creation
PDF Invoice Extractor (AI) End-to-end pipeline: Watch Drive ➜ Download PDF ➜ OCR text ➜ AI normalize to JSON ➜ Upsert Buyer (Account) ➜ Create Opportunity ➜ Map Products ➜ Create OLI via Composite API ➜ Archive to OneDrive. --- Node by node (what it does & key setup) 1) Google Drive Trigger Purpose: Fire when a new file appears in a specific Google Drive folder. Key settings: Event: fileCreated Folder ID: google drive folder id Polling: everyMinute Creds: googleDriveOAuth2Api Output: Metadata { id, name, ... } for the new file. --- 2) Download File From Google Purpose: Get the file binary for processing and archiving. Key settings: Operation: download File ID: ={{ $json.id }} Creds: googleDriveOAuth2Api Output: Binary (default key: data) and original metadata. --- 3) Extract from File Purpose: Extract text from PDF (OCR as needed) for AI parsing. Key settings: Operation: pdf OCR: enable for scanned PDFs (in options) Output: JSON with OCR text at {{ $json.text }}. --- 4) Message a model (AI JSON Extractor) Purpose: Convert OCR text into strict normalized JSON array (invoice schema). Key settings: Node: @n8n/n8n-nodes-langchain.openAi Model: gpt-4.1 (or gpt-4.1-mini) Message role: system (the strict prompt; references {{ $json.text }}) jsonOutput: true Creds: openAiApi Output (per item): $.message.content → the parsed JSON (ensure it’s an array). --- 5) Create or update an account (Salesforce) Purpose: Upsert Buyer as Account using an external ID. Key settings: Resource: account Operation: upsert External Id Field: taxid_c External Id Value: ={{ $json.message.content.buyer.tax_id }} Name: ={{ $json.message.content.buyer.name }} Creds: salesforceOAuth2Api Output: Account record (captures Id) for downstream Opportunity. --- 6) Create an opportunity (Salesforce) Purpose: Create Opportunity linked to the Buyer (Account). Key settings: Resource: opportunity Name: ={{ $('Message a model').item.json.message.content.invoice.code }} Close Date: ={{ $('Message a model').item.json.message.content.invoice.issue_date }} Stage: Closed Won Amount: ={{ $('Message a model').item.json.message.content.summary.grand_total }} AccountId: ={{ $json.id }} (from Upsert Account output) Creds: salesforceOAuth2Api Output: Opportunity Id for OLI creation. --- 7) Build SOQL (Code / JS) Purpose: Collect unique product codes from AI JSON and build a SOQL query for PricebookEntry by Pricebook2Id. Key settings: pricebook2Id (hardcoded in script): e.g., 01sxxxxxxxxxxxxxxx Source lines: $('Message a model').first().json.message.content.products Output: { soql, codes } --- 8) Query PricebookEntries (Salesforce) Purpose: Fetch PricebookEntry.Id for each Product2.ProductCode. Key settings: Resource: search Query: ={{ $json.soql }} Creds: salesforceOAuth2Api Output: Items with Id, Product2.ProductCode (used for mapping). --- 9) Code in JavaScript (Build OLI payloads) Purpose: Join lines with PBE results and Opportunity Id ➜ build OpportunityLineItem payloads. Inputs: OpportunityId: ={{ $('Create an opportunity').first().json.id }} Lines: ={{ $('Message a model').first().json.message.content.products }} PBE rows: from previous node items Output: { body: { allOrNone:false, records:[{ OpportunityLineItem... }] } } Notes: Converts discount_total ➜ per-unit if needed (currently commented for standard pricing). Throws on missing PBE mapping or empty lines. --- 10) Create Opportunity Line Items (HTTP Request) Purpose: Bulk create OLIs via Salesforce Composite API. Key settings: Method: POST URL: https://<your-instance>.my.salesforce.com/services/data/v65.0/composite/sobjects Auth: salesforceOAuth2Api (predefined credential) Body (JSON): ={{ $json.body }} Output: Composite API results (per-record statuses). --- 11) Update File to One Drive Purpose: Archive the original PDF in OneDrive. Key settings: Operation: upload File Name: ={{ $json.name }} Parent Folder ID: onedrive folder id Binary Data: true (from the Download node) Creds: microsoftOneDriveOAuth2Api Output: Uploaded file metadata. --- Data flow (wiring) Google Drive Trigger → Download File From Google Download File From Google → Extract from File → Update File to One Drive Extract from File → Message a model Message a model → Create or update an account Create or update an account → Create an opportunity Create an opportunity → Build SOQL Build SOQL → Query PricebookEntries Query PricebookEntries → Code in JavaScript Code in JavaScript → Create Opportunity Line Items --- Quick setup checklist 🔐 Credentials: Connect Google Drive, OneDrive, Salesforce, OpenAI. 📂 IDs: Drive Folder ID (watch) OneDrive Parent Folder ID (archive) Salesforce Pricebook2Id (in the JS SOQL builder) 🧠 AI Prompt: Use the strict system prompt; jsonOutput = true. 🧾 Field mappings: Buyer tax id/name → Account upsert fields Invoice code/date/amount → Opportunity fields Product name must equal your Product2.ProductCode in SF. ✅ Test: Drop a sample PDF → verify: AI returns array JSON only Account/Opportunity created OLI records created PDF archived to OneDrive --- Notes & best practices If PDFs are scans, enable OCR in Extract from File. If AI returns non-JSON, keep “Return only a JSON array” as the last line of the prompt and keep jsonOutput enabled. Consider adding validation on parsing.warnings to gate Salesforce writes. For discounts/taxes in OLI: Standard OLI fields don’t support per-line discount amounts directly; model them in UnitPrice or custom fields. Replace the Composite API URL with your org’s domain or use the Salesforce node’s Bulk Upsert for simplicity.
 By Le Nguyen