Enrich company firmographic data in Google Sheets with Explorium MCP

Google Sheets Company Enrichment with Explorium MCP
Template
Download the following json file and import it to a new n8n workflow:
Overview
This n8n workflow template enables automatic enrichment of company information in your Google Sheets. When you add a new company or update existing company details (name or website), the workflow automatically fetches additional business intelligence data using Explorium MCP and updates your sheet with:
- Business ID
- NAICS industry code
- Number of employees (range)
- Annual revenue (range)
Key Features
- Automatic Triggering: Monitors your Google Sheet for new rows or updates to company name/website fields
- Smart Processing: Only processes new or modified rows, not the entire sheet
- Data Validation: Ensures both company name and website are present before processing
- Error Handling: Processes each row individually to prevent one failure from affecting others
- Powered by AI: Uses Claude Sonnet 4 with Explorium MCP for intelligent data enrichment
Prerequisites
Before setting up this workflow, ensure you have:
- n8n instance (self-hosted or cloud)
- Google account with access to Google Sheets
- Anthropic API key for Claude
- Explorium MCP API key
Installation & Setup
Step 1: Import the Workflow
- Create a new workflow.
- Download the workflow JSON from above.
- In your n8n instance, go to Workflows → Add Workflow → Import from File
- Select the JSON file and click Import
Step 2: Create Google Sheet
- Create a new google sheet (or make a copy of this template)
- Your Google Sheet must have the following columns (exact names):
name- Company namewebsite- Company website URLbusiness_id- Will be populated by the workflownaics- Will be populated by the workflownumber_of_employees_range- Will be populated by the workflowyearly_revenue_range- Will be populated by the workflow
Step 3: Configure Google Sheets Credentials
You'll need to set up two Google credentials:
Google Sheets Trigger Credentials:
-
Click on the Google Sheets Trigger node
-
Under Credentials, click Create New
-
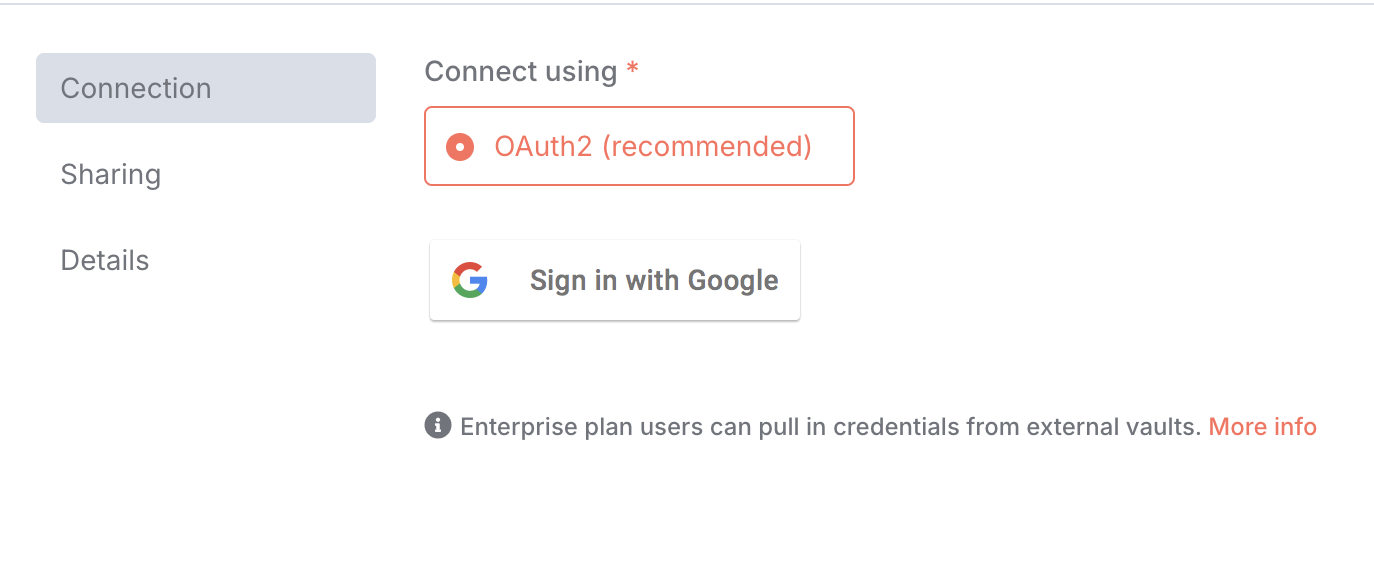
If working on n8n Cloud, Click the 'Sign in with Google' button
-
Grant permissions to read and monitor your Google Sheets
-
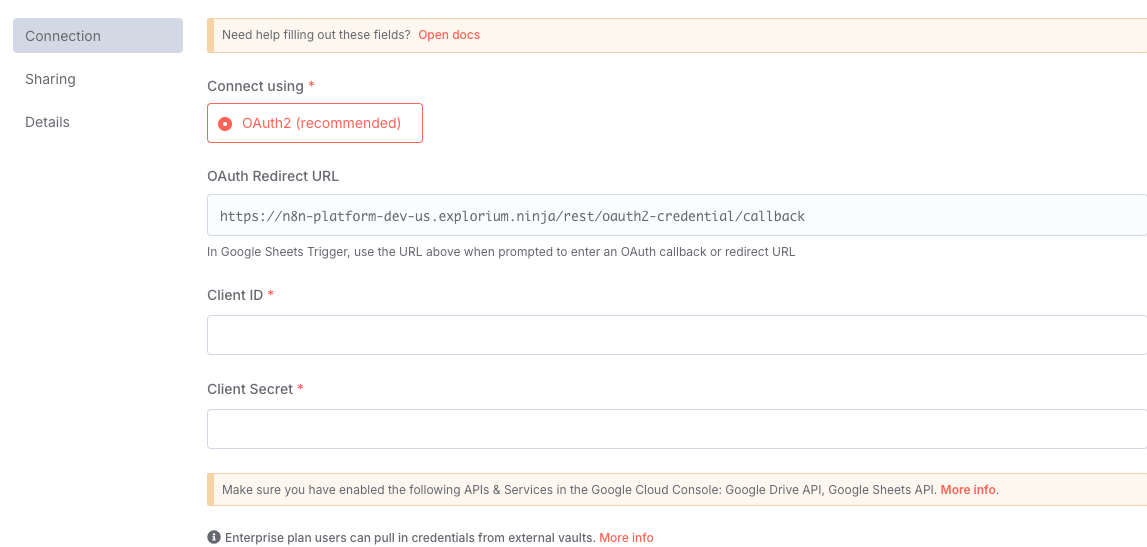
If working on n8n Instance, Follow the OAuth2 authentication process here
-
Fill the Client ID and Client Secret fields
Google Sheets Update Credentials:
- Click on the Update Company Row node
- Under Credentials, select the same credentials or create new ones (The same you did above)
- Ensure permissions include write access to your sheets
Step 4: Configure Anthropic Credentials
- Click on the Anthropic Chat Model node
- Under Credentials, click Create New
- Enter your Anthropic API key
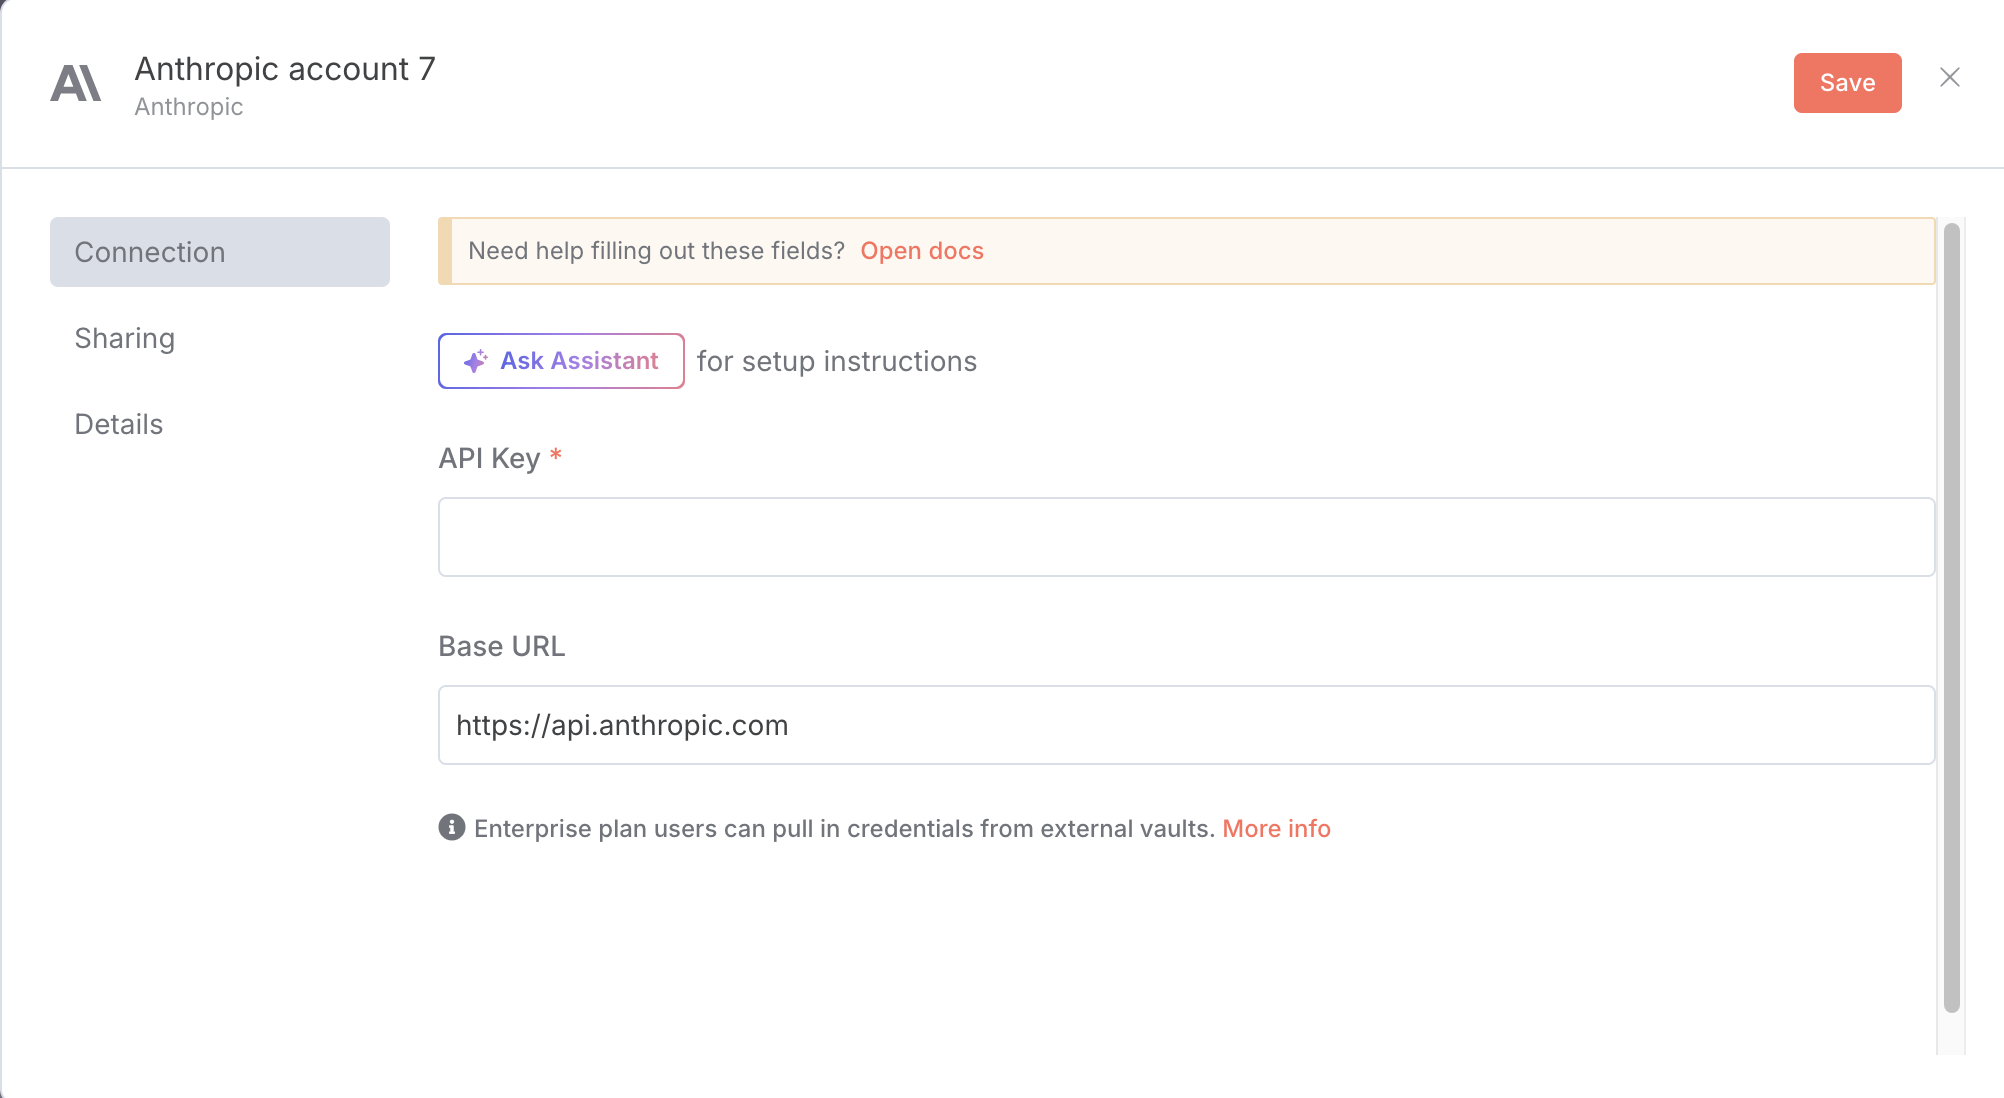
- Save the credentials
Step 5: Configure Explorium MCP Credentials
- Click on the MCP Client node
- Under Credentials, click Create New (Header Auth)
- Fill the Name field with
api_key - Fill the Value field with your Explorium API Key
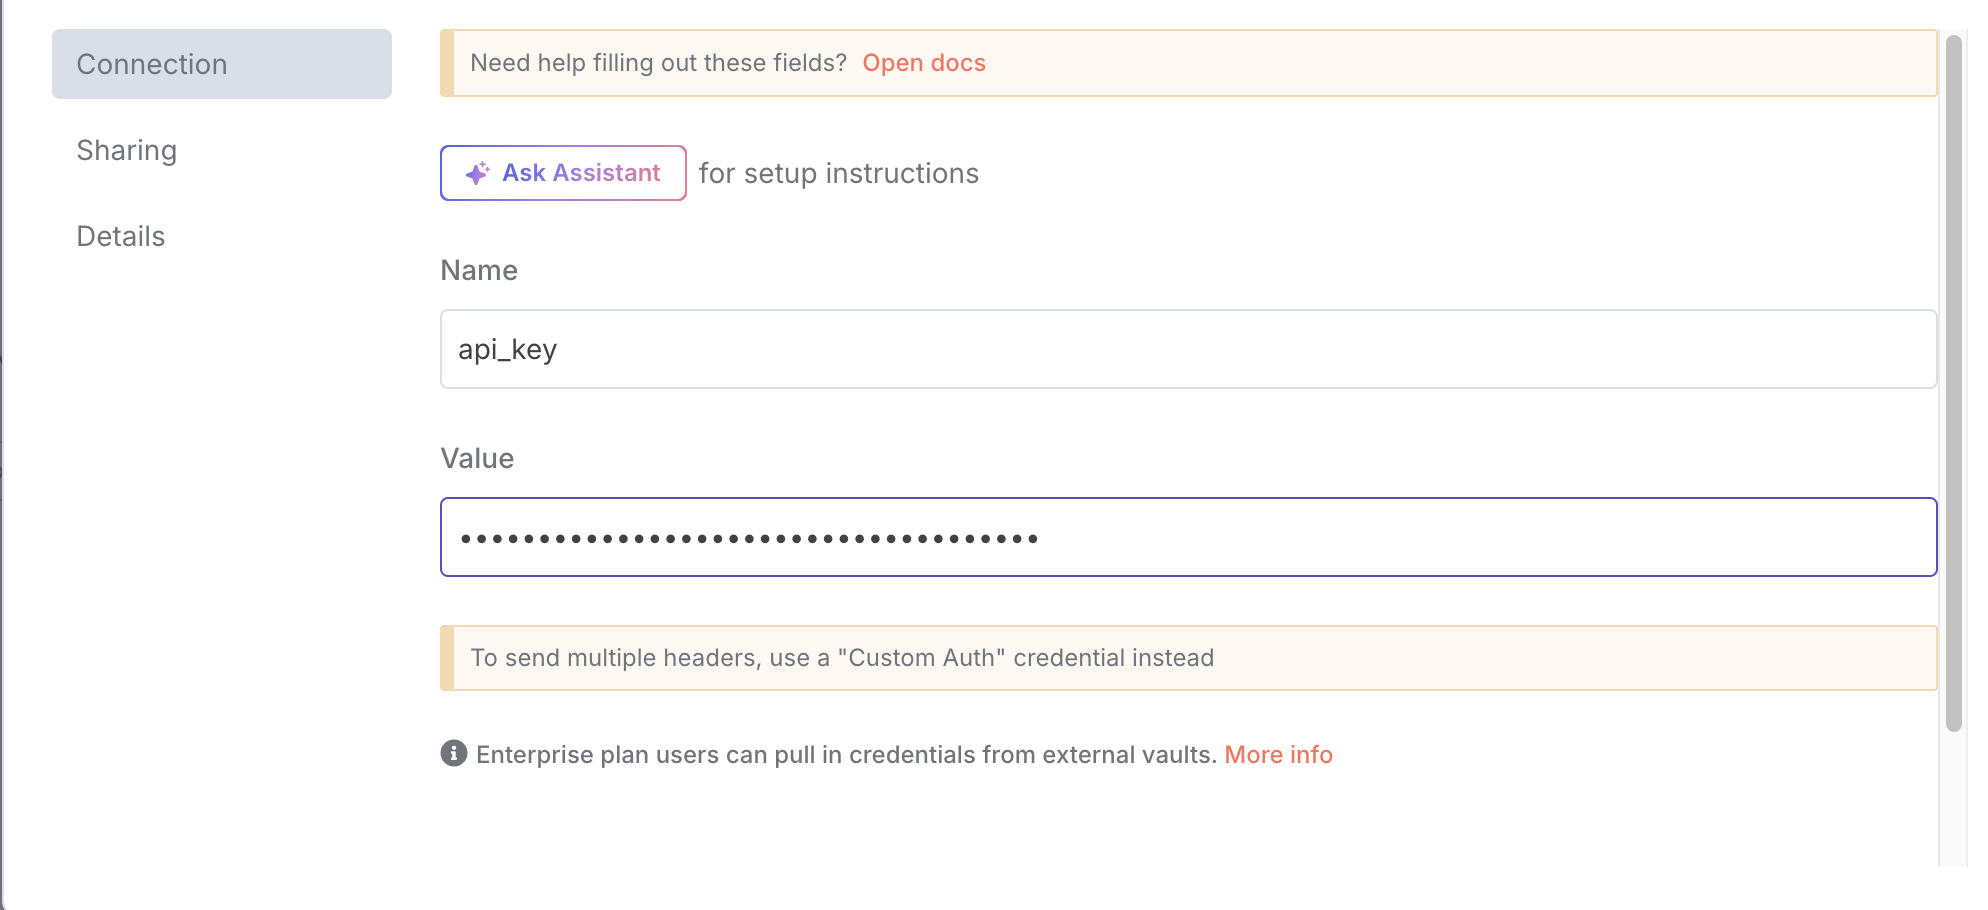
- Save the credentials
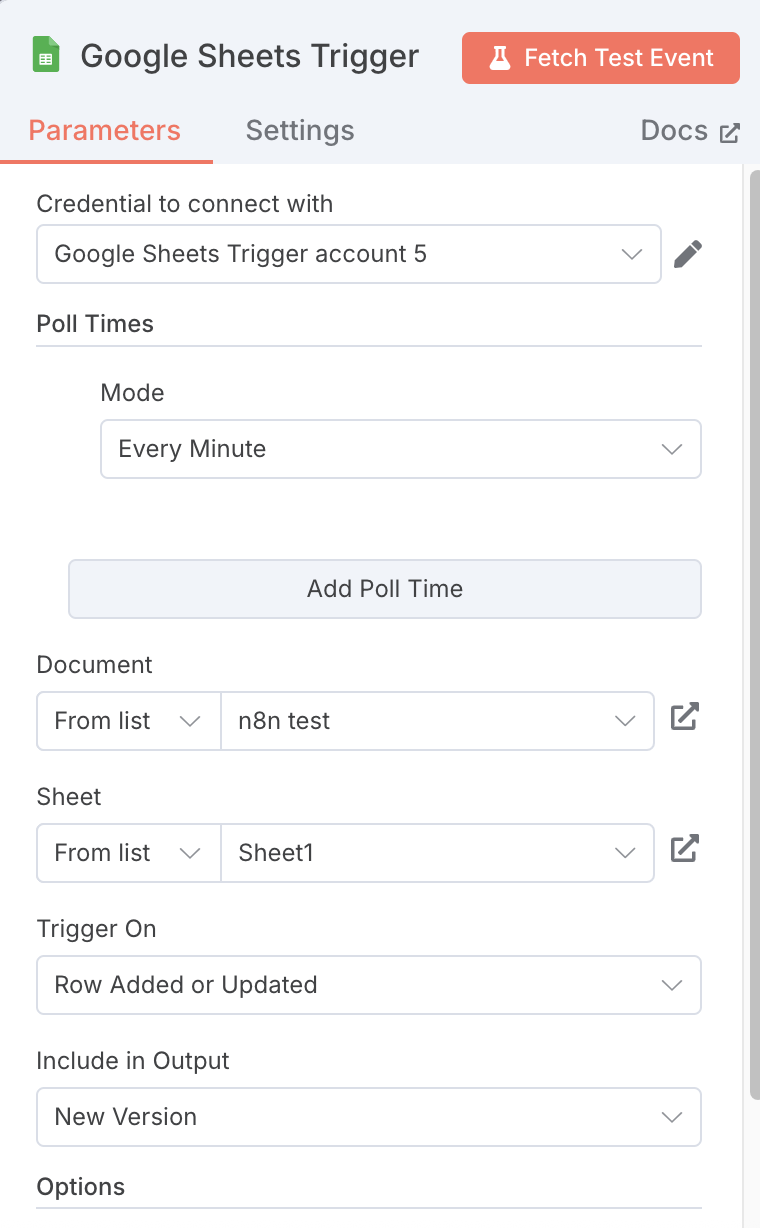
Step 6: Link Your Google Sheet
-
In the Google Sheets Trigger node:
- Select your Google Sheet from the dropdown
- Select the worksheet (usually "Sheet1")
-
In the Update Company Row node:
- Select the same Google Sheet and worksheet
- Ensure the matching column is set to
row_number

Step 7: Activate the Workflow
- Click the Active toggle in the top right to activate the workflow
- The workflow will now monitor your sheet every minute for changes
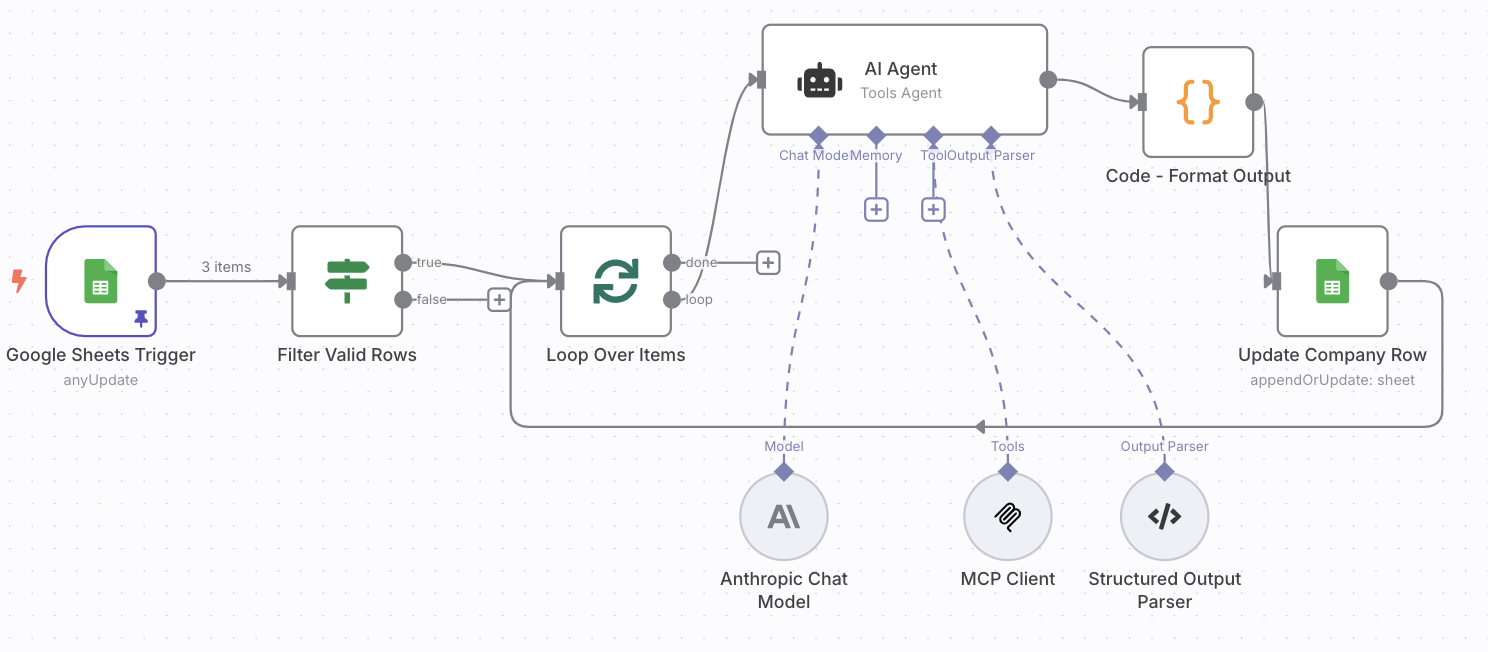
How It Works
Workflow Process Flow
- Google Sheets Trigger: Polls your sheet every minute for new rows or changes to name/website fields
- Filter Valid Rows: Validates that both company name and website are present
- Loop Over Items: Processes each company individually
- AI Agent: Uses Explorium MCP to:
- Find the company's business ID
- Retrieve firmographic data (revenue, employees, NAICS code)
- Format Output: Structures the data for Google Sheets
- Update Company Row: Writes the enriched data back to the original row
Trigger Behavior
- First Activation: May process all existing rows to establish a baseline
- Ongoing Operation: Only processes new rows or rows where name/website fields change
- Polling Frequency: Checks for changes every minute
Usage
Adding New Companies
- Add a new row to your Google Sheet
- Fill in the
nameandwebsitecolumns - Within 1 minute, the workflow will automatically:
- Detect the new row
- Enrich the company data
- Update the remaining columns
Updating Existing Companies
- Modify the
nameorwebsitefield of an existing row - The workflow will re-process that row with the updated information
- All enrichment data will be refreshed
Monitoring Executions
- In n8n, go to Executions to see workflow runs
- Each execution shows:
- Which rows were processed
- Success/failure status
- Detailed logs for troubleshooting
Troubleshooting
Common Issues
All rows are processed instead of just new/updated ones
- Ensure the workflow is activated, not just run manually
- Manual test runs will process all rows
- First activation may process all rows once
No data is returned for a company
- Verify the company name and website are correct
- Check if the company exists in Explorium's database
- Some smaller or newer companies may not have data available
Workflow isn't triggering
- Confirm the workflow is activated (Active toggle is ON)
- Check that changes are made to the
nameorwebsitecolumns - Verify Google Sheets credentials have proper permissions
Authentication errors
- Re-authenticate Google Sheets credentials
- Verify Anthropic API key is valid and has credits
- Check Explorium Bearer token is correct and active
Error Handling
The workflow processes each row individually, so if one company fails to enrich:
- Other rows will still be processed
- The failed row will retain its original data
- Check the execution logs for specific error details
Best Practices
- Data Quality: Ensure company names and websites are accurate for best results
- Website Format: Include full URLs (https://example.com) rather than just domain names
- Batch Processing: The workflow handles multiple updates efficiently, so you can add several companies at once
- Regular Monitoring: Periodically check execution logs to ensure smooth operation
API Limits & Considerations
- Google Sheets API: Subject to Google's API quotas
- Anthropic API: Each enrichment uses Claude Sonnet 4 tokens
- Explorium MCP: Rate limits may apply based on your subscription
Support
For issues specific to:
- n8n platform: Consult n8n documentation or community
- Google Sheets integration: Check n8n's Google Sheets node documentation
- Explorium MCP: Contact Explorium support for API-related issues
- Anthropic/Claude: Refer to Anthropic's documentation for API issues
Example Use Cases
- Sales Prospecting: Automatically enrich lead lists with company size and revenue data
- Market Research: Build comprehensive databases of companies in specific industries
- Competitive Analysis: Track and monitor competitor information
- Investment Research: Gather firmographic data for potential investment targets
Enrich Company Firmographic Data in Google Sheets with Explorium MCP
This n8n workflow automates the process of enriching company firmographic data stored in a Google Sheet using an AI Agent powered by an Anthropic Chat Model and the Explorium Model Context Protocol (MCP) Client. It listens for new or updated rows in a specified Google Sheet, processes each company name through the AI agent to retrieve firmographic data, and then updates the Google Sheet with the enriched information.
What it does
- Triggers on Google Sheet Updates: The workflow starts when new rows are added or existing rows are updated in a designated Google Sheet.
- Splits Data into Batches: It processes the incoming Google Sheet data in batches to manage API calls and prevent rate limiting.
- Initial Data Check: It checks if the "Company Name" column exists in the incoming data. If not, it skips the item.
- Prepares AI Agent Input: For each item (company), it constructs a prompt for the AI Agent, asking it to find firmographic data for the given company name.
- Enriches Data with AI Agent: It uses an AI Agent powered by an Anthropic Chat Model to query for firmographic data. This agent utilizes an MCP Client Tool to interact with external data sources (presumably Explorium).
- Parses AI Agent Output: The AI Agent's response, which is expected to be structured JSON, is parsed to extract the relevant firmographic details.
- Updates Google Sheet: Finally, it updates the original Google Sheet with the enriched firmographic data for each company, adding new columns or updating existing ones.
Prerequisites/Requirements
- n8n Instance: A running n8n instance.
- Google Sheets Account: A Google account with access to Google Sheets.
- Google Sheets Credentials: Authenticated Google Sheets credentials configured in n8n.
- Anthropic API Key: An API key for Anthropic's chat models (e.g., Claude), configured as a credential in n8n.
- Explorium MCP Client Tool: Access and configuration for the Explorium Model Context Protocol (MCP) Client Tool. This likely requires specific credentials or setup within n8n for the MCP Client.
Setup/Usage
- Import the Workflow:
- Download the workflow JSON.
- In your n8n instance, go to "Workflows" and click "New".
- Click the three dots menu (
...) and select "Import from JSON". - Paste the workflow JSON or upload the file.
- Configure Credentials:
- Google Sheets Trigger & Node: Update the "Google Sheets Trigger" and "Google Sheets" nodes with your Google Sheets credentials. Ensure they have read/write access to the target spreadsheet.
- Anthropic Chat Model: Configure your Anthropic API key as a credential for the "Anthropic Chat Model" node.
- MCP Client Tool: Ensure the "MCP Client Tool" node is correctly configured with the necessary credentials or API keys for Explorium.
- Specify Google Sheet:
- In the "Google Sheets Trigger" node, select the spreadsheet and sheet name you want to monitor for company data.
- In the final "Google Sheets" node, ensure the same spreadsheet and sheet name are selected for updating.
- Activate the Workflow: Once all credentials and sheet details are configured, activate the workflow. It will now automatically enrich company data as new entries are added or updated in your Google Sheet.
- Customize (Optional):
- Code Node (834): The "Code" node prepares the prompt for the AI agent. You might need to adjust the prompt if your company data is structured differently or if you want to request specific firmographic fields.
- Structured Output Parser (1179): If the AI agent's output structure changes, you may need to update the schema in the "Structured Output Parser" node to correctly extract the data.
- Google Sheets Update (18): Adjust the "Google Sheets" node at the end to map the parsed firmographic data to the correct columns in your spreadsheet.
Related Templates
Dynamic Hubspot lead routing with GPT-4 and Airtable sales team distribution
AI Agent for Dynamic Lead Distribution (HubSpot + Airtable) 🧠 AI-Powered Lead Routing and Sales Team Distribution This intelligent n8n workflow automates end-to-end lead qualification and allocation by integrating HubSpot, Airtable, OpenAI, Gmail, and Slack. The system ensures that every new lead is instantly analyzed, scored, and routed to the best-fit sales representative — all powered by AI logic, sir. --- 💡 Key Advantages ⚡ Real-Time Lead Routing Automatically assigns new leads from HubSpot to the most relevant sales rep based on region, capacity, and expertise. 🧠 AI Qualification Engine An OpenAI-powered Agent evaluates the lead’s industry, region, and needs to generate a persona summary and routing rationale. 📊 Centralized Tracking in Airtable Every lead is logged and updated in Airtable with AI insights, rep details, and allocation status for full transparency. 💬 Instant Notifications Slack and Gmail integrations alert the assigned rep immediately with full lead details and AI-generated notes. 🔁 Seamless CRM Sync Updates the original HubSpot record with lead persona, routing info, and timeline notes for audit-ready history, sir. --- ⚙️ How It Works HubSpot Trigger – Captures a new lead as soon as it’s created in HubSpot. Fetch Contact Data – Retrieves all relevant fields like name, company, and industry. Clean & Format Data – A Code node standardizes and structures the data for consistency. Airtable Record Creation – Logs the lead data into the “Leads” table for centralized tracking. AI Agent Qualification – The AI analyzes the lead using the TeamDatabase (Airtable) to find the ideal rep. Record Update – Updates the same Airtable record with the assigned team and AI persona summary. Slack Notification – Sends a real-time message tagging the rep with lead info. Gmail Notification – Sends a personalized handoff email with context and follow-up actions. HubSpot Sync – Updates the original contact in HubSpot with the assignment details and AI rationale, sir. --- 🛠️ Setup Steps Trigger Node: HubSpot → Detect new leads. HubSpot Node: Retrieve complete lead details. Code Node: Clean and normalize data. Airtable Node: Log lead info in the “Leads” table. AI Agent Node: Process lead and match with sales team. Slack Node: Notify the designated representative. Gmail Node: Email the rep with details. HubSpot Node: Update CRM with AI summary and allocation status, sir. --- 🔐 Credentials Required HubSpot OAuth2 API – To fetch and update leads. Airtable Personal Access Token – To store and update lead data. OpenAI API – To power the AI qualification and matching logic. Slack OAuth2 – For sending team notifications. Gmail OAuth2 – For automatic email alerts to assigned reps, sir. --- 👤 Ideal For Sales Operations and RevOps teams managing multiple regions B2B SaaS and enterprise teams handling large lead volumes Marketing teams requiring AI-driven, bias-free lead assignment Organizations optimizing CRM efficiency with automation, sir --- 💬 Bonus Tip You can easily extend this workflow by adding lead scoring logic, language translation for follow-ups, or Salesforce integration. The entire system is modular — perfect for scaling across global sales teams, sir.
 By MANISH KUMAR
Track daily moods with AI analysis & reports using GPT-4o, Data Tables & Gmail
Track your daily mood in one tap and receive automated AI summaries of your emotional trends every week and month. Perfect for self-reflection, wellness tracking, or personal analytics. This workflow logs moods sent through a webhook (/mood) into Data Tables, analyzes them weekly and monthly with OpenAI (GPT-4o), and emails you clear summaries and actionable recommendations via Gmail. ⚙️ How It Works Webhook – Mood → Collects new entries (🙂, 😐, or 😩) plus an optional note. Set Mood Data → Adds date, hour, and note fields automatically. Insert Mood Row → Stores each record in a Data Table. Weekly Schedule (Sunday 20:00) → Aggregates the last 7 days and sends a summarized report. Monthly Schedule (Day 1 at 08:00) → Aggregates the last 30 days for a deeper AI analysis. OpenAI Analysis → Generates insights, patterns, and 3 actionable recommendations. Gmail → Sends the full report (chart + AI text) to your inbox. 📊 Example Auto-Email Weekly Mood Summary (last 7 days) 🙂 5 ██████████ 😐 2 ████ 😩 0 Average: 1.7 (Positive 🙂) AI Insights: You’re trending upward this week — notes show that exercise days improved mood. Try keeping short walks mid-week to stabilize energy. 🧩 Requirements n8n Data Tables enabled OpenAI credential (GPT-4o or GPT-4 Turbo) Gmail OAuth2 credential to send summaries 🔧 Setup Instructions Connect your credentials: Add your own OpenAI and Gmail OAuth2 credentials. Set your Data Table ID: Open the Insert Mood Row node and enter your own Data Table ID. Without this, new moods won’t be stored. Replace the email placeholder: In the Gmail nodes, replace your.email@example.com with your actual address. Deploy and run: Send a test POST request to /mood (e.g. { "mood": "🙂", "note": "productive day" }) to log your first entry. ⚠️ Before activating the workflow, ensure you have configured the Data Table ID in the “Insert Mood Row” node. 🧠 AI Analysis Interprets mood patterns using GPT-4o. Highlights trends, potential triggers, and suggests 3 specific actions. Runs automatically every week and month. 🔒 Security No personal data is exposed outside your n8n instance. Always remove or anonymize credential references before sharing publicly. 💡 Ideal For Personal mood journaling and AI feedback Therapists tracking client progress Productivity or self-quantification projects 🗒️ Sticky Notes Guide 🟡 Mood Logging Webhook POST /mood receives mood + optional note. ⚠️ Configure your own Data Table ID in the “Insert Mood Row” node before running. 🟢 Weekly Summary Runs every Sunday 20:00 → aggregates last 7 days → generates AI insights + emails report. 🔵 Monthly Summary Runs on Day 1 at 08:00 → aggregates last 30 days → creates monthly reflection. 🟣 AI Analysis Uses OpenAI GPT-4o to interpret trends and recommend actions. 🟠 Email Delivery Sends formatted summaries to your inbox automatically.
 By Jose Castillo
Create, update, and get a person from Copper
This workflow allows you to create, update, and get a person from Copper. Copper node: This node will create a new person in Copper. Copper1 node: This node will update the information of the person that we created using the previous node. Copper2 node: This node will retrieve the information of the person that we created earlier.
 By Harshil Agrawal