Automate VIRAL Youtube titles & thumbnails creation (FLUX.1 + Apify)

For Who?
- Content Creators
- Youtube Automation
- Marketing Team
How it works?
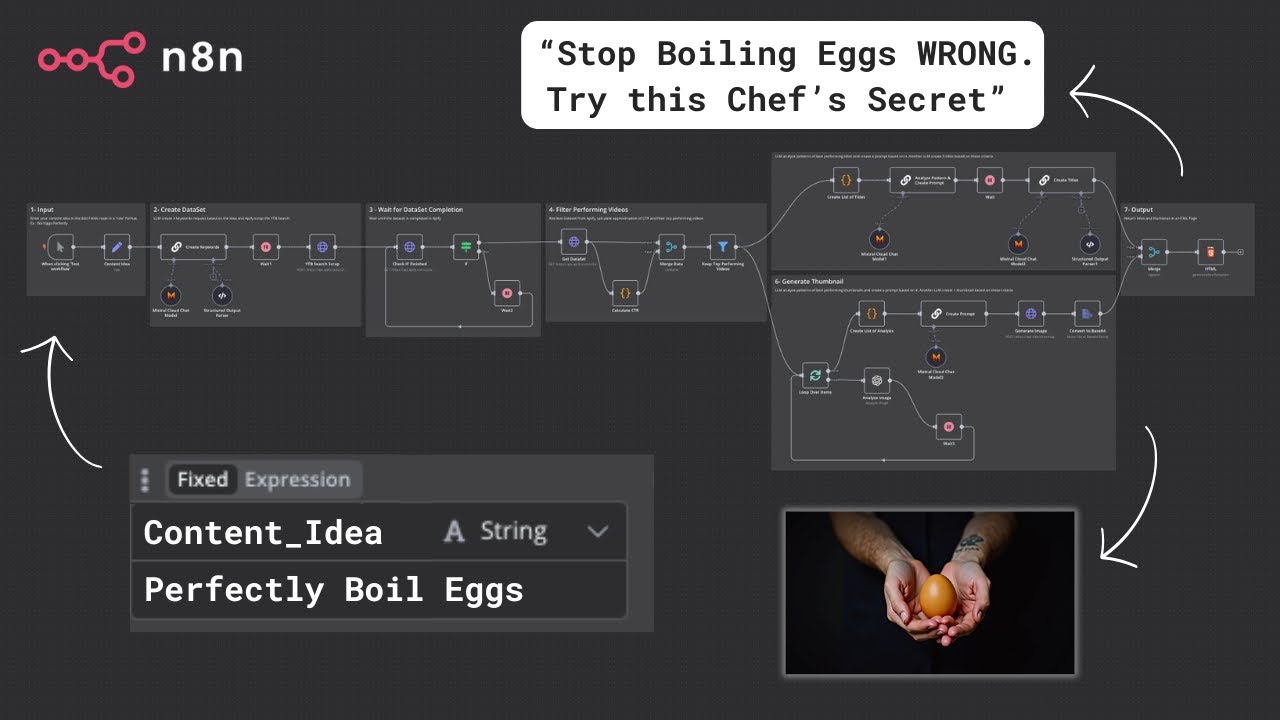
1 - Enter your content idea in the Edit Fields node in a "raw" format. Ex : Boil Eggs Perfectly 2 - LLM create 3 keywords request based on the idea and Apify scrape the YTB Search 3 - Wait until the dataset is completed in Apify 4 - Retrieve Dataset from Apify, calculate approximation of CTR and filter top performing videos 5 - LLM analyze patterns of best performing titles and create a prompt based on it. Another LLM create 5 titles based on these criteria 6 - LLM analyze patterns of best performing thumbnails and create a prompt based on it. Another LLM create 1 thumbnail based on these criteria 7 - Return titles and thumbnail in a HTML Page
📺 YouTube Video Tutorial:
SETUP
Setup Input Content Idea : Enter Keyword Related to the niche you want. Trigger can be replaced with anything as long as you retrieve a content idea. For example : Form submission, Database entry, etc ...
If you want to change the number of keywords, update the data accordingly in the "Create Keywords" LLM Chain node ➡️ Structured Output Parser AND in the "YTB Search Scrape" HTTP Request Node in Body ➡️ JSON ➡️ searchQueries. If you want to change the number of scraped videos for each keyword, update the data accordingly in the "Create Videos Dataset" HTTP Request Node in Body ➡️ JSON ➡️ maxResults. If you want to adjust the CTR Calculation feel free to update it in the Code Node ➡️ Follow the Comments (after "//") to find what you're looking for. If you want to adjust the level of virality of the videos kept for analaysis go to Filter Node ➡️ Value.
Setup Output HTML Page : You can also replace this part with any type of storage. For example : Airtable Database, Google Drive/Google Sheet, Send to an email, etc ...
APIs : For the following third-party integrations, replace ==[YOUR_API_TOKEN]== with your API Token or connect your account via Client ID / Secret to your n8n instance :
- Apify : https://docs.apify.com/api/v2/getting-started
- OpenAI : https://platform.openai.com/docs/overview (base URL : https://api.openai.com/v1) OR OpenRouter : https://openrouter.ai/docs/quickstart (base URL : https://openrouter.ai/api/v1)
- HuggingFace (FLUX.1) : https://huggingface.co/docs
👨💻 More Workflows : https://n8n.io/creators/nasser/
n8n Workflow: Automate YouTube Title & Thumbnail Creation with LLMs
This n8n workflow automates the process of generating viral YouTube video titles and thumbnail descriptions using Large Language Models (LLMs) and external API calls. It's designed to streamline content creation for YouTube channels by leveraging AI to brainstorm engaging ideas.
What it does
This workflow performs the following key steps:
- Manual Trigger: Initiates the workflow upon manual execution.
- HTTP Request (Apify): Makes an API call to Apify (or a similar web scraping service) to retrieve data. This step likely fetches information related to YouTube videos or trends that will inform the title and thumbnail generation.
- Loop Over Items: Processes each item (e.g., each video idea or data point) returned from the Apify API call individually.
- Edit Fields: Sets a
video_title_promptandthumbnail_promptfor each item, preparing the input for the LLM. - Basic LLM Chain (Mistral Cloud Chat Model):
- Takes the
video_title_promptas input. - Uses a Mistral Cloud Chat Model to generate multiple viral YouTube video title suggestions.
- The output is structured using a
Structured Output Parserto ensure consistency.
- Takes the
- Basic LLM Chain (OpenAI):
- Takes the
thumbnail_promptas input. - Uses an OpenAI model to generate a detailed description for a YouTube thumbnail based on the video title.
- The output is also structured using a
Structured Output Parser.
- Takes the
- Edit Fields (Clean up): Cleans up the generated titles and thumbnail descriptions, potentially removing unwanted characters or formatting.
- Filter: Filters the generated titles and thumbnail descriptions, likely to remove empty or irrelevant results.
- Merge: Combines the processed titles and thumbnail descriptions back into a single data stream.
- HTML: Processes the merged data, potentially formatting it for display or further use (e.g., generating an HTML report or embedding it into a web page).
- Code: Executes custom JavaScript code, likely for final data manipulation, validation, or integration with other services.
- Wait: Introduces a pause in the workflow, potentially to manage API rate limits or allow time for external processes to complete.
- HTTP Request (Final API Call): Makes a final API call, possibly to store the generated titles and thumbnail descriptions in a database, send them to a content management system, or publish them.
Prerequisites/Requirements
To use this workflow, you will need:
- n8n Instance: A running n8n instance.
- Apify Account/API Key: For the initial HTTP Request node (Node 19).
- Mistral Cloud API Key: For the
Mistral Cloud Chat Modelnode (Node 1245). - OpenAI API Key: For the
OpenAInode (Node 1250). - Basic understanding of JSON and n8n expressions: To configure the
Edit Fields,Filter, andCodenodes.
Setup/Usage
- Import the workflow: Download the JSON provided and import it into your n8n instance.
- Configure Credentials:
- For the
HTTP Requestnodes, set up your Apify (or relevant API) credentials. - For the
Mistral Cloud Chat Modelnode, configure your Mistral Cloud API Key. - For the
OpenAInode, configure your OpenAI API Key.
- For the
- Review and Customize Nodes:
- HTTP Request (Apify): Adjust the URL, headers, and body to match the specific Apify actor or API endpoint you are using to fetch initial data.
- Edit Fields (Set video_title_prompt & Set thumbnail_prompt): Modify the
video_title_promptandthumbnail_promptvalues to guide the LLMs according to your specific content needs and desired virality. - Basic LLM Chain (Mistral Cloud Chat Model & OpenAI): Review the model settings and prompts within these nodes to fine-tune the title and thumbnail generation.
- Edit Fields (Clean up): Adjust the JavaScript code or expressions to clean up the output as required.
- Filter: Customize the conditions to filter out unwanted or low-quality generated content.
- HTML: Modify the HTML generation logic if you need a specific output format.
- Code: If you have specific post-processing or integration logic, update the JavaScript code in this node.
- Wait: Adjust the wait duration if necessary.
- HTTP Request (Final API Call): Configure this node to send the final generated content to your desired destination (e.g., a database, CMS, or notification service).
- Execute the workflow: Click the "Execute workflow" button on the
Manual Triggernode to run the workflow and generate your YouTube titles and thumbnail descriptions.
Related Templates
Generate song lyrics and music from text prompts using OpenAI and Fal.ai Minimax
Spark your creativity instantly in any chat—turn a simple prompt like "heartbreak ballad" into original, full-length lyrics and a professional AI-generated music track, all without leaving your conversation. 📋 What This Template Does This chat-triggered workflow harnesses AI to generate detailed, genre-matched song lyrics (at least 600 characters) from user messages, then queues them for music synthesis via Fal.ai's minimax-music model. It polls asynchronously until the track is ready, delivering lyrics and audio URL back in chat. Crafts original, structured lyrics with verses, choruses, and bridges using OpenAI Submits to Fal.ai for melody, instrumentation, and vocals aligned to the style Handles long-running generations with smart looping and status checks Returns complete song package (lyrics + audio link) for seamless sharing 🔧 Prerequisites n8n account (self-hosted or cloud with chat integration enabled) OpenAI account with API access for GPT models Fal.ai account for AI music generation 🔑 Required Credentials OpenAI API Setup Go to platform.openai.com → API keys (sidebar) Click "Create new secret key" → Name it (e.g., "n8n Songwriter") Copy the key and add to n8n as "OpenAI API" credential type Test by sending a simple chat completion request Fal.ai HTTP Header Auth Setup Sign up at fal.ai → Dashboard → API Keys Generate a new API key → Copy it In n8n, create "HTTP Header Auth" credential: Name="Fal.ai", Header Name="Authorization", Header Value="Key [Your API Key]" Test with a simple GET to their queue endpoint (e.g., /status) ⚙️ Configuration Steps Import the workflow JSON into your n8n instance Assign OpenAI API credentials to the "OpenAI Chat Model" node Assign Fal.ai HTTP Header Auth to the "Generate Music Track", "Check Generation Status", and "Fetch Final Result" nodes Activate the workflow—chat trigger will appear in your n8n chat interface Test by messaging: "Create an upbeat pop song about road trips" 🎯 Use Cases Content Creators: YouTubers generating custom jingles for videos on the fly, streamlining production from idea to audio export Educators: Music teachers using chat prompts to create era-specific folk tunes for classroom discussions, fostering interactive learning Gift Personalization: Friends crafting anniversary R&B tracks from shared memories via quick chats, delivering emotional audio surprises Artist Brainstorming: Songwriters prototyping hip-hop beats in real-time during sessions, accelerating collaboration and iteration ⚠️ Troubleshooting Invalid JSON from AI Agent: Ensure the system prompt stresses valid JSON; test the agent standalone with a sample query Music Generation Fails (401/403): Verify Fal.ai API key has minimax-music access; check usage quotas in dashboard Status Polling Loops Indefinitely: Bump wait time to 45-60s for complex tracks; inspect fal.ai queue logs for bottlenecks Lyrics Under 600 Characters: Tweak agent prompt to enforce fuller structures like [V1][C][V2][B][C]; verify output length in executions
 By Daniel Nkencho
Automate Dutch Public Procurement Data Collection with TenderNed
TenderNed Public Procurement What This Workflow Does This workflow automates the collection of public procurement data from TenderNed (the official Dutch tender platform). It: Fetches the latest tender publications from the TenderNed API Retrieves detailed information in both XML and JSON formats for each tender Parses and extracts key information like organization names, titles, descriptions, and reference numbers Filters results based on your custom criteria Stores the data in a database for easy querying and analysis Setup Instructions This template comes with sticky notes providing step-by-step instructions in Dutch and various query options you can customize. Prerequisites TenderNed API Access - Register at TenderNed for API credentials Configuration Steps Set up TenderNed credentials: Add HTTP Basic Auth credentials with your TenderNed API username and password Apply these credentials to the three HTTP Request nodes: "Tenderned Publicaties" "Haal XML Details" "Haal JSON Details" Customize filters: Modify the "Filter op ..." node to match your specific requirements Examples: specific organizations, contract values, regions, etc. How It Works Step 1: Trigger The workflow can be triggered either manually for testing or automatically on a daily schedule. Step 2: Fetch Publications Makes an API call to TenderNed to retrieve a list of recent publications (up to 100 per request). Step 3: Process & Split Extracts the tender array from the response and splits it into individual items for processing. Step 4: Fetch Details For each tender, the workflow makes two parallel API calls: XML endpoint - Retrieves the complete tender documentation in XML format JSON endpoint - Fetches metadata including reference numbers and keywords Step 5: Parse & Merge Parses the XML data and merges it with the JSON metadata and batch information into a single data structure. Step 6: Extract Fields Maps the raw API data to clean, structured fields including: Publication ID and date Organization name Tender title and description Reference numbers (kenmerk, TED number) Step 7: Filter Applies your custom filter criteria to focus on relevant tenders only. Step 8: Store Inserts the processed data into your database for storage and future analysis. Customization Tips Modify API Parameters In the "Tenderned Publicaties" node, you can adjust: offset: Starting position for pagination size: Number of results per request (max 100) Add query parameters for date ranges, status filters, etc. Add More Fields Extend the "Splits Alle Velden" node to extract additional fields from the XML/JSON data, such as: Contract value estimates Deadline dates CPV codes (procurement classification) Contact information Integrate Notifications Add a Slack, Email, or Discord node after the filter to get notified about new matching tenders. Incremental Updates Modify the workflow to only fetch new tenders by: Storing the last execution timestamp Adding date filters to the API query Only processing publications newer than the last run Troubleshooting No data returned? Verify your TenderNed API credentials are correct Check that you have setup youre filter proper Need help setting this up or interested in a complete tender analysis solution? Get in touch 🔗 LinkedIn – Wessel Bulte
 By Wessel Bulte
AI-powered code review with linting, red-marked corrections in Google Sheets & Slack
Advanced Code Review Automation (AI + Lint + Slack) Who’s it for For software engineers, QA teams, and tech leads who want to automate intelligent code reviews with both AI-driven suggestions and rule-based linting — all managed in Google Sheets with instant Slack summaries. How it works This workflow performs a two-layer review system: Lint Check: Runs a lightweight static analysis to find common issues (e.g., use of var, console.log, unbalanced braces). AI Review: Sends valid code to Gemini AI, which provides human-like review feedback with severity classification (Critical, Major, Minor) and visual highlights (red/orange tags). Formatter: Combines lint and AI results, calculating an overall score (0–10). Aggregator: Summarizes results for quick comparison. Google Sheets Writer: Appends results to your review log. Slack Notification: Posts a concise summary (e.g., number of issues and average score) to your team’s channel. How to set up Connect Google Sheets and Slack credentials in n8n. Replace placeholders (<YOURSPREADSHEETID>, <YOURSHEETGIDORNAME>, <YOURSLACKCHANNEL_ID>). Adjust the AI review prompt or lint rules as needed. Activate the workflow — reviews will start automatically whenever new code is added to the sheet. Requirements Google Sheets and Slack integrations enabled A configured AI node (Gemini, OpenAI, or compatible) Proper permissions to write to your target Google Sheet How to customize Add more linting rules (naming conventions, spacing, forbidden APIs) Extend the AI prompt for project-specific guidelines Customize the Slack message formatting Export analytics to a dashboard (e.g., Notion or Data Studio) Why it’s valuable This workflow brings realistic, team-oriented AI-assisted code review to n8n — combining the speed of automated linting with the nuance of human-style feedback. It saves time, improves code quality, and keeps your team’s review history transparent and centralized.
 By higashiyama