Deploy Docker InfluxDB, API backend for WHMCS/WISECP

Overview
The Docker InfluxDB WHMCS module uses a specially designed workflow for n8n to automate deployment processes. The workflow provides an API interface for the module, receives specific commands, and connects via SSH to a server with Docker installed to perform predefined actions.
Prerequisites
- You must have your own n8n server.
- Alternatively, you can use the official n8n cloud installations available at: n8n Official Site
Installation Steps
Install the Required Workflow on n8n
You have two options:
Option 1: Use the Latest Version from the n8n Marketplace
- The latest workflow templates for our modules are available on the official n8n marketplace.
- Visit our profile: PUQcloud on n8n
Option 2: Manual Installation
- Each module version comes with a workflow template file.
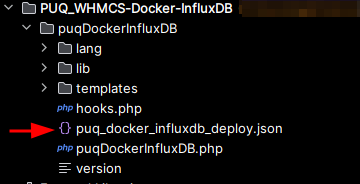
- You need to manually import this template into your n8n server.
n8n Workflow API Backend Setup for WHMCS/WISECP
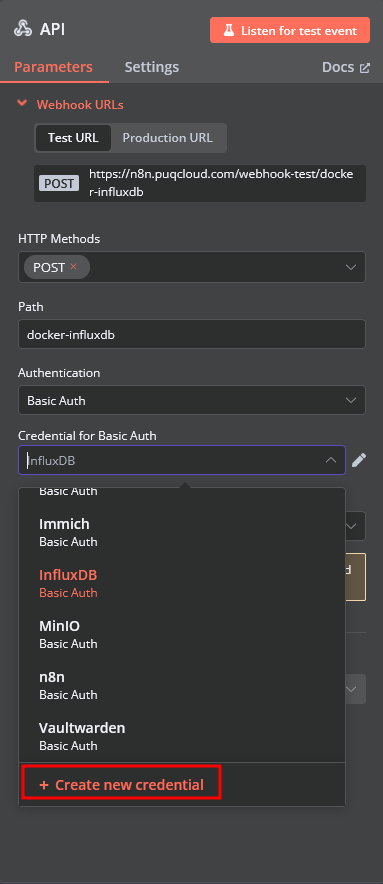
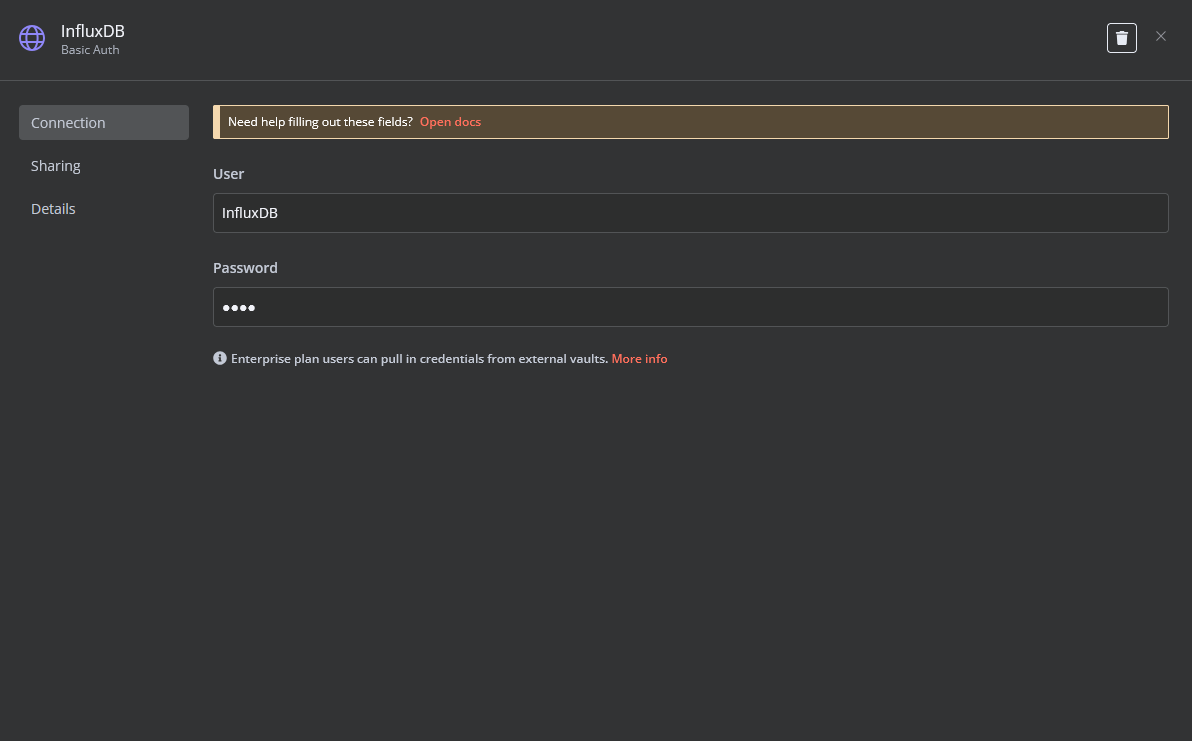
1. Configure API Webhook and SSH Access
-
Create a Basic Auth Credential for the Webhook API block in n8n.
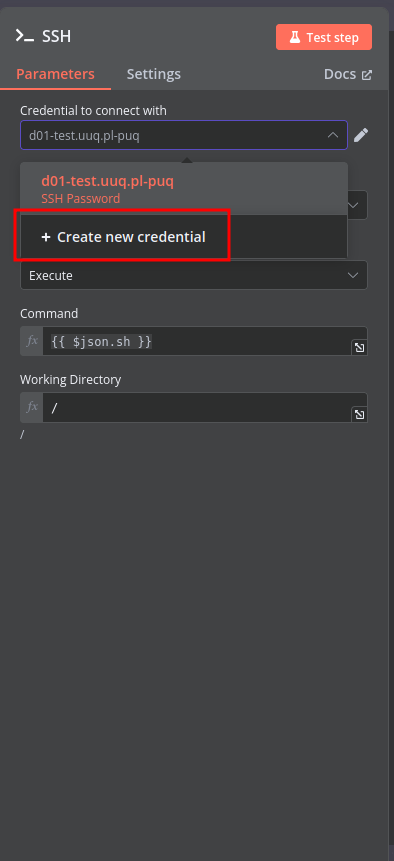
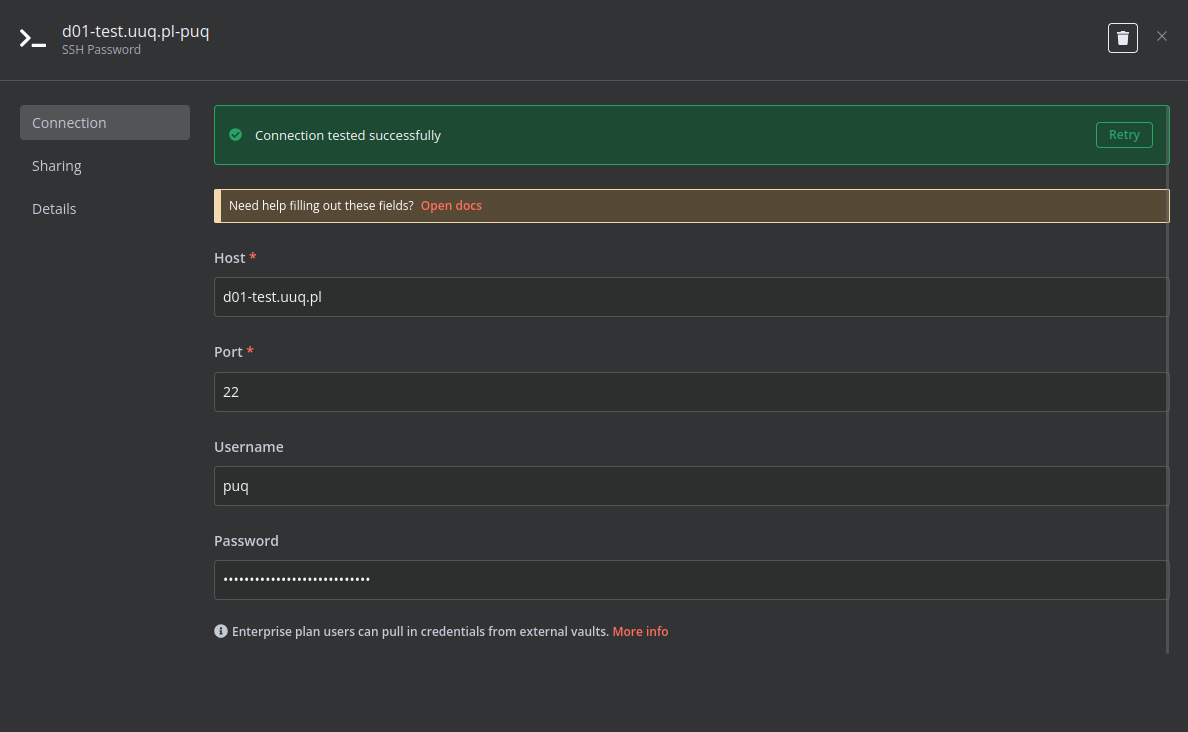
-
Create an SSH Credential for accessing a server with Docker installed.
2. Modify Template Parameters
In the Parameters block of the template, update the following settings:
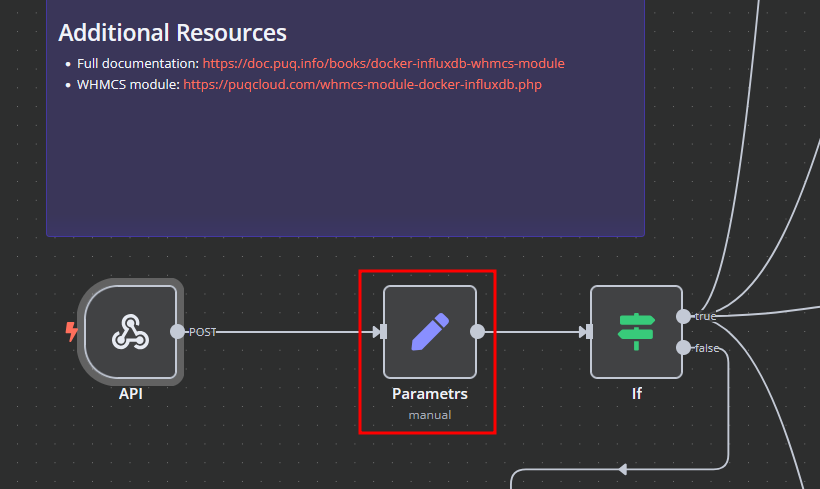
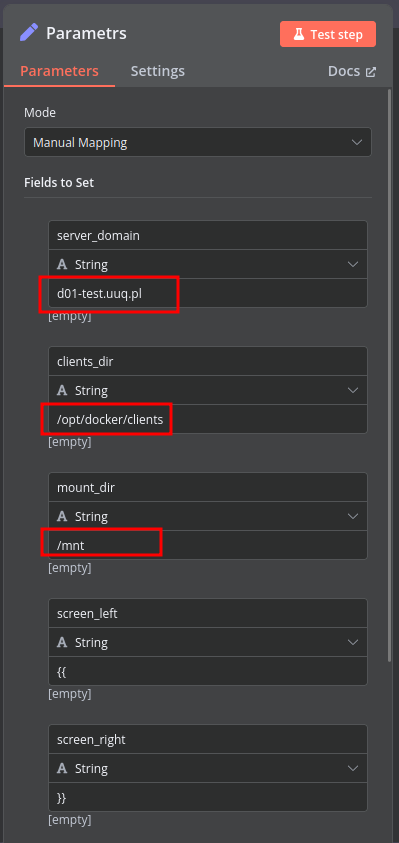
server_domain– Must match the domain of the WHMCS/WISECP Docker server.clients_dir– Directory where user data related to Docker and disks will be stored.mount_dir– Default mount point for the container disk (recommended not to change).
Do not modify the following technical parameters:
screen_leftscreen_right
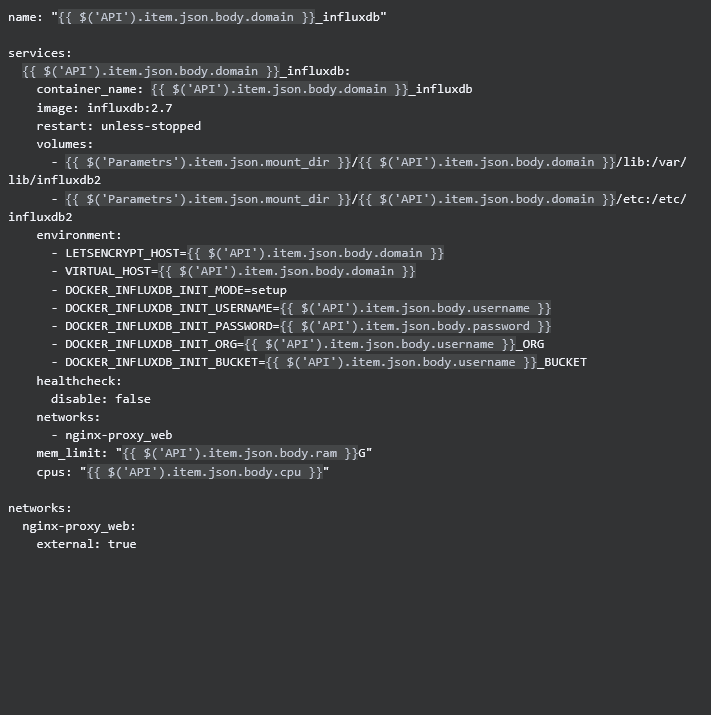
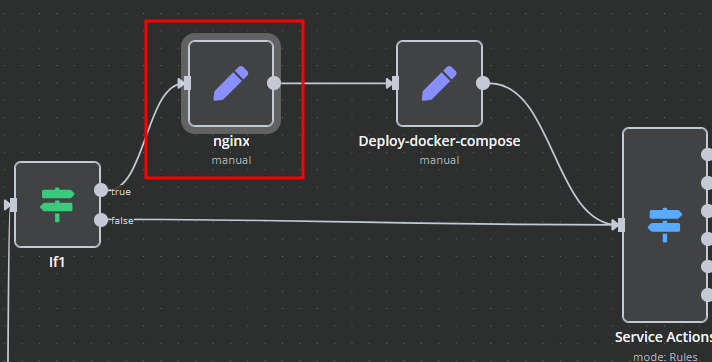
Deploy-docker-compose
In the Deploy-docker-compose element, you can modify the Docker Compose configuration. This is generated in the following scenarios:
- When the service is created
- When the service is unlocked
- When the service is updated
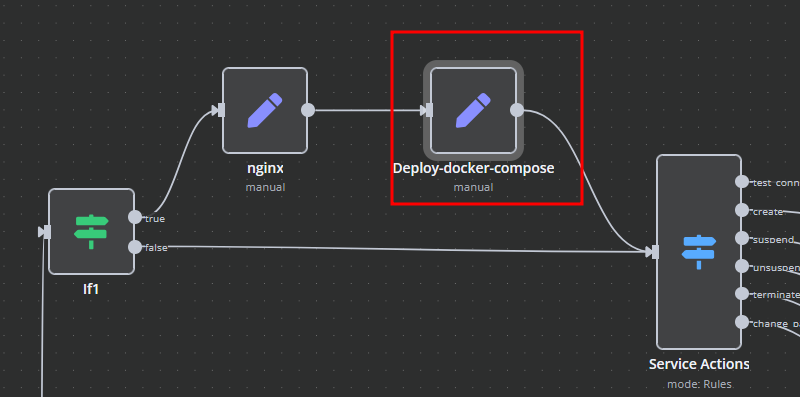
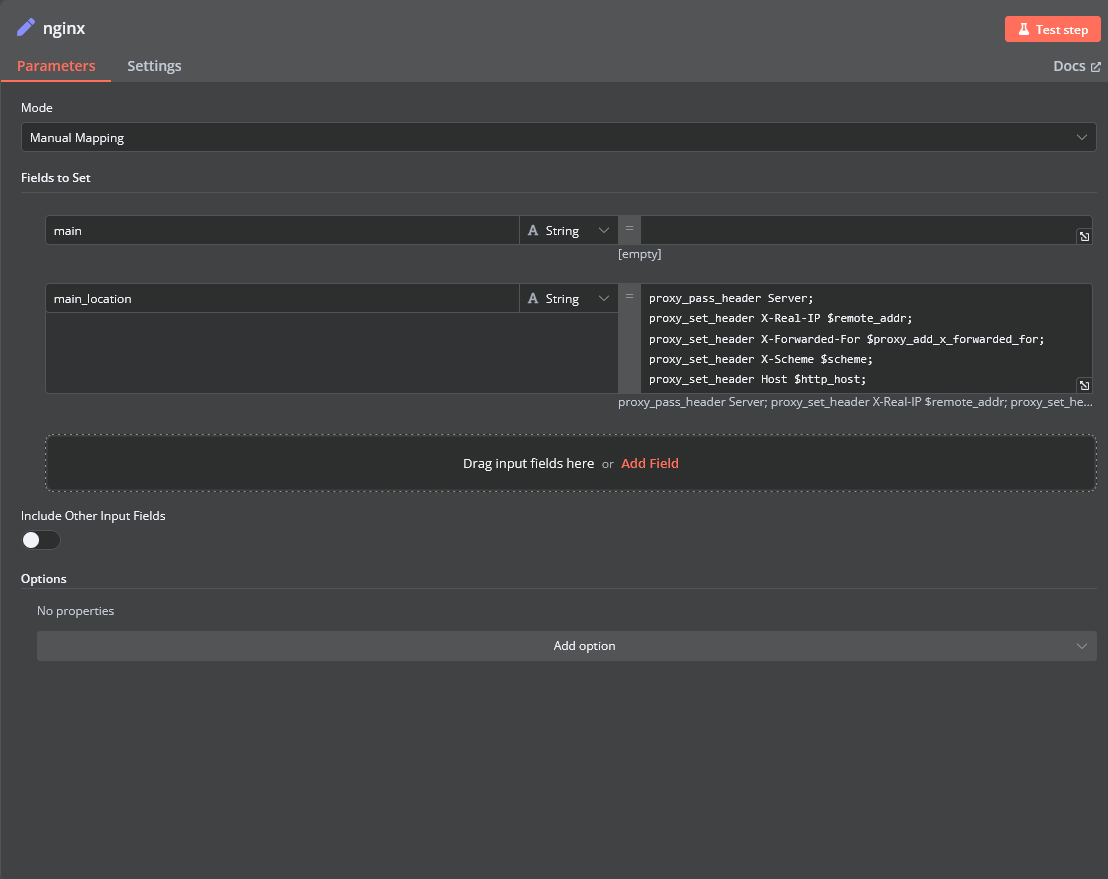
nginx
In the nginx element, you can modify configuration parameters of the web interface proxy server.
- The main section allows you to add custom parameters to the
serverblock in the proxy server configuration file. - The main_location section contains settings that will be added to the
location /block of the configuration. Here, you can define custom headers and parameters.
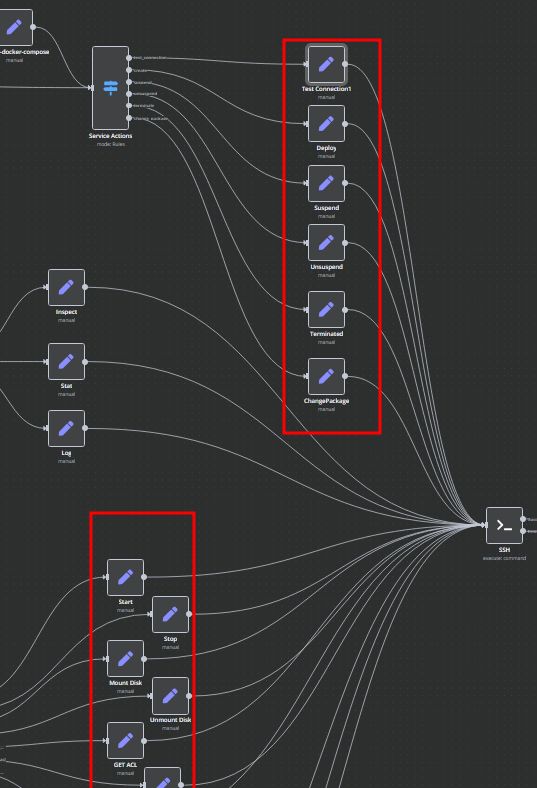
Bash Scripts
Management of Docker containers and related procedures is done by executing Bash scripts generated in n8n. These scripts return either JSON or plain strings.
- All scripts are located in elements directly connected to the SSH element.
- You have full control over any script and can modify or execute it as needed.
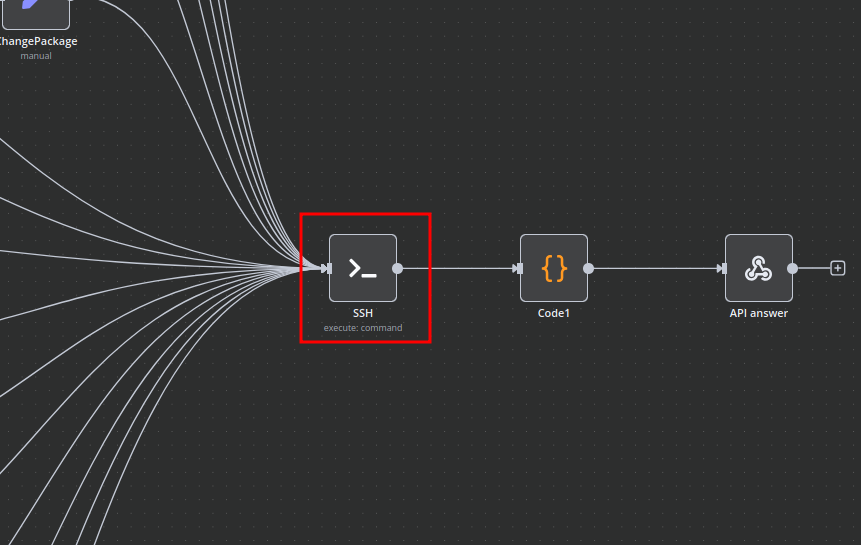
n8n Workflow: Basic Webhook Listener with Conditional Logic
This n8n workflow provides a foundational structure for receiving data via a webhook, applying conditional logic, and responding to the incoming request. It demonstrates how to set up an entry point for external systems and process the data based on specific criteria.
What it does
This workflow simplifies the process of:
- Receiving Webhook Data: It starts by listening for incoming HTTP requests at a defined webhook URL.
- Applying Conditional Logic: It evaluates the received data using a "Switch" node, allowing for different processing paths based on the value of a specific field (e.g.,
body.action). - Data Transformation (Optional): A "Set" node is included, demonstrating how to modify or add fields to the incoming data.
- SSH Command Execution (Optional): An SSH node is present, indicating the potential to execute remote commands based on the workflow's logic.
- Custom Code Execution (Optional): A "Code" node is available for executing custom JavaScript logic.
- Responding to the Webhook: It concludes by sending a response back to the system that initiated the webhook request.
Prerequisites/Requirements
- n8n Instance: A running n8n instance (self-hosted or cloud).
- Webhook Source: An external system or application configured to send HTTP POST requests to the n8n webhook URL.
- SSH Credentials (if using SSH node): If the SSH node is to be used, appropriate SSH credentials configured in n8n.
Setup/Usage
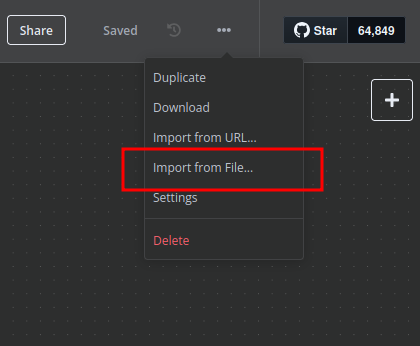
- Import the Workflow:
- Copy the provided JSON code.
- In your n8n instance, go to "Workflows" and click "New".
- Click the "Import from JSON" button and paste the copied JSON.
- Click "Import".
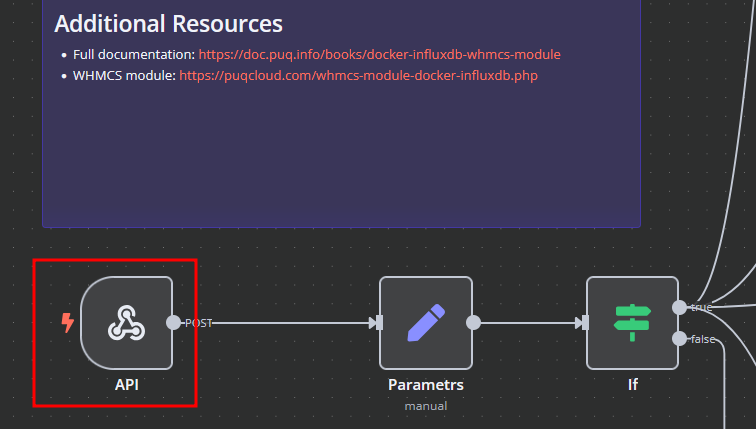
- Configure the Webhook Trigger:
- The "Webhook" node (ID: 47) is already configured to listen for POST requests.
- Activate the workflow to generate the unique webhook URL. You can find this URL in the "Webhook" node's settings once the workflow is active.
- Configure your external system to send data to this URL.
- Customize Conditional Logic:
- The "Switch" node (ID: 112) currently has no conditions defined. Click on it and add conditions based on the data you expect from your webhook. For example, you might check
{{ $json.body.action }}for values like "deploy", "update", or "delete".
- The "Switch" node (ID: 112) currently has no conditions defined. Click on it and add conditions based on the data you expect from your webhook. For example, you might check
- Customize Data Transformation:
- The "Edit Fields (Set)" node (ID: 38) is currently empty. You can use it to add, remove, or modify fields in the incoming data before further processing.
- Configure SSH Commands (if needed):
- The "SSH" node (ID: 490) is present but not connected. If you intend to execute SSH commands, connect it to the appropriate branch of your "Switch" node and configure the SSH credentials and commands to run.
- Add Custom Code (if needed):
- The "Code" node (ID: 834) is present but not connected. If you need to execute custom JavaScript logic, connect it to the appropriate branch and write your code.
- Configure Webhook Response:
- The "Respond to Webhook" node (ID: 535) is ready to send a response. You can customize the response body and HTTP status code as needed.
- Activate the Workflow: Once configured, activate the workflow to start listening for incoming webhook requests.
This workflow serves as a flexible template for building more complex automation tasks triggered by external events.
Related Templates
Track competitor SEO keywords with Decodo + GPT-4.1-mini + Google Sheets
This workflow automates competitor keyword research using OpenAI LLM and Decodo for intelligent web scraping. Who this is for SEO specialists, content strategists, and growth marketers who want to automate keyword research and competitive intelligence. Marketing analysts managing multiple clients or websites who need consistent SEO tracking without manual data pulls. Agencies or automation engineers using Google Sheets as an SEO data dashboard for keyword monitoring and reporting. What problem this workflow solves Tracking competitor keywords manually is slow and inconsistent. Most SEO tools provide limited API access or lack contextual keyword analysis. This workflow solves that by: Automatically scraping any competitor’s webpage with Decodo. Using OpenAI GPT-4.1-mini to interpret keyword intent, density, and semantic focus. Storing structured keyword insights directly in Google Sheets for ongoing tracking and trend analysis. What this workflow does Trigger — Manually start the workflow or schedule it to run periodically. Input Setup — Define the website URL and target country (e.g., https://dev.to, france). Data Scraping (Decodo) — Fetch competitor web content and metadata. Keyword Analysis (OpenAI GPT-4.1-mini) Extract primary and secondary keywords. Identify focus topics and semantic entities. Generate a keyword density summary and SEO strength score. Recommend optimization and internal linking opportunities. Data Structuring — Clean and convert GPT output into JSON format. Data Storage (Google Sheets) — Append structured keyword data to a Google Sheet for long-term tracking. Setup Prerequisites If you are new to Decode, please signup on this link visit.decodo.com n8n account with workflow editor access Decodo API credentials OpenAI API key Google Sheets account connected via OAuth2 Make sure to install the Decodo Community node. Create a Google Sheet Add columns for: primarykeywords, seostrengthscore, keyworddensity_summary, etc. Share with your n8n Google account. Connect Credentials Add credentials for: Decodo API credentials - You need to register, login and obtain the Basic Authentication Token via Decodo Dashboard OpenAI API (for GPT-4o-mini) Google Sheets OAuth2 Configure Input Fields Edit the “Set Input Fields” node to set your target site and region. Run the Workflow Click Execute Workflow in n8n. View structured results in your connected Google Sheet. How to customize this workflow Track Multiple Competitors → Use a Google Sheet or CSV list of URLs; loop through them using the Split In Batches node. Add Language Detection → Add a Gemini or GPT node before keyword analysis to detect content language and adjust prompts. Enhance the SEO Report → Expand the GPT prompt to include backlink insights, metadata optimization, or readability checks. Integrate Visualization → Connect your Google Sheet to Looker Studio for SEO performance dashboards. Schedule Auto-Runs → Use the Cron Node to run weekly or monthly for competitor keyword refreshes. Summary This workflow automates competitor keyword research using: Decodo for intelligent web scraping OpenAI GPT-4.1-mini for keyword and SEO analysis Google Sheets for live tracking and reporting It’s a complete AI-powered SEO intelligence pipeline ideal for teams that want actionable insights on keyword gaps, optimization opportunities, and content focus trends, without relying on expensive SEO SaaS tools.
 By Ranjan Dailata
Generate song lyrics and music from text prompts using OpenAI and Fal.ai Minimax
Spark your creativity instantly in any chat—turn a simple prompt like "heartbreak ballad" into original, full-length lyrics and a professional AI-generated music track, all without leaving your conversation. 📋 What This Template Does This chat-triggered workflow harnesses AI to generate detailed, genre-matched song lyrics (at least 600 characters) from user messages, then queues them for music synthesis via Fal.ai's minimax-music model. It polls asynchronously until the track is ready, delivering lyrics and audio URL back in chat. Crafts original, structured lyrics with verses, choruses, and bridges using OpenAI Submits to Fal.ai for melody, instrumentation, and vocals aligned to the style Handles long-running generations with smart looping and status checks Returns complete song package (lyrics + audio link) for seamless sharing 🔧 Prerequisites n8n account (self-hosted or cloud with chat integration enabled) OpenAI account with API access for GPT models Fal.ai account for AI music generation 🔑 Required Credentials OpenAI API Setup Go to platform.openai.com → API keys (sidebar) Click "Create new secret key" → Name it (e.g., "n8n Songwriter") Copy the key and add to n8n as "OpenAI API" credential type Test by sending a simple chat completion request Fal.ai HTTP Header Auth Setup Sign up at fal.ai → Dashboard → API Keys Generate a new API key → Copy it In n8n, create "HTTP Header Auth" credential: Name="Fal.ai", Header Name="Authorization", Header Value="Key [Your API Key]" Test with a simple GET to their queue endpoint (e.g., /status) ⚙️ Configuration Steps Import the workflow JSON into your n8n instance Assign OpenAI API credentials to the "OpenAI Chat Model" node Assign Fal.ai HTTP Header Auth to the "Generate Music Track", "Check Generation Status", and "Fetch Final Result" nodes Activate the workflow—chat trigger will appear in your n8n chat interface Test by messaging: "Create an upbeat pop song about road trips" 🎯 Use Cases Content Creators: YouTubers generating custom jingles for videos on the fly, streamlining production from idea to audio export Educators: Music teachers using chat prompts to create era-specific folk tunes for classroom discussions, fostering interactive learning Gift Personalization: Friends crafting anniversary R&B tracks from shared memories via quick chats, delivering emotional audio surprises Artist Brainstorming: Songwriters prototyping hip-hop beats in real-time during sessions, accelerating collaboration and iteration ⚠️ Troubleshooting Invalid JSON from AI Agent: Ensure the system prompt stresses valid JSON; test the agent standalone with a sample query Music Generation Fails (401/403): Verify Fal.ai API key has minimax-music access; check usage quotas in dashboard Status Polling Loops Indefinitely: Bump wait time to 45-60s for complex tracks; inspect fal.ai queue logs for bottlenecks Lyrics Under 600 Characters: Tweak agent prompt to enforce fuller structures like [V1][C][V2][B][C]; verify output length in executions
 By Daniel Nkencho
Automate invoice processing with OCR, GPT-4 & Salesforce opportunity creation
PDF Invoice Extractor (AI) End-to-end pipeline: Watch Drive ➜ Download PDF ➜ OCR text ➜ AI normalize to JSON ➜ Upsert Buyer (Account) ➜ Create Opportunity ➜ Map Products ➜ Create OLI via Composite API ➜ Archive to OneDrive. --- Node by node (what it does & key setup) 1) Google Drive Trigger Purpose: Fire when a new file appears in a specific Google Drive folder. Key settings: Event: fileCreated Folder ID: google drive folder id Polling: everyMinute Creds: googleDriveOAuth2Api Output: Metadata { id, name, ... } for the new file. --- 2) Download File From Google Purpose: Get the file binary for processing and archiving. Key settings: Operation: download File ID: ={{ $json.id }} Creds: googleDriveOAuth2Api Output: Binary (default key: data) and original metadata. --- 3) Extract from File Purpose: Extract text from PDF (OCR as needed) for AI parsing. Key settings: Operation: pdf OCR: enable for scanned PDFs (in options) Output: JSON with OCR text at {{ $json.text }}. --- 4) Message a model (AI JSON Extractor) Purpose: Convert OCR text into strict normalized JSON array (invoice schema). Key settings: Node: @n8n/n8n-nodes-langchain.openAi Model: gpt-4.1 (or gpt-4.1-mini) Message role: system (the strict prompt; references {{ $json.text }}) jsonOutput: true Creds: openAiApi Output (per item): $.message.content → the parsed JSON (ensure it’s an array). --- 5) Create or update an account (Salesforce) Purpose: Upsert Buyer as Account using an external ID. Key settings: Resource: account Operation: upsert External Id Field: taxid_c External Id Value: ={{ $json.message.content.buyer.tax_id }} Name: ={{ $json.message.content.buyer.name }} Creds: salesforceOAuth2Api Output: Account record (captures Id) for downstream Opportunity. --- 6) Create an opportunity (Salesforce) Purpose: Create Opportunity linked to the Buyer (Account). Key settings: Resource: opportunity Name: ={{ $('Message a model').item.json.message.content.invoice.code }} Close Date: ={{ $('Message a model').item.json.message.content.invoice.issue_date }} Stage: Closed Won Amount: ={{ $('Message a model').item.json.message.content.summary.grand_total }} AccountId: ={{ $json.id }} (from Upsert Account output) Creds: salesforceOAuth2Api Output: Opportunity Id for OLI creation. --- 7) Build SOQL (Code / JS) Purpose: Collect unique product codes from AI JSON and build a SOQL query for PricebookEntry by Pricebook2Id. Key settings: pricebook2Id (hardcoded in script): e.g., 01sxxxxxxxxxxxxxxx Source lines: $('Message a model').first().json.message.content.products Output: { soql, codes } --- 8) Query PricebookEntries (Salesforce) Purpose: Fetch PricebookEntry.Id for each Product2.ProductCode. Key settings: Resource: search Query: ={{ $json.soql }} Creds: salesforceOAuth2Api Output: Items with Id, Product2.ProductCode (used for mapping). --- 9) Code in JavaScript (Build OLI payloads) Purpose: Join lines with PBE results and Opportunity Id ➜ build OpportunityLineItem payloads. Inputs: OpportunityId: ={{ $('Create an opportunity').first().json.id }} Lines: ={{ $('Message a model').first().json.message.content.products }} PBE rows: from previous node items Output: { body: { allOrNone:false, records:[{ OpportunityLineItem... }] } } Notes: Converts discount_total ➜ per-unit if needed (currently commented for standard pricing). Throws on missing PBE mapping or empty lines. --- 10) Create Opportunity Line Items (HTTP Request) Purpose: Bulk create OLIs via Salesforce Composite API. Key settings: Method: POST URL: https://<your-instance>.my.salesforce.com/services/data/v65.0/composite/sobjects Auth: salesforceOAuth2Api (predefined credential) Body (JSON): ={{ $json.body }} Output: Composite API results (per-record statuses). --- 11) Update File to One Drive Purpose: Archive the original PDF in OneDrive. Key settings: Operation: upload File Name: ={{ $json.name }} Parent Folder ID: onedrive folder id Binary Data: true (from the Download node) Creds: microsoftOneDriveOAuth2Api Output: Uploaded file metadata. --- Data flow (wiring) Google Drive Trigger → Download File From Google Download File From Google → Extract from File → Update File to One Drive Extract from File → Message a model Message a model → Create or update an account Create or update an account → Create an opportunity Create an opportunity → Build SOQL Build SOQL → Query PricebookEntries Query PricebookEntries → Code in JavaScript Code in JavaScript → Create Opportunity Line Items --- Quick setup checklist 🔐 Credentials: Connect Google Drive, OneDrive, Salesforce, OpenAI. 📂 IDs: Drive Folder ID (watch) OneDrive Parent Folder ID (archive) Salesforce Pricebook2Id (in the JS SOQL builder) 🧠 AI Prompt: Use the strict system prompt; jsonOutput = true. 🧾 Field mappings: Buyer tax id/name → Account upsert fields Invoice code/date/amount → Opportunity fields Product name must equal your Product2.ProductCode in SF. ✅ Test: Drop a sample PDF → verify: AI returns array JSON only Account/Opportunity created OLI records created PDF archived to OneDrive --- Notes & best practices If PDFs are scans, enable OCR in Extract from File. If AI returns non-JSON, keep “Return only a JSON array” as the last line of the prompt and keep jsonOutput enabled. Consider adding validation on parsing.warnings to gate Salesforce writes. For discounts/taxes in OLI: Standard OLI fields don’t support per-line discount amounts directly; model them in UnitPrice or custom fields. Replace the Composite API URL with your org’s domain or use the Salesforce node’s Bulk Upsert for simplicity.
 By Le Nguyen