Deploy docker Grafana, API backend for WHMCS/WISECP

Setting up n8n workflow
Overview
The Docker Grafana WHMCS module uses a specially designed workflow for n8n to automate deployment processes. The workflow provides an API interface for the module, receives specific commands, and connects via SSH to a server with Docker installed to perform predefined actions.
Prerequisites
- You must have your own n8n server.
- Alternatively, you can use the official n8n cloud installations available at: n8n Official Site
Installation Steps
Install the Required Workflow on n8n
You have two options:
Option 1: Use the Latest Version from the n8n Marketplace
- The latest workflow templates for our modules are available on the official n8n marketplace.
- Visit our profile to access all available templates: PUQcloud on n8n
Option 2: Manual Installation
- Each module version comes with a workflow template file.
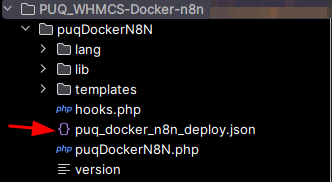
- You need to manually import this template into your n8n server.


n8n Workflow API Backend Setup for WHMCS/WISECP
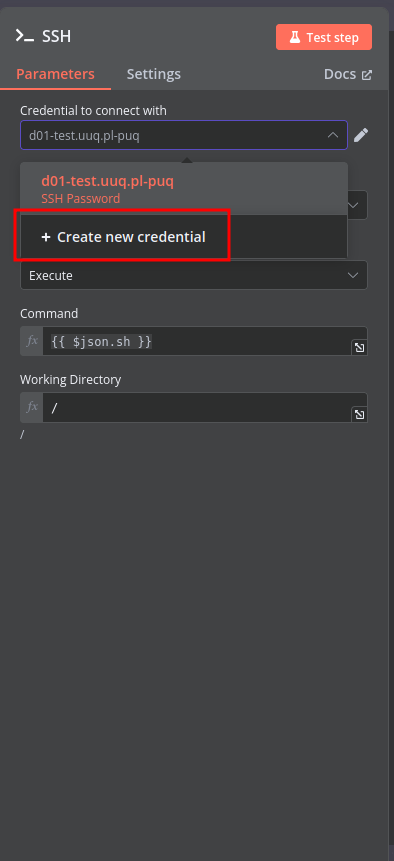
Configure API Webhook and SSH Access
-
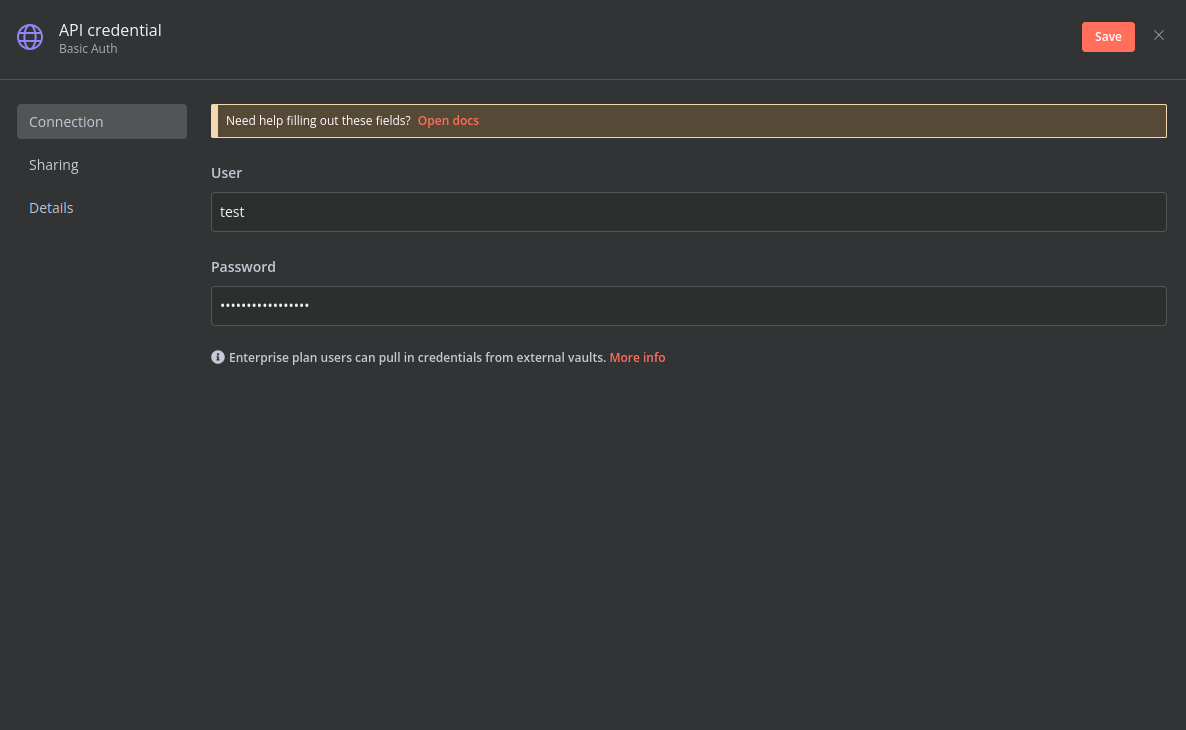
Create a Basic Auth Credential for the Webhook API Block in n8n.

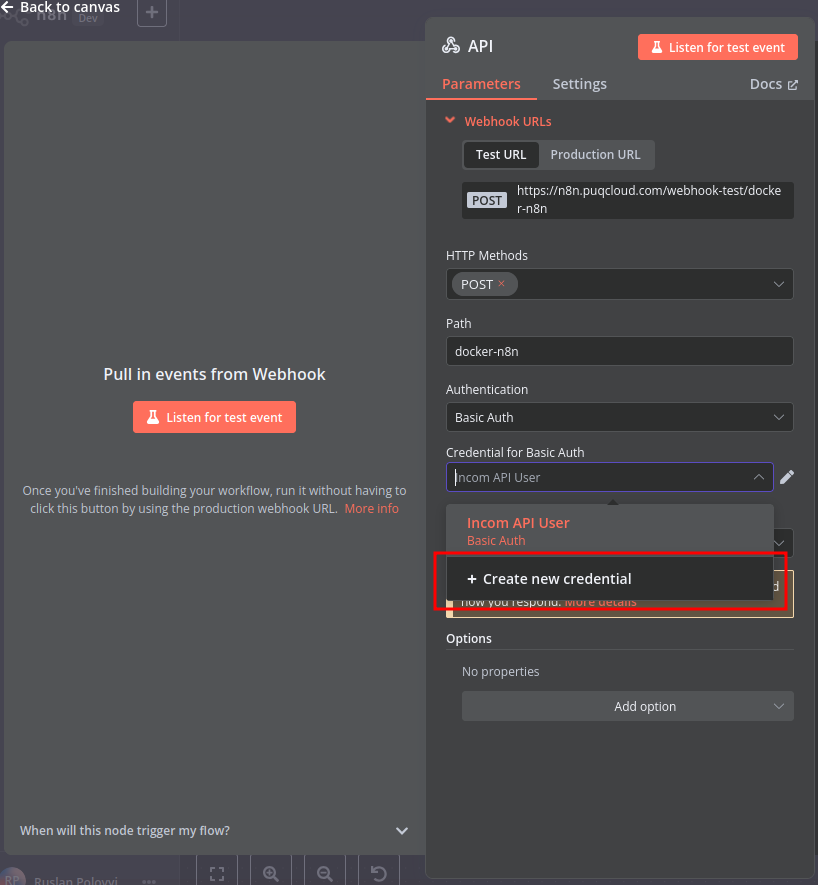
-
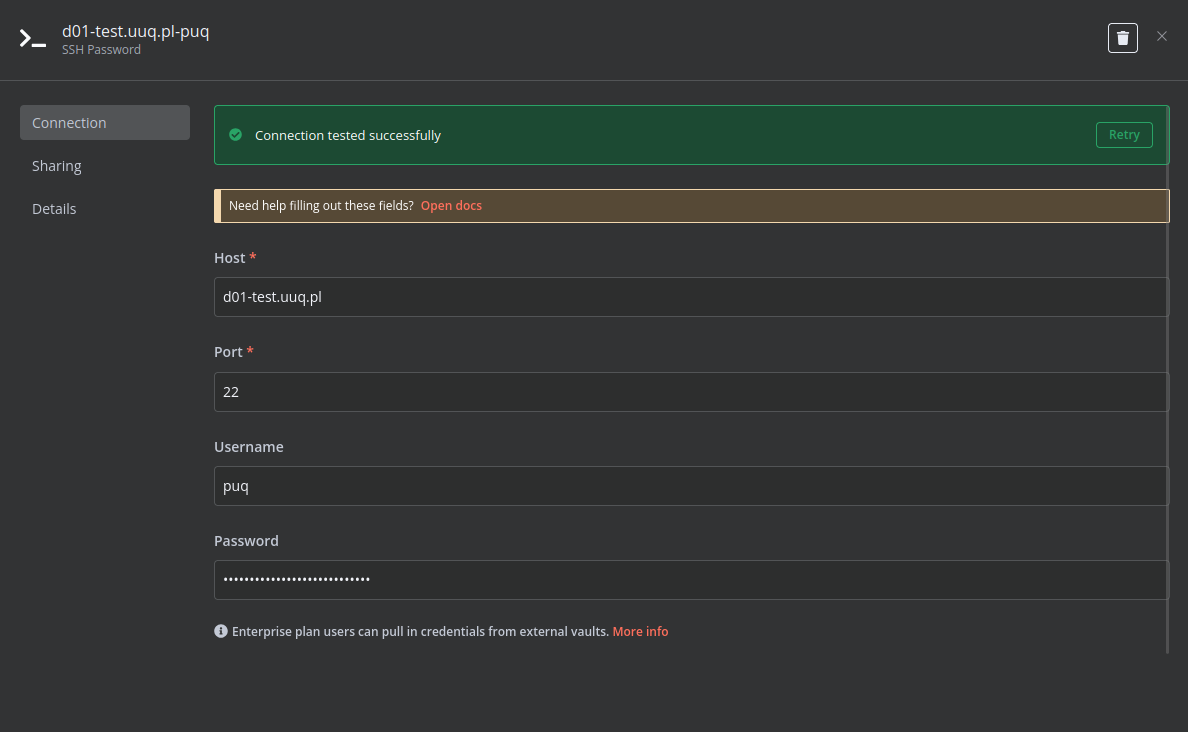
Create an SSH Credential for accessing a server with Docker installed.

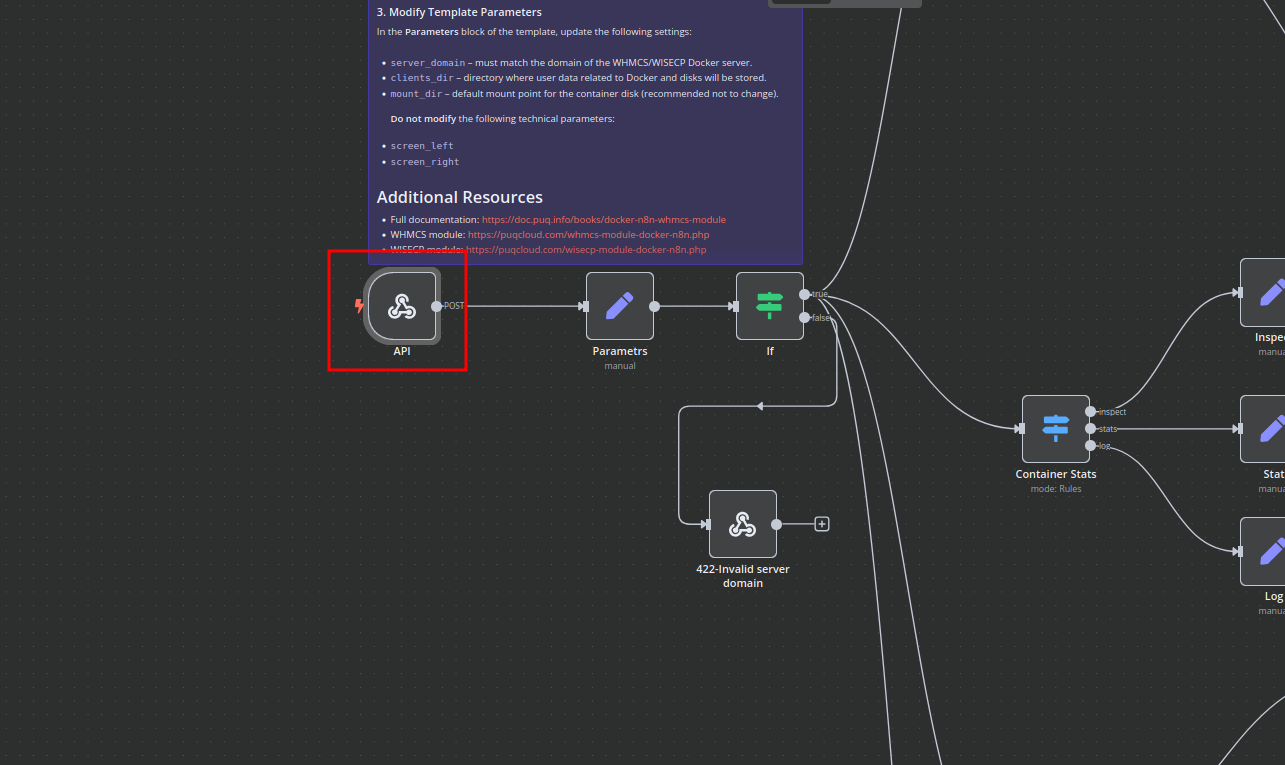


Modify Template Parameters
In the Parameters block of the template, update the following settings:
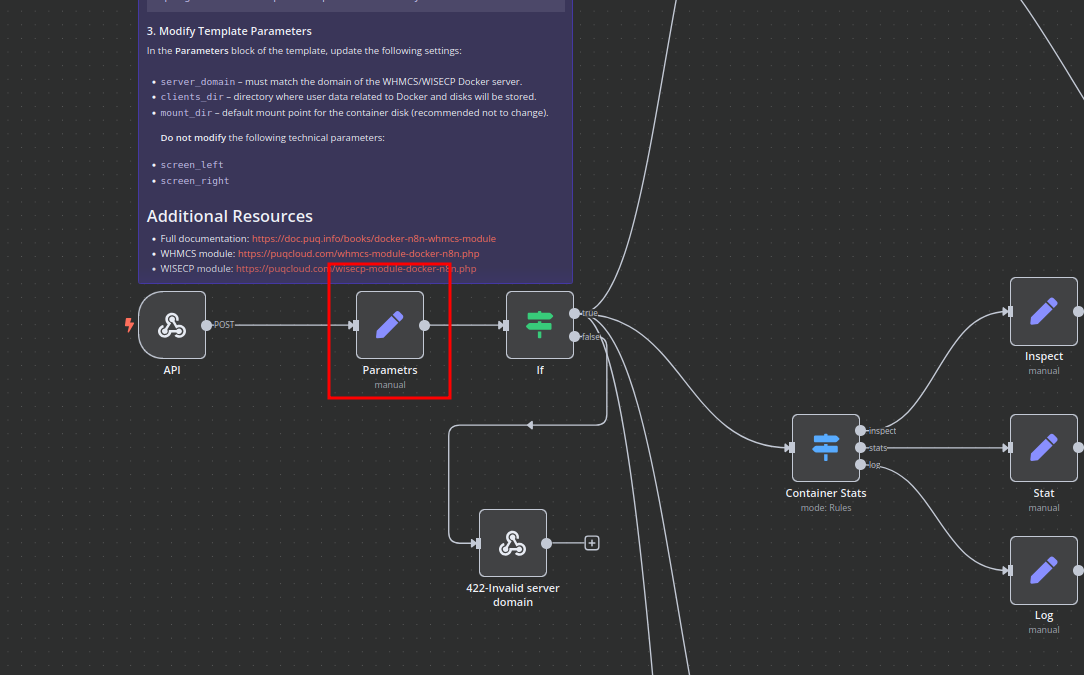
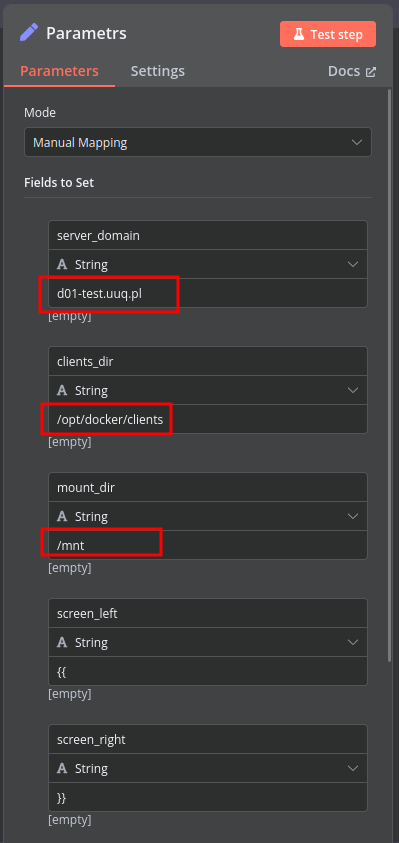
server_domain– Must match the domain of the WHMCS/WISECP Docker server.clients_dir– Directory where user data related to Docker and disks will be stored.mount_dir– Default mount point for the container disk (recommended not to change).
Do not modify the following technical parameters:
screen_leftscreen_right
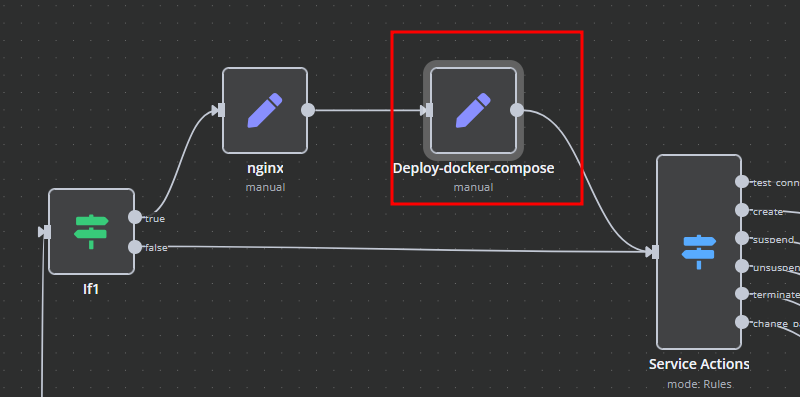
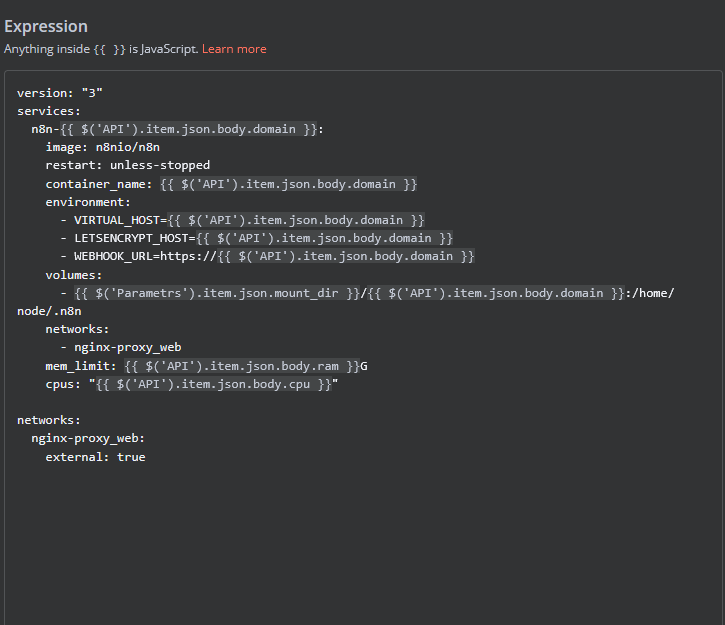
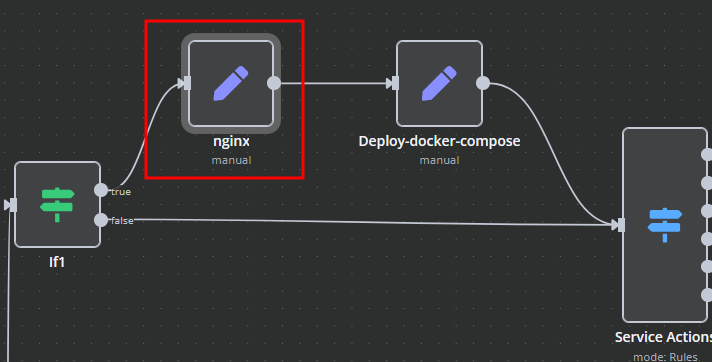
Deploy-docker-compose
In the Deploy-docker-compose element, you have the ability to modify the Docker Compose configuration, which will be generated in the following scenarios:
- When the service is created
- When the service is unlocked
- When the service is updated
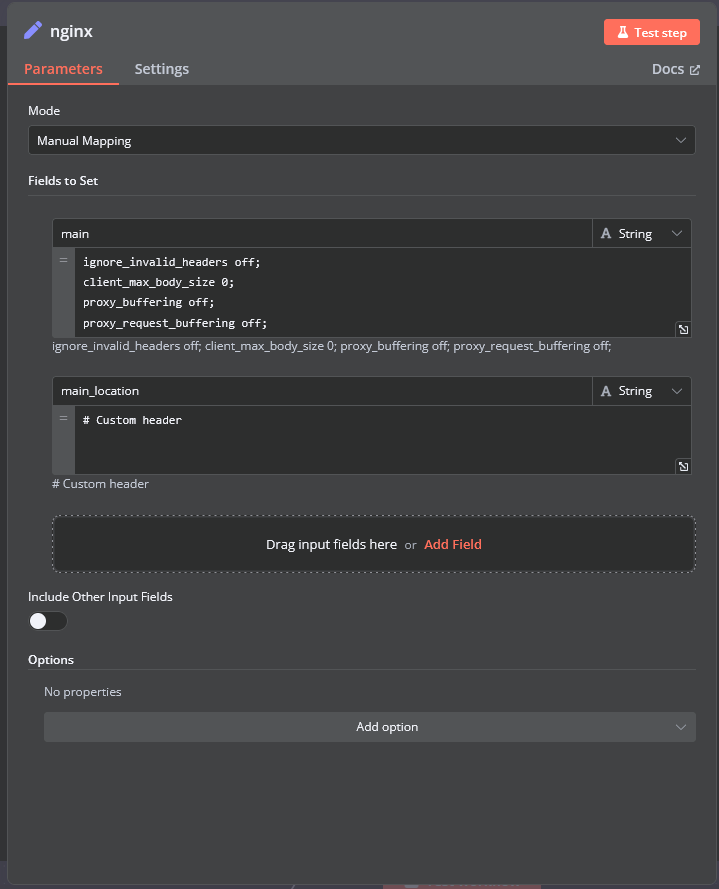
nginx
In the nginx element, you can modify the configuration parameters of the web interface proxy server.
- The main section allows you to add custom parameters to the server block in the proxy server configuration file.
- The main_location section contains settings that will be added to the location / block of the proxy server configuration. Here, you can define custom headers and other parameters specific to the root location.
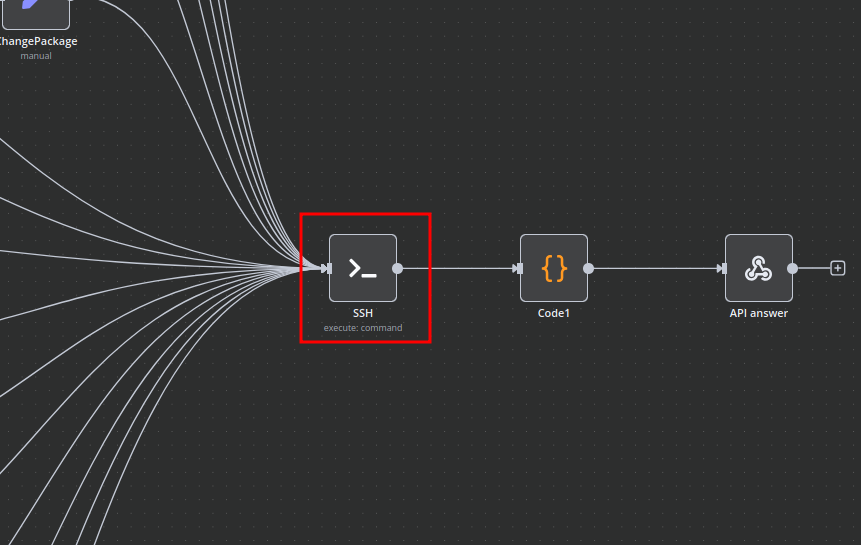
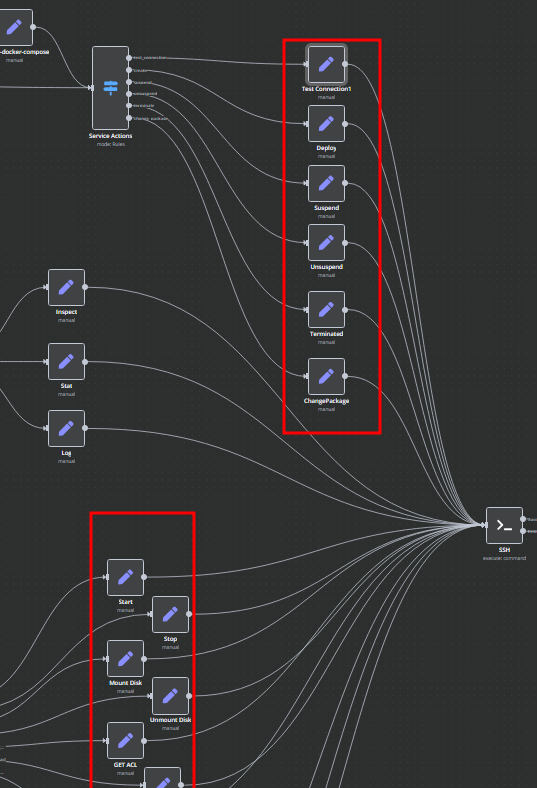
Bash Scripts
Management of Docker containers and all related procedures on the server is carried out by executing Bash scripts generated in n8n. These scripts return either a JSON response or a string.
- All scripts are located in elements directly connected to the SSH element.
- You have full control over any script and can modify or execute it as needed.
n8n Docker Container Deployment Workflow
This n8n workflow provides a robust and flexible system for deploying Docker containers based on incoming webhook requests. It allows for conditional logic to determine the deployment action, customizes environment variables, and executes SSH commands on a remote server.
What it does
This workflow automates the following steps:
- Listens for Webhook Requests: It starts by waiting for an incoming HTTP POST request to a defined webhook URL.
- Initial Data Transformation: It processes the incoming webhook data to prepare it for subsequent logic.
- Conditional Routing (If Node): It evaluates the processed data using an "If" node to determine the next course of action. This could be based on specific payload values, headers, or query parameters.
- Conditional Routing (Switch Node): Further refines the routing based on multiple possible conditions, allowing for different deployment scenarios or actions depending on the input.
- Environment Variable Preparation: For specific conditions, it uses a "Set" node to define or modify environment variables or other data points required for the deployment.
- Custom Code Execution: It includes a "Code" node, which allows for custom JavaScript logic to be executed. This can be used for complex data manipulation, validation, or generating dynamic commands.
- Remote SSH Command Execution: It connects to a remote server via SSH and executes commands. This is typically where the Docker deployment commands (e.g.,
docker pull,docker run,docker-compose up) would be performed. - Responds to Webhook: After processing, it sends a response back to the original webhook caller, indicating the status or outcome of the deployment attempt.
- Sticky Note: Includes a sticky note for internal documentation or reminders within the workflow.
Prerequisites/Requirements
To use this workflow, you will need:
- n8n Instance: A running n8n instance to host the workflow.
- Webhook Caller: An external system or application that can send HTTP POST requests to the n8n webhook URL.
- SSH Access: Credentials (host, username, private key/password) for an SSH server where Docker containers will be deployed.
- Docker/Docker Compose: Docker and potentially Docker Compose installed on the target SSH server.
- Understanding of JSON: Familiarity with JSON data structures for configuring webhook payloads and data transformations.
Setup/Usage
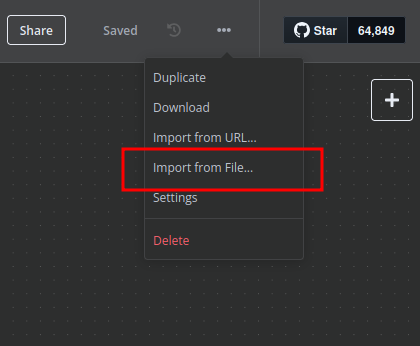
- Import the Workflow:
- Copy the provided JSON workflow definition.
- In your n8n instance, go to "Workflows" and click "New".
- Click the "Import from JSON" button and paste the copied JSON.
- Configure the Webhook Trigger:
- Locate the "Webhook" node (ID: 47).
- Set the "HTTP Method" to
POST. - Copy the "Webhook URL" provided by n8n. This is the endpoint your external system will call.
- Configure SSH Credentials:
- Locate the "SSH" node (ID: 490).
- Click on "Credentials" and add a new SSH credential.
- Provide the SSH Host, Username, and either a Private Key or Password for authentication to your deployment server.
- Specify the SSH commands to be executed for your Docker deployment. These commands will likely vary based on your specific application and Docker setup (e.g.,
cd /path/to/app && docker-compose pull && docker-compose up -d).
- Configure Conditional Logic (If & Switch Nodes):
- Review the "If" node (ID: 20) and "Switch" node (ID: 112).
- Adjust the conditions based on the expected payload from your webhook. For example, you might check for a specific
event_typeorrepository_namein the incoming JSON. - Define the different branches for
true/falsein the "If" node and various "Cases" in the "Switch" node to handle different deployment scenarios.
- Customize Data Transformations (Edit Fields & Code Nodes):
- Modify the "Edit Fields" (Set) node (ID: 38) to extract, rename, or add data points from the incoming webhook payload that are relevant to your deployment.
- Adjust the "Code" node (ID: 834) to implement any custom logic, such as dynamically generating Docker image tags, filtering data, or performing complex validation.
- Configure Webhook Response:
- Review the "Respond to Webhook" node (ID: 535).
- Customize the response body and status code to provide meaningful feedback to the system that triggered the webhook.
- Activate the Workflow:
- Once configured, save the workflow and activate it by toggling the "Active" switch in the top right corner of the n8n editor.
Your workflow is now ready to receive webhook requests and automate your Docker container deployments.
Related Templates
Automate interior design lead qualification with AI & human approval to Notion
Overview This automated workflow intelligently qualifies interior design leads, generates personalized client emails, and manages follow-up through a human-approval process. Built with n8n, Claude AI, Telegram approval, and Notion database integration. ⚠️ Hosting Options This template works with both n8n Cloud and self-hosted instances. Most nodes are native to n8n, making it cloud-compatible out of the box. What This Template Does Automated Lead Management Pipeline: Captures client intake form submissions from website or n8n forms AI-powered classification into HOT/WARM/COLD categories based on budget, project scope, and commitment indicators Generates personalized outreach emails tailored to each lead type Human approval workflow via Telegram for quality control Email revision capability for rejected drafts Automated client email delivery via Gmail Centralized lead tracking in Notion database Key Features ✅ Intelligent Lead Scoring: Analyzes 12+ data points including budget (AED), space count, project type, timeline, and style preferences ✅ Personalized Communication: AI-generated emails reference specific client details, demonstrating genuine understanding ✅ Quality Control: Human-in-the-loop approval via Telegram prevents errors before client contact ✅ Smart Routing: Different workflows for qualified leads (meeting invitations) vs. unqualified leads (respectful alternatives) ✅ Revision Loop: Rejected emails automatically route to revision agent for improvements ✅ Database Integration: All leads stored in Notion for pipeline tracking and analytics Use Cases Interior design firms managing high-volume lead intake Architecture practices with complex qualification criteria Home renovation companies prioritizing project value Any service business requiring budget-based lead scoring Sales teams needing approval workflows before client contact Prerequisites Required Accounts & API Keys: Anthropic Claude API - For AI classification and email generation Telegram Bot Token - For approval notifications Gmail Account - For sending client emails (or any SMTP provider) Notion Account - For lead database storage n8n Account - Cloud or self-hosted instance Technical Requirements: Basic understanding of n8n workflows Ability to create Telegram bots via BotFather Gmail app password or OAuth setup Notion database with appropriate properties Setup Instructions Step 1: Clone and Import Template Copy this template to your n8n instance (cloud or self-hosted) All nodes will appear as inactive - this is normal Step 2: Configure Form Trigger Open the Client Intake Form Trigger node Choose your trigger type: For n8n forms: Configure form fields matching the template structure For webhook: Copy webhook URL and integrate with your website form Required form fields: First Name, Second Name, Email, Contact Number Project Address, Project Type, Spaces Included Budget Range, Completion Date, Style Preferences Involvement Level, Previous Experience, Inspiration Links Step 3: Set Up Claude AI Credentials Obtain API key from https://console.anthropic.com In n8n: Create new credential → Anthropic → Paste API key Apply credential to these nodes: AI Lead Scoring Engine Personalized Client Outreach Email Generator Email Revision Agent Step 4: Configure Telegram Approval Bot Create bot via Telegram's @BotFather Copy bot token Get your Telegram Chat ID (use @userinfobot) In n8n: Create Telegram credential with bot token Configure Human-in-the-Loop Email Approval node: Add your Chat ID Customize approval message format if desired Step 5: Set Up Gmail Sending Enable 2-factor authentication on Gmail account Generate app password: Google Account → Security → App Passwords In n8n: Create Gmail credential using app password Configure Client Email Delivery node with sender details Step 6: Connect Notion Database Create Notion integration at https://www.notion.so/my-integrations Copy integration token Create database with these properties: Client Name (Title), Email (Email), Contact Number (Phone) Project Address (Text), Project Type (Multi-select) Spaces Included (Text), Budget (Select), Timeline (Date) Classification (Select: HOT/WARM/COLD), Confidence (Select) Estimated Value (Number), Status (Select) Share database with your integration In n8n: Add Notion credential → Paste token Configure Notion Lead Database Manager with database ID Step 7: Customize Classification Rules (Optional) Open AI Lead Scoring Engine node Review classification criteria in the prompt: HOT: 500k+ AED, full renovations, 2+ spaces WARM: 100k+ AED, 2+ spaces COLD: <100k AED OR single space Adjust thresholds to match your business requirements Modify currency if not using AED Step 8: Personalize Email Templates Open Personalized Client Outreach Email Generator node Customize: Company name and branding Signature placeholders ([Your Name], [Title], etc.) Tone and style preferences Alternative designer recommendations for COLD leads Step 9: Test the Workflow Activate the workflow Submit a test form with sample data Monitor each node execution in n8n Check Telegram for approval message Verify email delivery and Notion database entry Step 10: Set Up Error Handling (Recommended) Add error workflow trigger Configure notifications for failed executions Set up retry logic for API failures Workflow Node Breakdown Client Intake Form Trigger Captures lead data from website forms or n8n native forms with all project details. AI Lead Scoring Engine Analyzes intake data using structured logic: budget validation, space counting, and multi-factor evaluation. Returns HOT/WARM/COLD classification with confidence scores. Lead Classification Router Routes leads into three priority workflows based on AI classification, optimizing resource allocation. Sales Team Email Notifier Sends instant alerts to sales representatives with complete lead details and AI reasoning for internal tracking. Personalized Client Outreach Email Generator AI-powered composer creating tailored responses demonstrating genuine understanding of client vision, adapted by lead type. Latest Email Version Controller Captures most recent email output ensuring only final approved version proceeds to delivery. Human-in-the-Loop Email Approval Telegram-based review checkpoint sending generated emails to team member for quality control before client delivery. Approval Decision Router Evaluates reviewer's response, routing approved emails to client delivery or rejected emails to revision agent. Email Revision Agent AI-powered editor refining rejected emails based on feedback while maintaining personalization and brand voice. Client Email Delivery Sends final approved personalized emails demonstrating understanding of project vision with clear next steps. Notion Lead Database Manager Records all potential clients with complete intake data, classification results, and tracking information for pipeline management. Customization Tips Adjust Classification Thresholds: Modify budget ranges and space requirements in the AI Lead Scoring Engine prompt to match your market and service level. Multi-Language Support: Update all AI agent prompts with instructions for your target language. Claude supports 100+ languages. Additional Routing: Add branches for special cases like urgent projects, VIP clients, or specific geographic regions. CRM Integration: Replace Notion with HubSpot, Salesforce, or Airtable using respective n8n nodes. SMS Notifications: Add Twilio node for immediate HOT lead alerts to mobile devices. Troubleshooting Issue: Telegram approval not received Verify bot token is correct Confirm chat ID matches your Telegram account Check bot is not blocked Issue: Claude API errors Verify API key validity and credits Check prompt length isn't exceeding token limits Review rate limits on your Anthropic plan Issue: Gmail not sending Confirm app password (not regular password) is used Check "Less secure app access" if using older method Verify daily sending limits not exceeded Issue: Notion database not updating Confirm integration has access to database Verify property names match exactly (case-sensitive) Check property types align with data being sent Template Metrics Execution Time: ~30-45 seconds per lead (including AI processing) API Calls: 2-3 Claude requests per lead (classification + email generation, +1 if revision) Cost Estimate: ~$0.05-0.15 per lead processed (based on Claude API pricing) Support & Community n8n Community Forum: https://community.n8n.io Template Issues: Report bugs or suggest improvements via n8n template feedback Claude Documentation: https://docs.anthropic.com Notion API Docs: https://developers.notion.com License This template is provided as-is under MIT license. Modify and adapt freely for your business needs. --- Version: 1.0 Last Updated: October 2025 Compatibility: n8n v1.0+ (Cloud & Self-Hosted), Claude API v2024-10+
 By Jameson Kanakulya
Automated UGC video generator with Gemini images and SORA 2
This workflow automates the creation of user-generated-content-style product videos by combining Gemini's image generation with OpenAI's SORA 2 video generation. It accepts webhook requests with product descriptions, generates images and videos, stores them in Google Drive, and logs all outputs to Google Sheets for easy tracking. Main Use Cases Automate product video creation for e-commerce catalogs and social media. Generate UGC-style content at scale without manual design work. Create engaging video content from simple text prompts for marketing campaigns. Build a centralized library of product videos with automated tracking and storage. How it works The workflow operates as a webhook-triggered process, organized into these stages: Webhook Trigger & Input Accepts POST requests to the /create-ugc-video endpoint. Required payload includes: product prompt, video prompt, Gemini API key, and OpenAI API key. Image Generation (Gemini) Sends the product prompt to Google's Gemini 2.5 Flash Image model. Generates a product image based on the description provided. Data Extraction Code node extracts the base64 image data from Gemini's response. Preserves all prompts and API keys for subsequent steps. Video Generation (SORA 2) Sends the video prompt to OpenAI's SORA 2 API. Initiates video generation with specifications: 720x1280 resolution, 8 seconds duration. Returns a video generation job ID for polling. Video Status Polling Continuously checks video generation status via OpenAI API. If status is "completed": proceeds to download. If status is still processing: waits 1 minute and retries (polling loop). Video Download & Storage Downloads the completed video file from OpenAI. Uploads the MP4 file to Google Drive (root folder). Generates a shareable Google Drive link. Logging to Google Sheets Records all generation details in a tracking spreadsheet: Product description Video URL (Google Drive link) Generation status Timestamp Summary Flow: Webhook Request → Generate Product Image (Gemini) → Extract Image Data → Generate Video (SORA 2) → Poll Status → If Complete: Download Video → Upload to Google Drive → Log to Google Sheets → Return Response If Not Complete: Wait 1 Minute → Poll Status Again Benefits: Fully automated video creation pipeline from text to finished product. Scalable solution for generating multiple product videos on demand. Combines cutting-edge AI models (Gemini + SORA 2) for high-quality output. Centralized storage in Google Drive with automatic logging in Google Sheets. Flexible webhook interface allows integration with any application or service. Retry mechanism ensures videos are captured even with longer processing times. --- Created by Daniel Shashko
 By Daniel Shashko
Track personal finances in Google Sheets with AI agent via Slack
Who's it for This workflow is perfect for individuals who want to maintain detailed financial records without the overhead of complex budgeting apps. If you prefer natural language over data entry forms and want an AI assistant to handle the bookkeeping, this template is for you. It's especially useful for: People who want to track cash and online transactions separately Anyone who lends money to friends/family and needs debt tracking Users comfortable with Slack as their primary interface Those who prefer conversational interactions over manual spreadsheet updates What it does This AI-powered finance tracker transforms your Slack workspace into a personal finance command center. Simply mention your bot with transactions in plain English (e.g., "₹500 cash food, borrowed ₹1000 from John"), and the AI agent will: Parse transactions using natural language understanding via Google Gemini Calculate balance changes for cash and online accounts Show a preview of changes before saving anything Update Google Sheets only after you approve Track debts (who owes you, who you owe, repayments) Send daily reminders at 11 PM with current balances and active debts The workflow maintains conversational context using PostgreSQL memory, so you can say things like "yesterday's transactions" or "that payment to Sarah" and it understands the context. How it works Scheduled Daily Check-in (11 PM) Fetches current balances from Google Sheets Retrieves all active debts Formats and sends a Slack message with balance summary Prompts you to share the day's transactions AI Agent Transaction Processing When you mention the bot in Slack: Phase 1: Parse & Analyze Extracts amount, payment type (cash/online), category (food, travel, etc.) Identifies transaction type (expense, income, borrowed, lent, repaid) Stores conversation context in PostgreSQL memory Phase 2: Calculate & Preview Reads current balances from Google Sheets Calculates new balances based on transactions Shows formatted preview with projected changes Waits for your approval ("yes"/"no") Phase 3: Update Database (only after approval) Logs transactions with unique IDs and timestamps Updates debt records with person names and status Recalculates and stores new balances Handles debt lifecycle (Active → Settled) Phase 4: Confirmation Sends success message with updated balances Shows active debts summary Includes logging timestamp Requirements Essential Services: n8n instance (self-hosted or cloud) Slack workspace with admin access Google account Google Gemini API key PostgreSQL database Recommended: Claude AI model (mentioned in workflow notes as better alternative to Gemini) How to set up Google Sheets Setup Create a new Google Sheet with three tabs named exactly: Balances Tab: | Date | CashBalance | OnlineBalance | Total_Balance | |------|--------------|----------------|---------------| Transactions Tab: | TransactionID | Date | Time | Amount | PaymentType | Category | TransactionType | PersonName | Description | Added_At | |----------------|------|------|--------|--------------|----------|------------------|-------------|-------------|----------| Debts Tab: | PersonName | Amount | Type | Datecreated | Status | Notes | |-------------|--------|------|--------------|--------|-------| Add header rows and one initial balance row in the Balances tab with today's date and starting amounts. Slack App Setup Go to api.slack.com/apps and create a new app Under OAuth & Permissions, add these Bot Token Scopes: app_mentions:read chat:write channels:read Install the app to your workspace Copy the Bot User OAuth Token Create a dedicated channel (e.g., personal-finance-tracker) Invite your bot to the channel Google Gemini API Visit ai.google.dev Create an API key Save it for n8n credentials setup PostgreSQL Database Set up a PostgreSQL database (you can use Supabase free tier): Create a new project Note down connection details (host, port, database name, user, password) The workflow will auto-create the required table n8n Workflow Configuration Import the workflow and configure: A. Credentials Google Sheets OAuth2: Connect your Google account Slack API: Add your Bot User OAuth Token Google Gemini API: Add your API key PostgreSQL: Add database connection details B. Update Node Parameters All Google Sheets nodes: Select your finance spreadsheet Slack nodes: Select your finance channel Schedule Trigger: Adjust time if you prefer a different check-in hour (default: 11 PM) Postgres Chat Memory: Change sessionKey to something unique (e.g., financetrackeryour_name) Keep tableName as n8nchathistory_finance or rename consistently C. Slack Trigger Setup Activate the "Bot Mention trigger" node Copy the webhook URL from n8n In Slack App settings, go to Event Subscriptions Enable events and paste the webhook URL Subscribe to bot event: app_mention Save changes Test the Workflow Activate both workflow branches (scheduled and agent) In your Slack channel, mention the bot: @YourBot ₹100 cash snacks Bot should respond with a preview Reply "yes" to approve Verify Google Sheets are updated How to customize Change Transaction Categories Edit the AI Agent's system message to add/remove categories. Current categories: travel, food, entertainment, utilities, shopping, health, education, other Modify Daily Check-in Time Change the Schedule Trigger's triggerAtHour value (0-23 in 24-hour format). Add Currency Support Replace ₹ with your currency symbol in: Format Daily Message code node AI Agent system prompt examples Switch AI Models The workflow uses Google Gemini, but notes recommend Claude. To switch: Replace "Google Gemini Chat Model" node Add Claude credentials Connect to AI Agent node Customize Debt Types Modify AI Agent's system prompt to change debt handling logic: Currently: IOwe and TheyOwe_Me You can add more types or change naming Add More Payment Methods Current: cash, online To add more (e.g., credit card): Update AI Agent prompt Modify Balances sheet structure Update balance calculation logic Change Approval Keywords Edit AI Agent's Phase 2 approval logic to recognize different approval phrases. Add Spending Analytics Extend the daily check-in to calculate: Weekly/monthly spending summaries Category-wise breakdowns Use additional Code nodes to process transaction history Important Notes ⚠️ Never trigger with normal messages - Only use app mentions (@botname) to avoid infinite loops where the bot replies to its own messages. 💡 Context Awareness - The bot remembers conversation history, so you can reference "yesterday", "last week", or previous transactions naturally. 🔒 Data Privacy - All your financial data stays in your Google Sheets and PostgreSQL database. The AI only processes transaction text temporarily. 📊 Backup Regularly - Export your Google Sheets periodically as backup. --- Pro Tips: Start with small test transactions to ensure everything works Use consistent person names for debt tracking The bot understands various formats: "₹500 cash food" = "paid 500 rupees in cash for food" You can batch transactions in one message: "₹100 travel, ₹200 food, ₹50 snacks"
 By Habeeb Mohammed